

Automated deployment of Hybrid Cloud NetApp Storage
 Suggest changes
Google Cloud
You must first enable APIs and create a service account that provides Cloud Manager with permissions to deploy and manage Cloud Volumes ONTAP systems that are in the same project as the Connector or in different projects.
Before you deploy a connector in a Google Cloud project, make sure that the connector isn’t running on your premises or in a different cloud provider.
Two sets of permissions must be in place before you deploy a Connector directly from Cloud Manager:
-
You need to deploy Connector using a Google account that has permissions to launch the Connector VM instance from Cloud Manager.
-
When deploying Connector, you are prompted to select the VM instance. Cloud Manager gets permissions from the service account to create and manage Cloud Volumes ONTAP systems on your behalf. Permissions are provided by attaching a custom role to the service account.You need to set up two YAML files that include the required permissions for the user and the service account. Learn how to use the YAML files to set up permissions here.
See this detailed video for all required prerequisites.
Cloud Volumes ONTAP deployment modes and architecture
Cloud Volumes ONTAP is available in Google Cloud as a single- node system and as a high-availability (HA) pair of nodes. Based on the requirements, we can choose the Cloud Volumes ONTAP deployment mode. Upgrading a single node system to an HA pair is not supported. If you want to switch between a single- node system and an HA pair, then you must deploy a new system and replicate data from the existing system to the new system.
Highly available Cloud Volumes ONTAP in Google Cloud
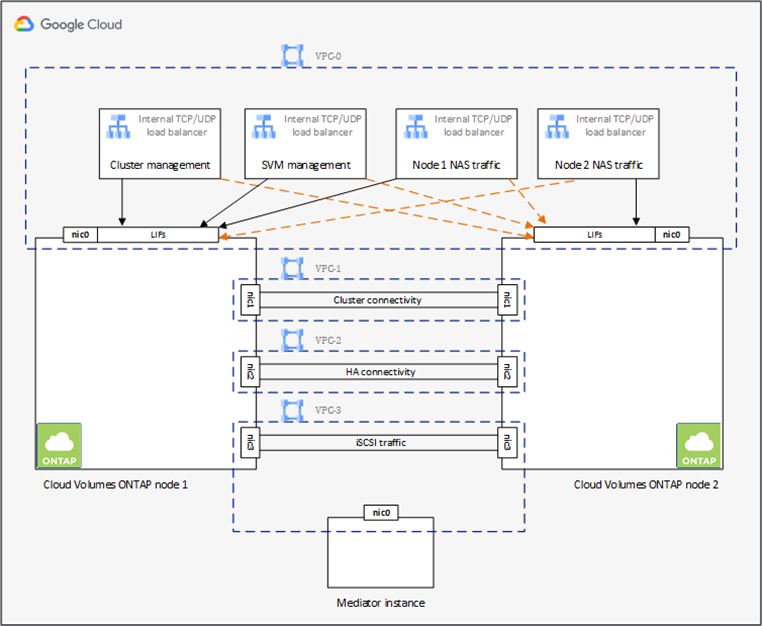
Google Cloud supports deployment of resources across multiple geographical regions and multiple zones within a region. The HA deployment consists of two ONTAP nodes that use powerful n1-standard or n2-standard machine types available in Google Cloud. Data is synchronously replicated between the two Cloud Volumes ONTAP nodes to provide availability in the event of a failure. HA deployment of Cloud Volumes ONTAP requires four VPCs and a private subnet in each VPC. The subnets in the four VPCs should be provisioned with non-overlapping CIDR ranges.
The four VPCs are used for the following purposes:
-
VPC 0 enables inbound communication to data and Cloud Volumes ONTAP nodes.
-
VPC 1 provides cluster connectivity between Cloud Volumes ONTAP nodes.
-
VPC 2 allows for non-volatile ram (NVRAM) replication between nodes.
-
VPC 3 is used for connectivity to the HA mediator instance and disk replication traffic for node rebuilds.
The following image shows a highly available Cloud Volumes ONTAP in Goggle Cloud.
For details, see this link.
For networking requirements for Cloud Volumes ONTAP in Google Cloud, see this link.
For details about data tiering, see this link.
Set up environment prerequisites
The automated creation of Cloud Volumes ONTAP clusters, SnapMirror configuration between an on-premises volume and a Cloud volume, creating a cloud volume, and so on are performed using Terraform configuration. These Terraform configurations are hosted on a Terraform Cloud for Business account. Using Intersight Cloud Orchestrator, you orchestrate tasks like creating a workspace in a Terraform Cloud for Business account, add all required variables to the workspace, execute a Terraform Plan, and so on.
For these automation and orchestration tasks, there are a few requirements and data needed, as is described in the following sections.
GitHub repository
You need a GitHub account to host your Terraform code. Intersight Orchestrator creates a new workspace in the Terraform Cloud for Business account. This workspace is configured with a version control workflow. For this purpose, you need to keep the Terraform configuration in a GitHub repository and provide it as an input while creating the workspace.
This GitHub link provides the Terraform configuration with various resources. You can fork this repository and make a copy in your GitHub account.
In this repository, provider.tf has the definition for the required Terraform provider. Terraform provider for NetApp Cloud Manager is used.
variables.tf has all the variable declarations. The value for these variables is input as the Intersight Cloud Orchestrator’s workflow input. This provides a convenient way to pass values to a workspace and execute the Terraform configuration.
resources.tf defines the various resources needed to add an on-premises ONTAP to the working environment, create a single node Cloud Volumes ONTAP cluster on Google Cloud, establish a SnapMirror relationship between on-premises and Cloud Volumes ONTAP, create a cloud volume on Cloud Volumes ONTAP, and so on.
In this repository:
-
provider.tfhas NetApp Cloud Manager as a definition for the required Terraform provider. -
variables.tfhas the variable declarations that are used as input for the Intersight Cloud Orchestrator workflow. This provides a convenient way to pass values to workspace and execute Terraform configuration. -
resources.tfdefines various resources to add an on-premises ONTAP to the working environment, create a single- node Cloud Volumes ONTAP cluster on Google Cloud, establish a SnapMirror relationship between on-premises and Cloud Volumes ONTAP, create a cloud volume on Cloud Volumes ONTAP, and so on.
You can add an additional resource block to create multiple volumes on Cloud Volumes ONTAP or use count or for_each Terraform constructs.
To connect Terraform workspaces, modules, and policy sets to git repositories containing Terraform configurations, Terraform Cloud needs access to your GitHub repo.
Add a client, and the OAuth Token ID of the client is used as one of the Intersight Cloud Orchestrator’s workflow input.
-
Log in to your Terraform Cloud for Business account. Navigate to Settings > Providers.
-
Click Add a VCS provider.
-
Select your version.
-
Follow the steps under Set up provider.
-
You see the added client in VCS Providers. Make a note of the OAuth Token ID.
Refresh token for NetApp Cloud Manager API operations
In addition to the web browser interface, Cloud Manager has a REST API that provides software developers with direct access to the Cloud Manager functionality through the SaaS interface. The Cloud Manager service consists of several distinct components that collectively form an extensible development platform. The refresh token enables you to generate access tokens that you add to the Authorization header for each API call.
Without calling an API directly, the netapp-cloudmanager provider uses a refresh token and translates the Terraform resources into corresponding API calls. You need to generate a refresh token for NetApp Cloud Manager API operations from NetApp Cloud Central.
You need the client ID of the Cloud Manager Connector to create resources on Cloud Manager such as creating a Cloud Volumes ONTAP cluster, configuring SnapMirror, and so on.
-
Log into Cloud Manager: https://cloudmanager.netapp.com/.
-
Click Connector.
-
Click Manage Connectors.
-
Click the ellipses and copy the Connector ID.
Develop Cisco Intersight Cloud Orchestrator workflow
Cisco Intersight Cloud Orchestrator is available in Cisco Intersight if:
-
You have installed the Intersight Premier license.
-
You are either an account administrator, storage administrator, virtualization administrator, or server administrator and have a minimum of one server assigned to you.
Workflow Designer
The Workflow Designer helps you create new workflows (as well as tasks and data types) and edit existing workflows to manage targets in Cisco Intersight.
To launch the Workflow Designer, go to Orchestration > Workflows. A dashboard displays the following details under the tabs My Workflows, Sample Workflows, and All Workflows:
-
Validation Status
-
Last Execution Status
-
Top Workflows by Execution Count
-
Top Workflow Categories
-
Number of System Defined Workflows
-
Top Workflows by Targets
Using the dashboard, you can create, edit, clone, or delete a tab. To create your own custom view tab, click +, specify a name, and then select the required parameters that need to be displayed in the columns, tag columns, and widgets. You can rename a tab if it doesn’t have a Lock icon.
Under the dashboard is a tabular list of workflows displaying the following information:
-
Display Name
-
Description
-
System Defined
-
Default Version
-
Executions
-
Last Execution Status
-
Validation Status
-
Last Update
-
Organization
The Actions column allows you to perform the following actions:
-
Execute. Executes the workflow.
-
History. Displays workflow execution history.
-
Manage Versions. Create and manage versions for workflows.
-
Delete. Delete a workflow.
-
Retry. Retry a failed workflow.
Workflow
Create a workflow that consists of the following steps:
-
Defining a workflow. Specify the display name, description, and other important attributes.
-
Define workflow inputs and workflow outputs. Specify which input parameters are mandatory for the workflow execution, and the outputs generated on successful execution
-
Add workflow tasks. Add one or more workflow tasks in the Workflow Designer that are needed for the workflow to carry out its function.
-
*Validate the workflow. *Validate a workflow to ensure that there are no errors in connecting task inputs and outputs.
Create workflows for on-premises FlexPod storage
To configure a workflow for on-premises FlexPod storage, see this link.