

DR workflow
 Suggest changes
The sequence of steps are as follows:
-
Define the workflow.
-
Create a short, user-friendly name for the workflow, such as Disaster Recovery Workflow.
-
-
Define the workflow input. The inputs we take for this workflow include the following:
-
Volume options (volume name, mount path)
-
Volume capacity
-
Data center associated with the new datastore
-
Cluster on which the datastore is hosted
-
Name for the new datastore to create in vCenter
-
Type and version of the new datastore
-
Name of the Terraform organization
-
Terraform workspace
-
Description of the Terraform workspace
-
Variables (sensitive and nonsensitive) required to execute Terraform configuration
-
Reason for starting the plan
-
-
Add the workflow tasks.
The tasks related to operations in FlexPod include the following:
-
Create volume in FlexPod.
-
Add storage export policy to the created volume.
-
Map the newly created volume to a datastore in VMware vCenter.
The tasks related to creating Cloud Volumes ONTAP cluster:
-
Add Terraform workspace
-
Add Terraform variables
-
Add Terraform sensitive variables
-
Start new Terraform plan
-
Confirm Terraform run
-
-
Validate the workflow.
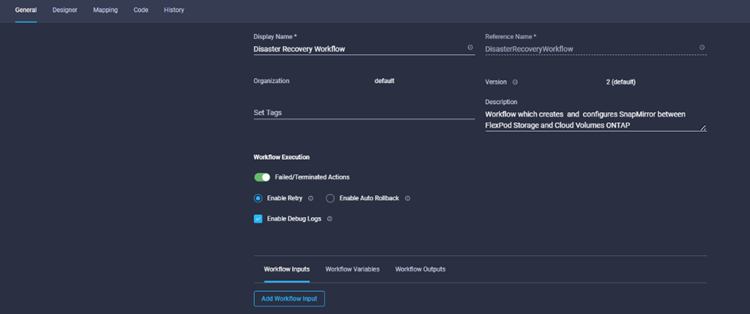
Procedure 1: Create the workflow
-
Click Orchestration from the left navigation pane and click Create Workflow.
-
In the General tab:
-
Provide the display name (Disaster Recovery Workflow).
-
Select the organization, set tags, and provide a description.
-
-
Click Save.
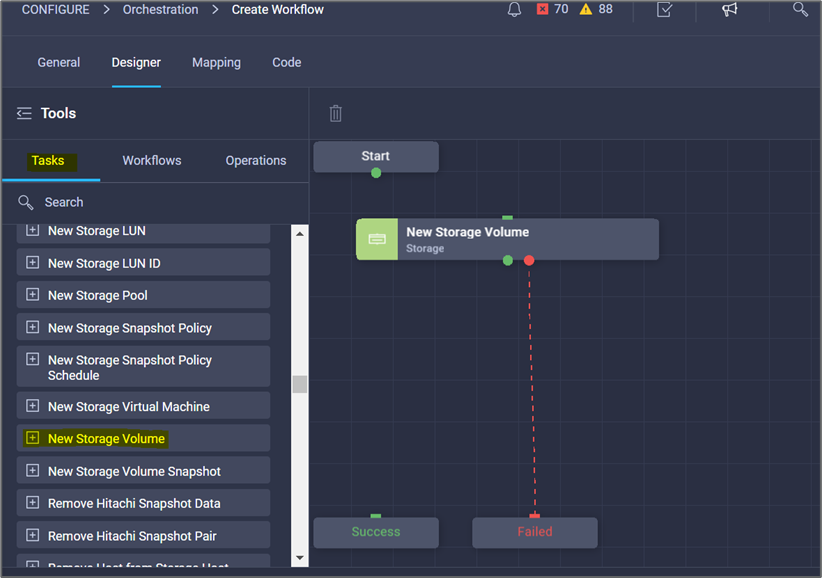
Procedure 2. Create a new volume in FlexPod
-
Go to the Designer tab and click Tasks from the Tools section.
-
Drag and drop the Storage > New Storage Volume task from the Tools section into the Design area.
-
Click New Storage Volume.
-
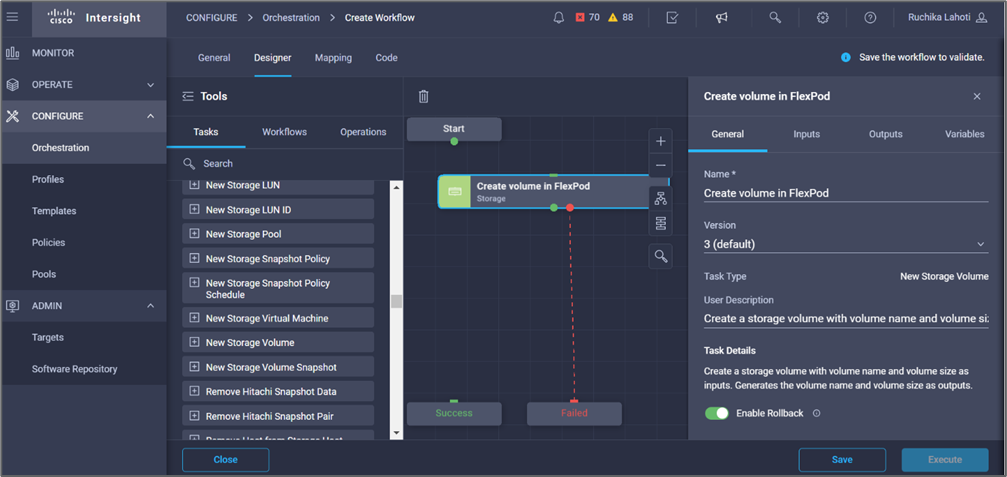
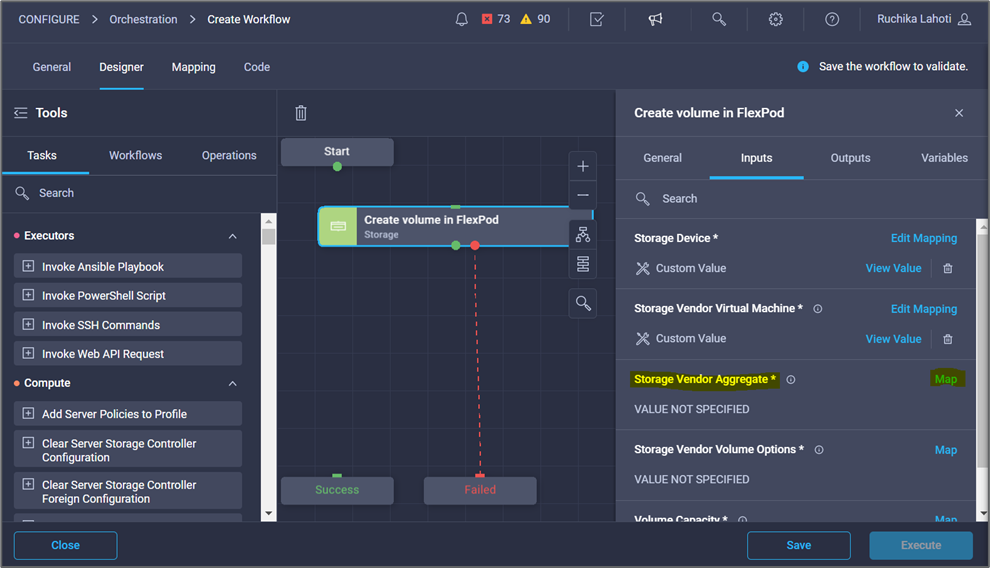
In the Task Properties area, click the General tab. Optionally, you can change the name and description for this task. In this example, the name of the task is Create Volume in FlexPod.
-
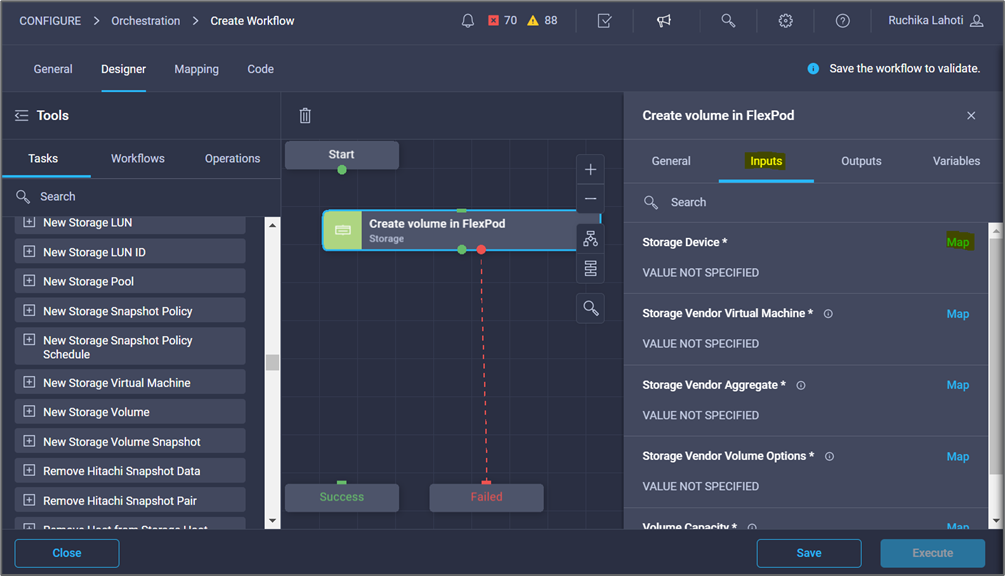
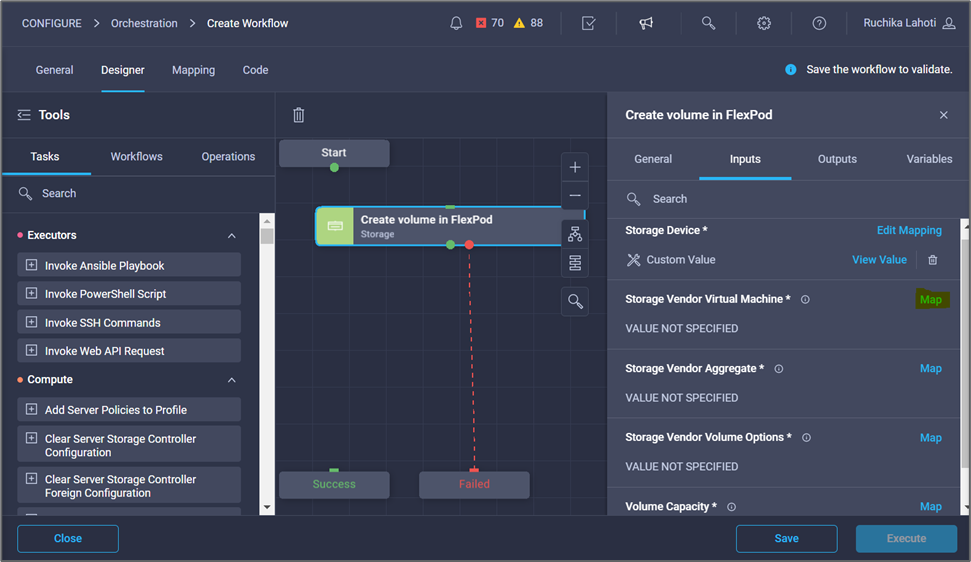
In the Task Properties area, click Inputs.
-
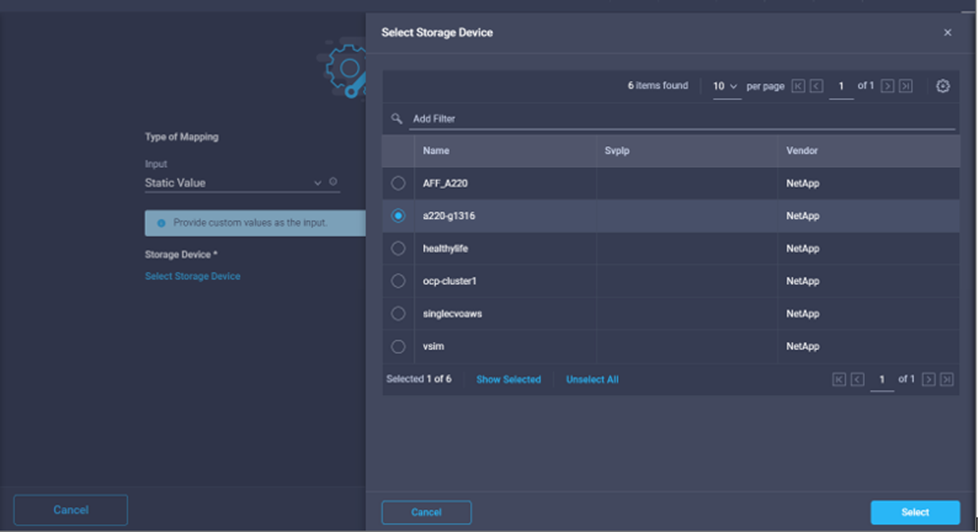
Click Map in the Storage Device field.
-
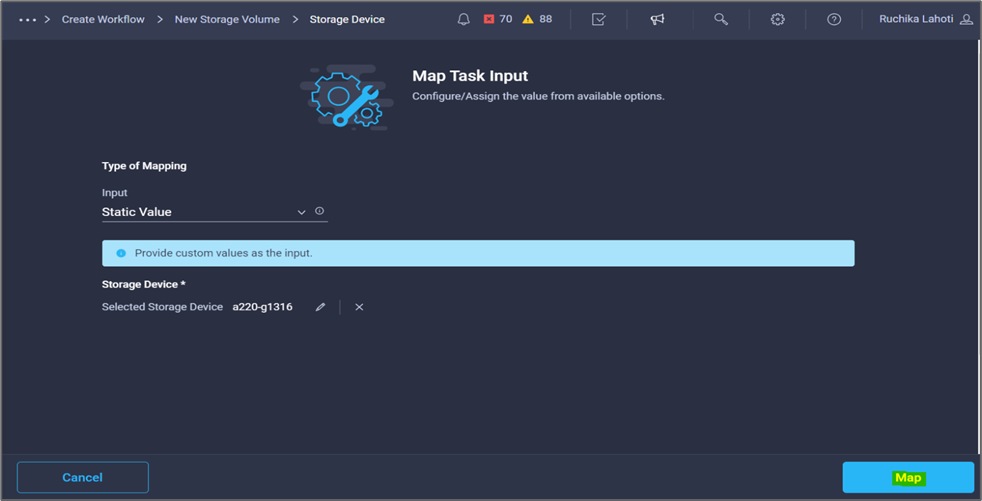
Choose Static Value and click Select Storage Device.
-
Click the storage target added and click Select.
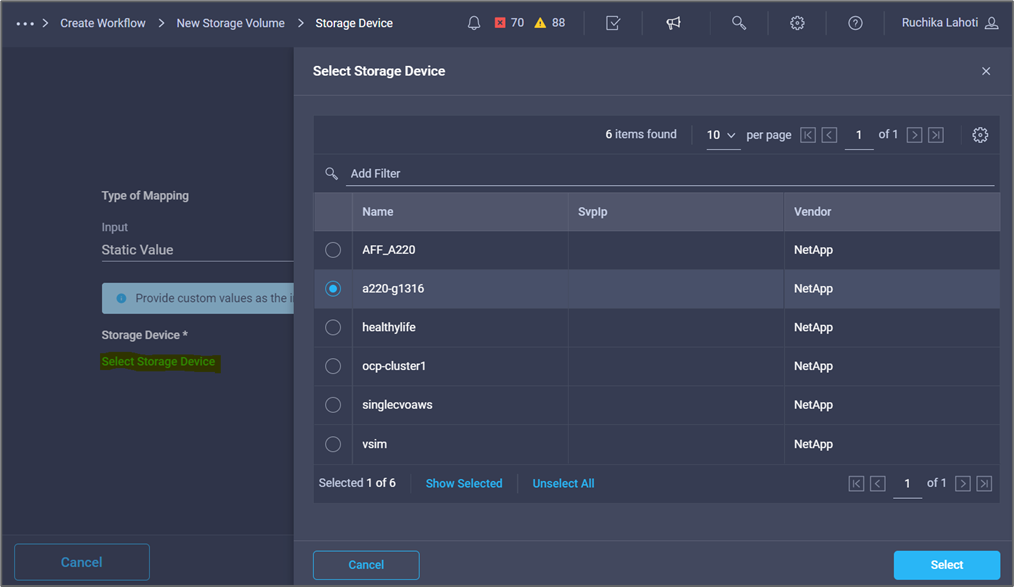
-
Click Map.
-
Click Map in the Storage Vendor Virtual Machine field.
-
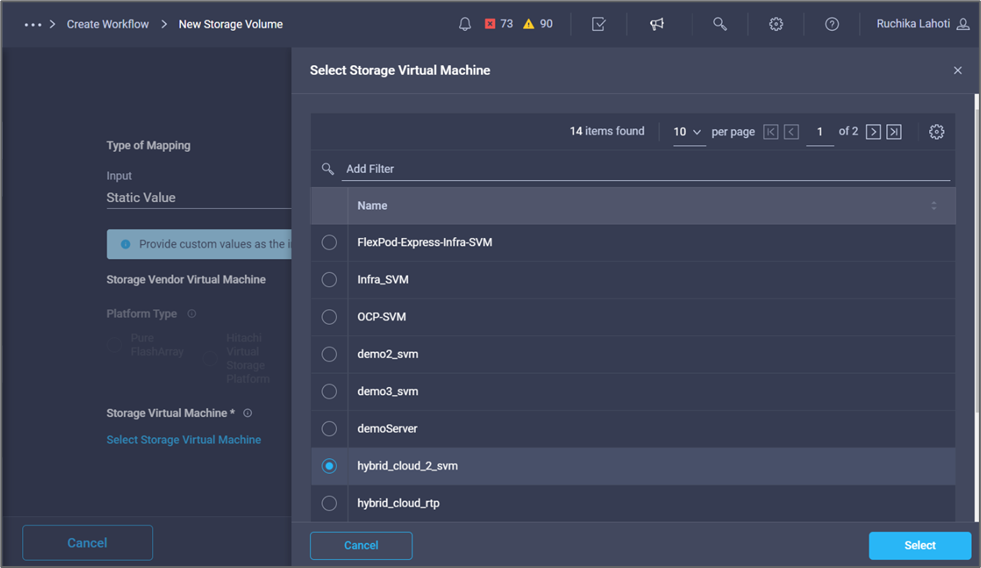
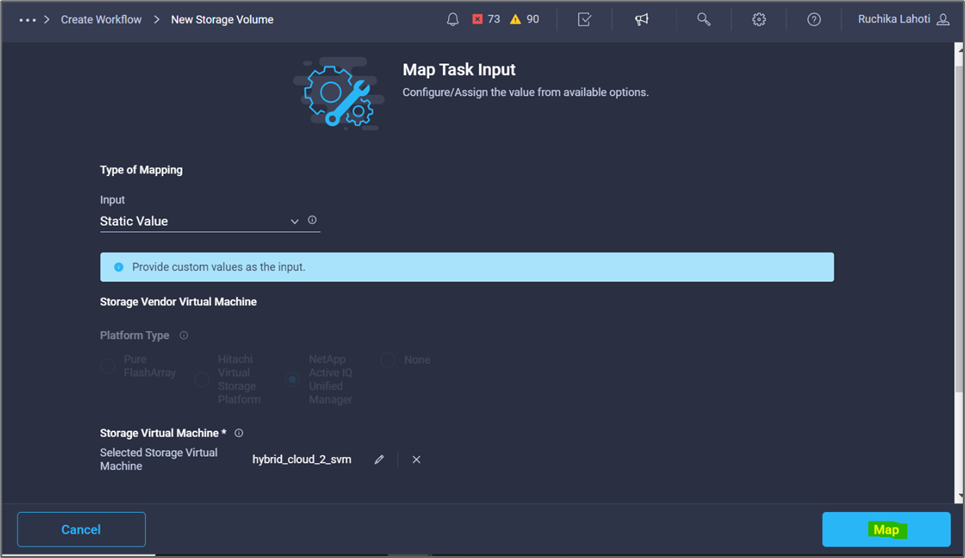
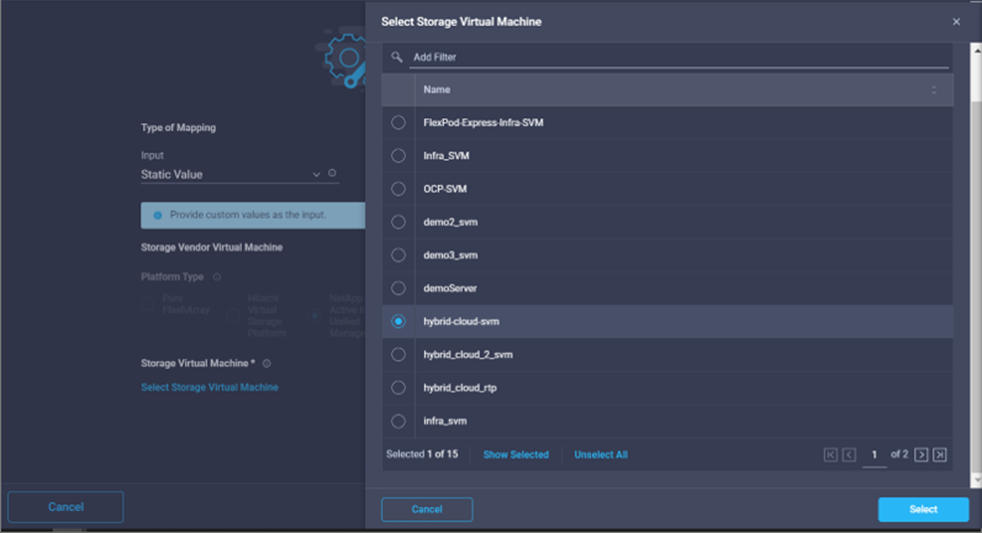
Choose Static Value and click Select Storage Virtual Machine.
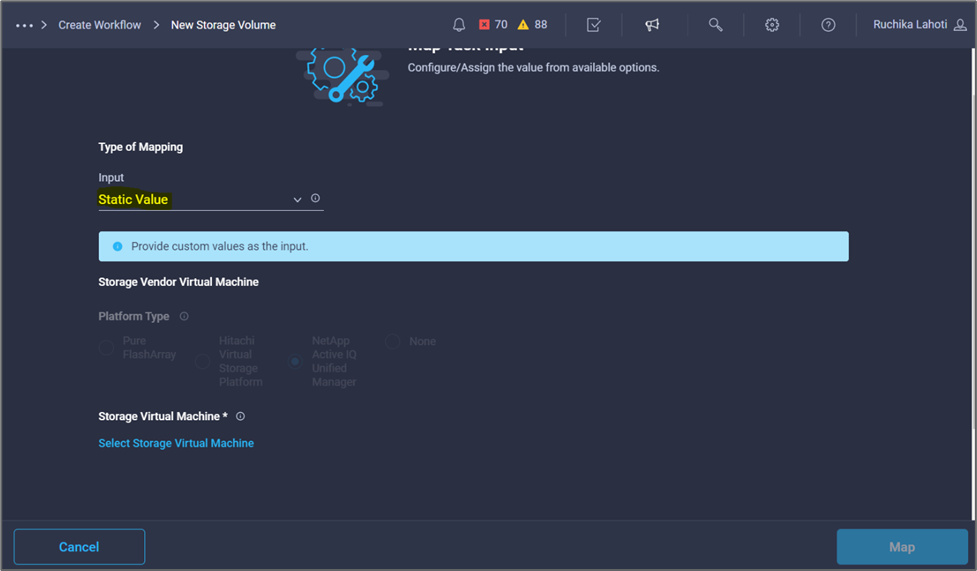
-
Select the storage virtual machine where the volume needs to be created and click Select.
-
Click Map.
-
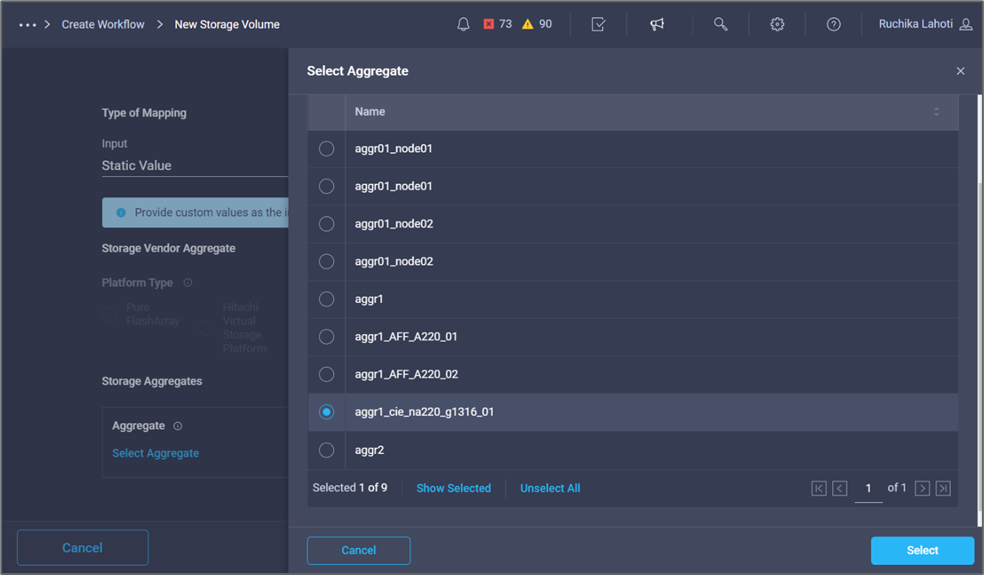
Click Map in the Storage Vendor Aggregate field.
-
Choose Static Value and click Select Storage Aggregate. Choose the aggregate and click Select.
-
Click Map.
-
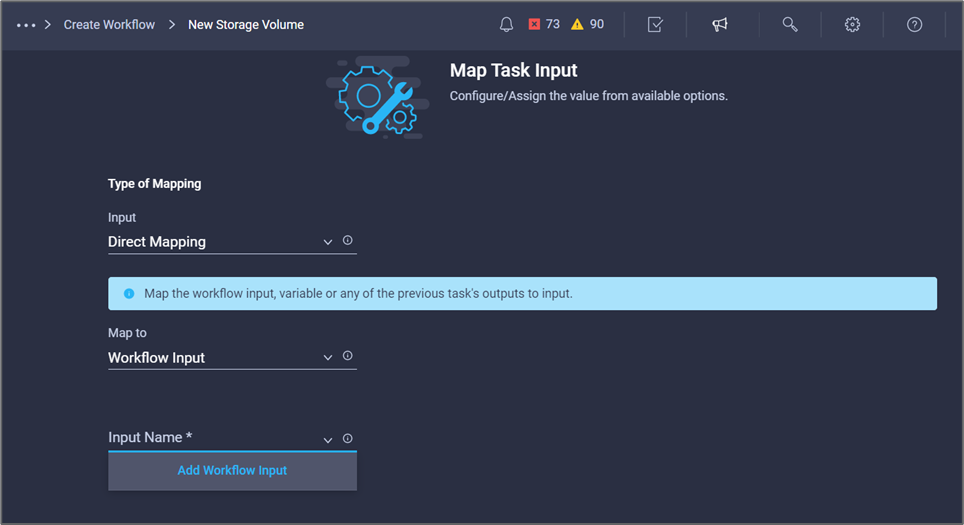
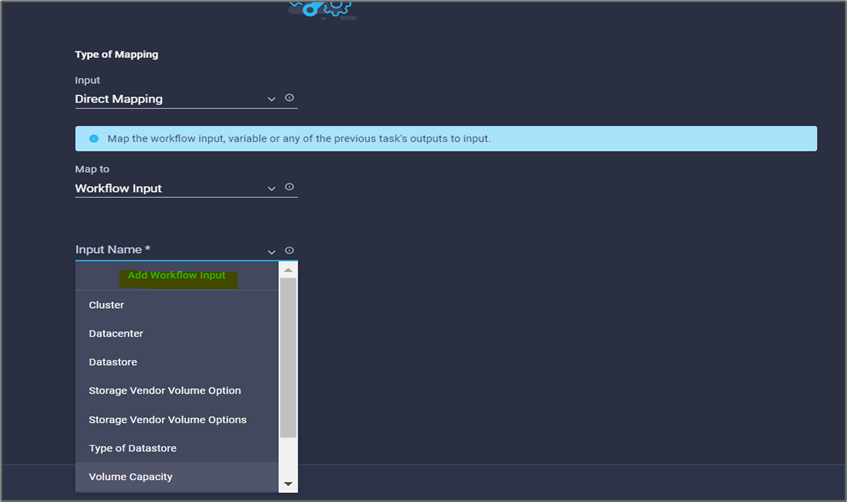
Click Map in the Storage Vendor Volume Options field.
-
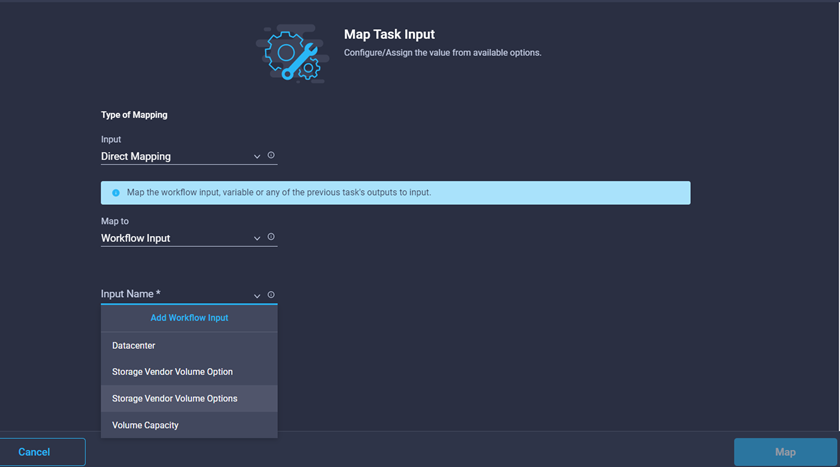
Choose Direct Mapping and click Workflow Input.
-
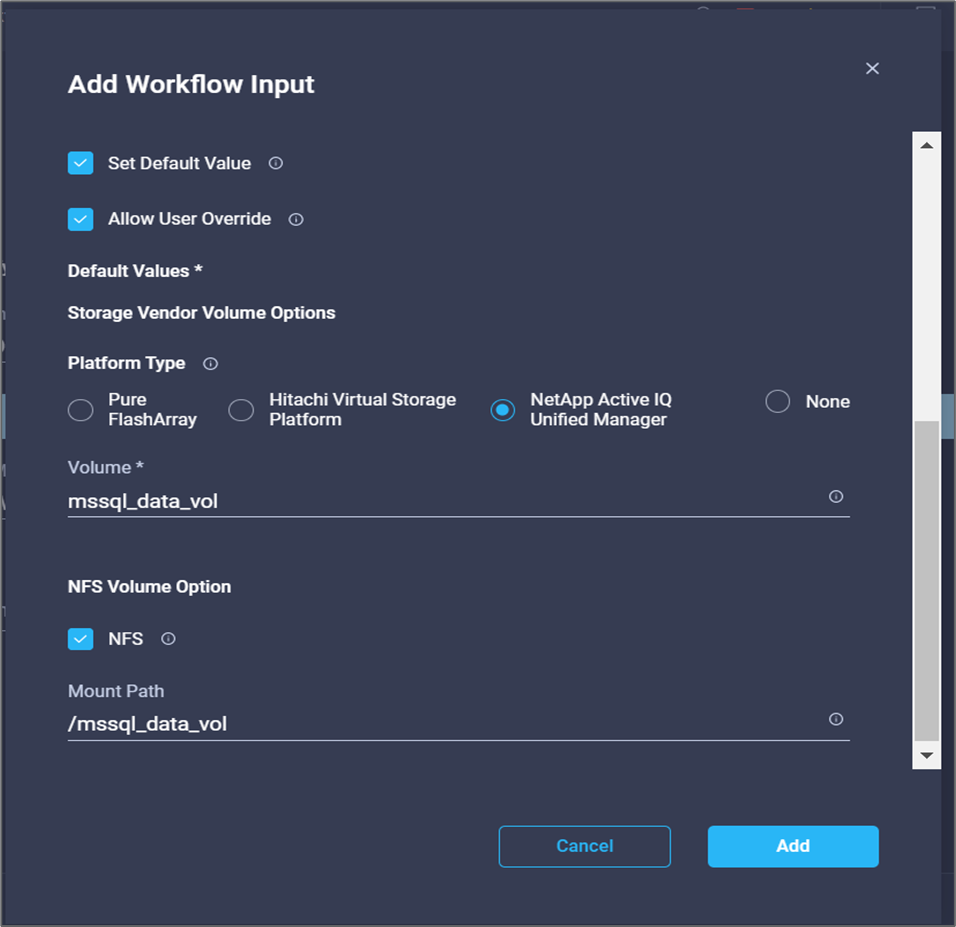
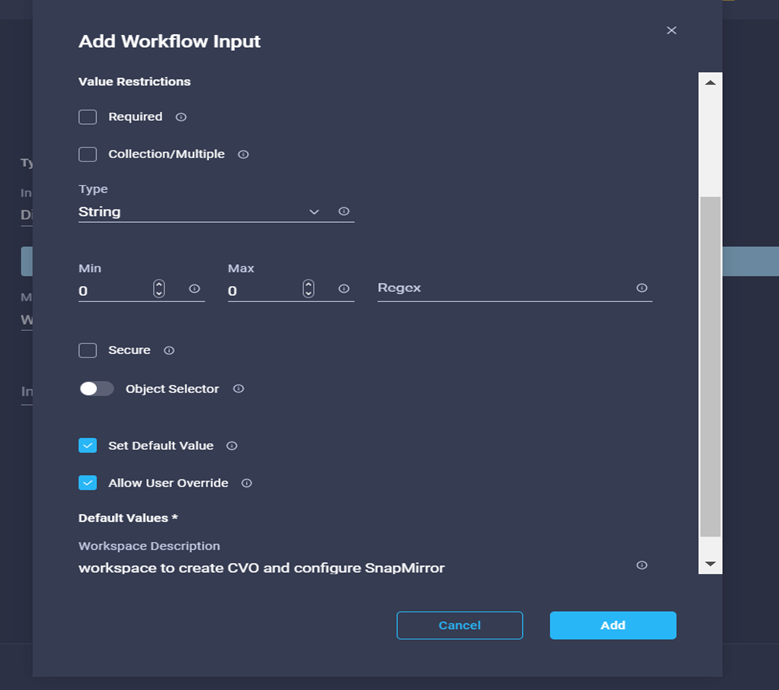
In the Add Input wizard, complete the following steps:
-
Provide a display name and reference name (optional).
-
Make sure that Storage Vendor Volume Options is selected for the Type.
-
Click Set Default Value and Override.
-
Click Required.
-
Set the Platform Type to NetApp Active IQ Unified Manager.
-
Provide a default value for the created volume under Volume.
-
Click NFS. If NFS is set, an NFS volume is created. If this value is set to false, a SAN volume is created.
-
Provide a mount path and click Add.
-
-
Click Map.
-
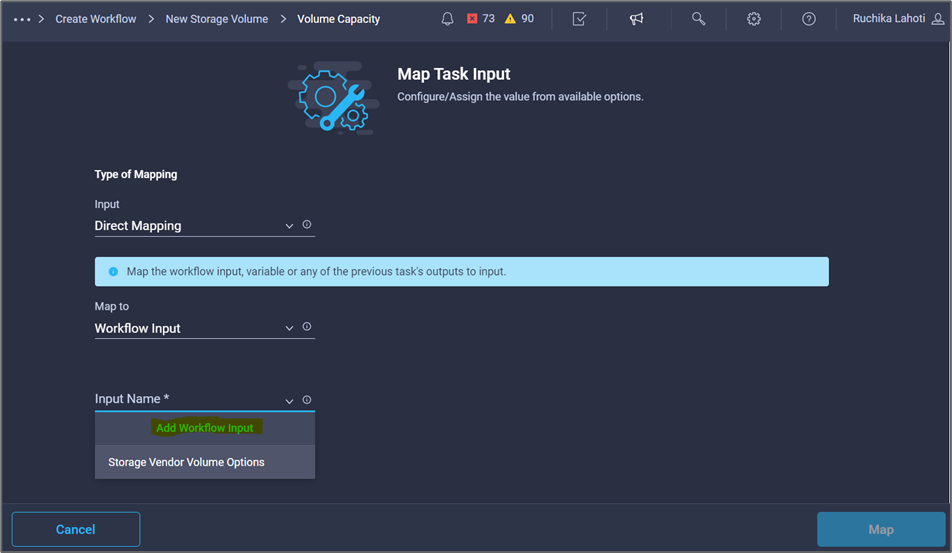
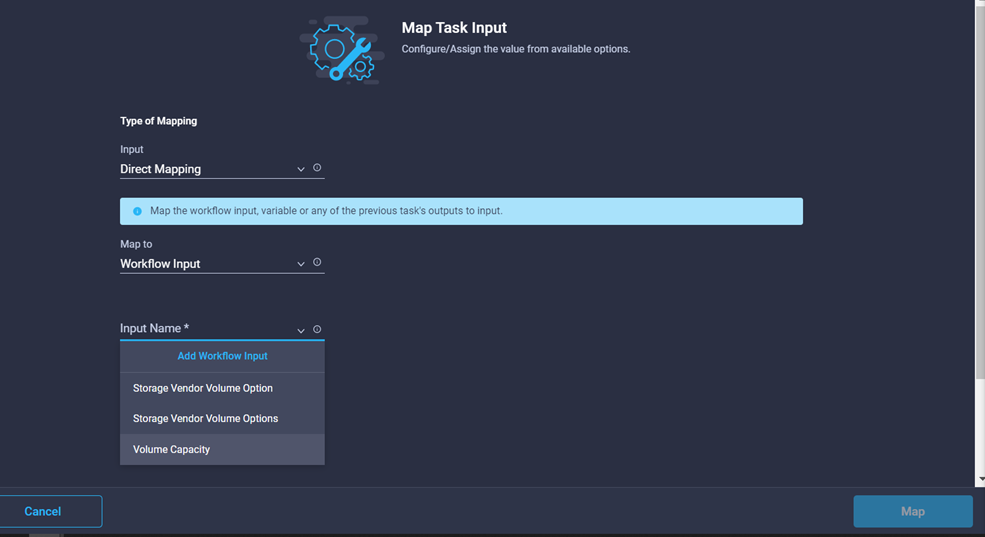
Click Map in the Volume Capacity field.
-
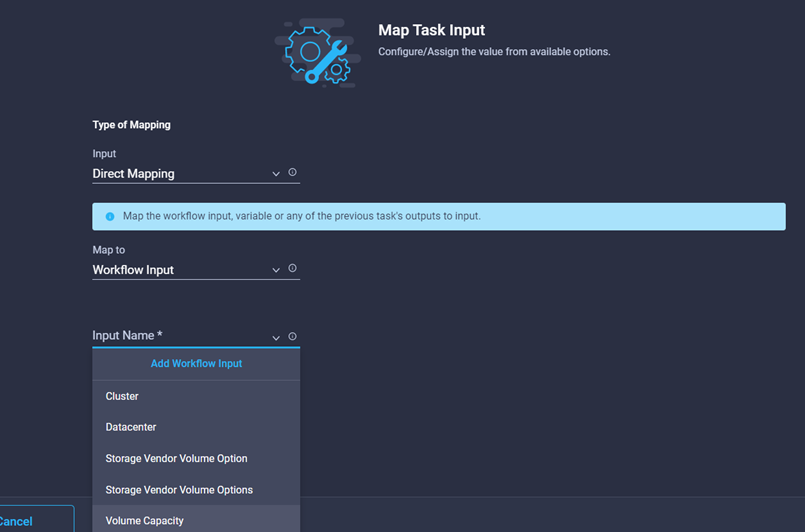
Choose Direct Mapping and click Workflow Input.
-
Click Input Name and Create Workflow Input.
-
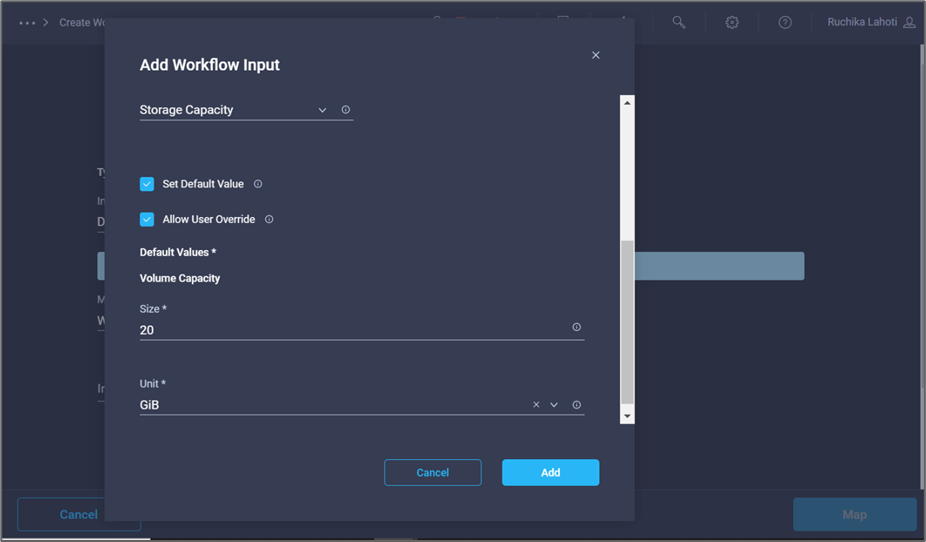
In the Add Input wizard:
-
Provide a display name and a reference name (optional).
-
Click Required.
-
For Type, select Storage Capacity.
-
Click Set Default Value and Override.
-
Provide a default value for the volume size and unit.
-
Click Add.
-
-
Click Map.
-
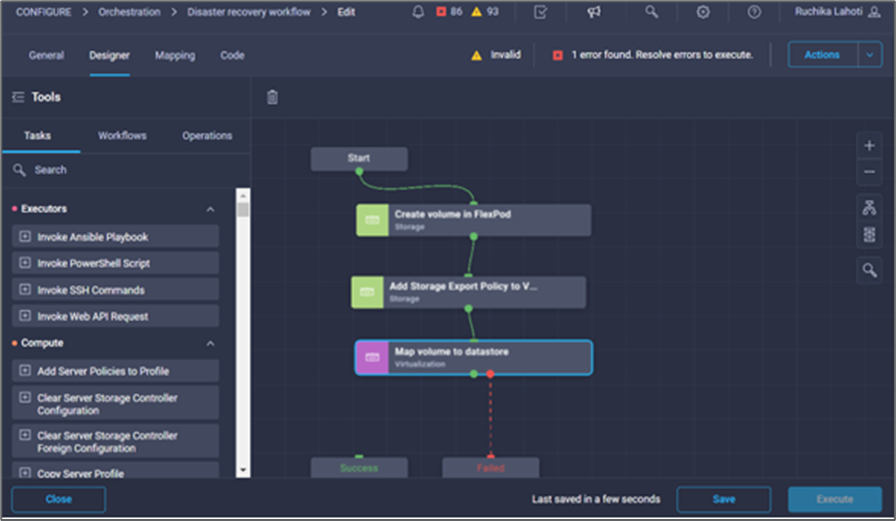
With Connector, create a connection between the Start and Create Volume in FlexPod tasks, and click Save.
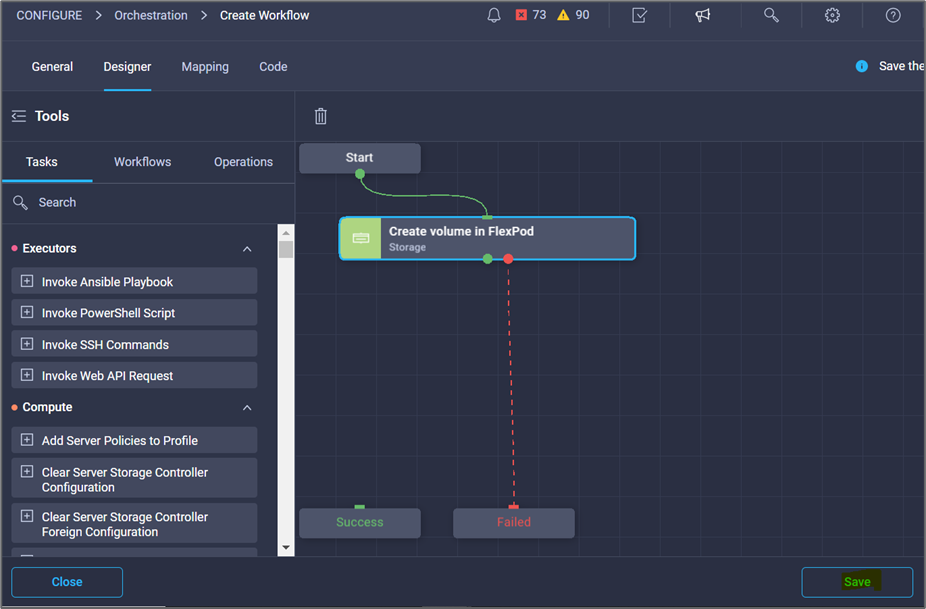

Ignore the error for now. This error displays because there is no connectivity between the tasks Create Volume in FlexPod and Success which is required to specify the successful transition.
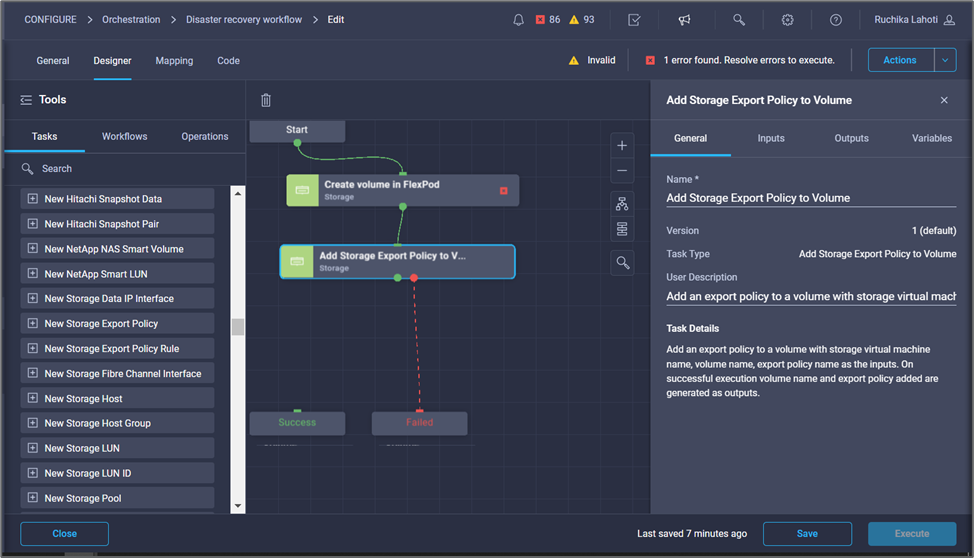
Procedure 3: Add storage export policy
-
Go to the Designer tab and click Tasks from the Tools section.
-
Drag and drop the Storage > Add Storage Export Policy to Volume task from the Tools section in the Design area.
-
Click Add Storage Export Policy to Volume. In the Task Properties area, click the General tab. Optionally, you can change the name and description for this task. In this example, the name of the task is Add Storage Export Policy.
-
Use Connector to make a connection between the tasks Create Volume in FlexPod and Add Storage Export Policy. Click Save.
-
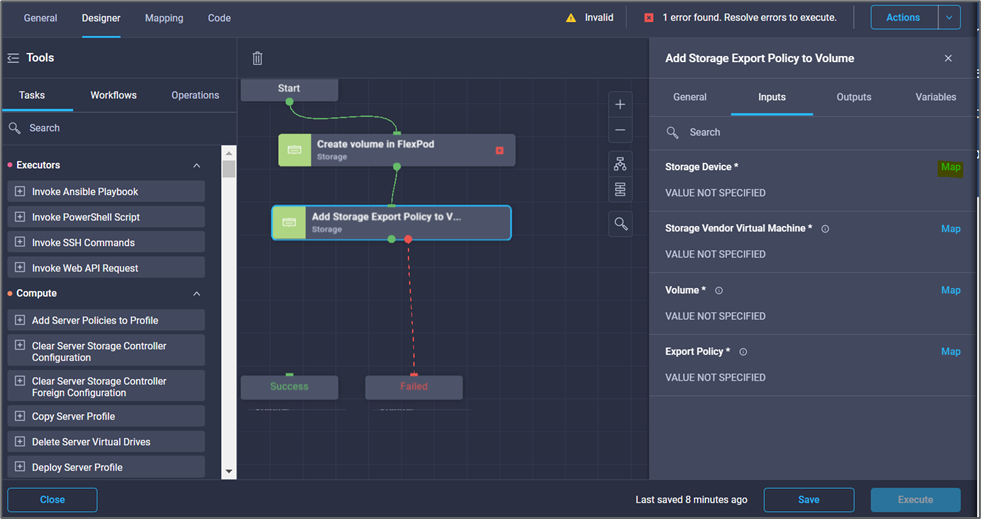
In the Task Properties area, click Inputs.
-
Click Map in the Storage Device field.
-
Choose Static Value and click Select Storage Device. Select the same storage target added while creating the previous task of creating a new storage volume.
-
Click Map.
-
Click Map in the Storage Vendor Virtual Machine field.
-
Choose Static Value and click Select Storage Virtual Machine. Select the same storage virtual machine added while creating the previous task of creating a new storage volume.
-
Click Map.
-
Click Map in the Volume field.
-
Click Task Name and then click Create Volume in FlexPod. Click Output Name and then Volume.
In Cisco Intersight Cloud Orchestrator, you can provide the output of a previous task as the input for a new task. In this example, the Volume details were provided from the Create Volume in FlexPod task as an input for the task Add Storage Export Policy. 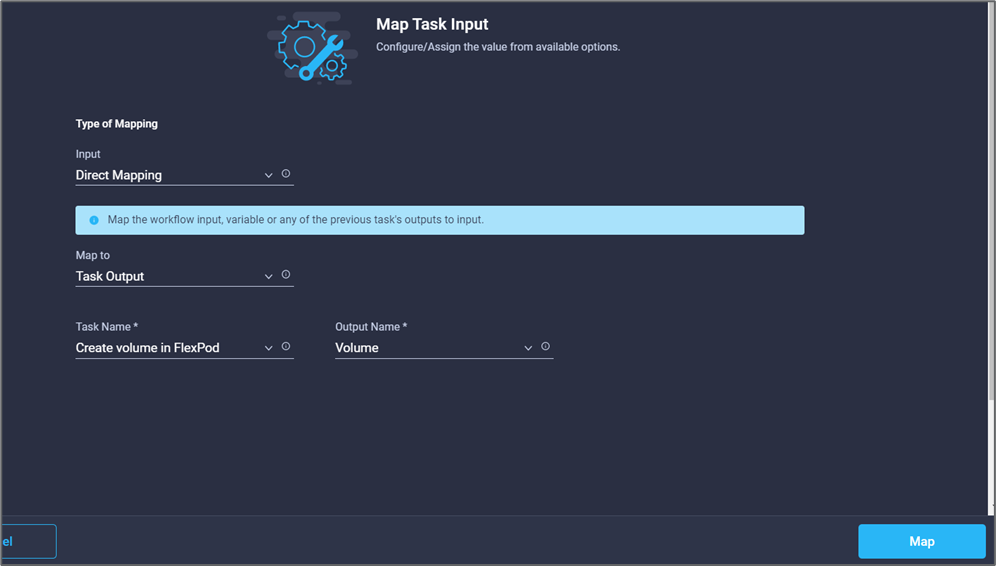
-
Click Map.
-
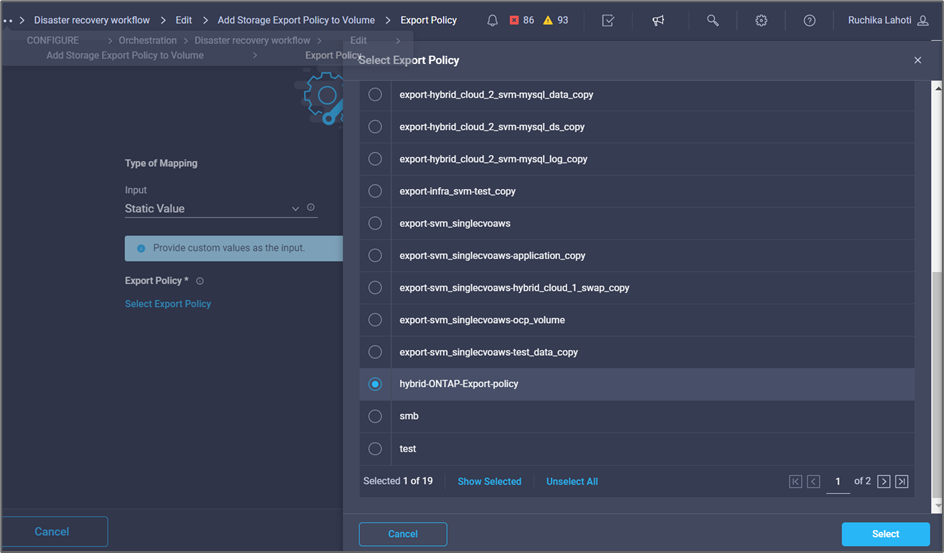
Click Map in the Export Policy field.
-
Choose Static Value and click Select Export Policy. Select the export policy created.
-
Click Map and then Save.
This completes addition of an export policy to the volume. Next, you create a new datastore mapping the created volume.
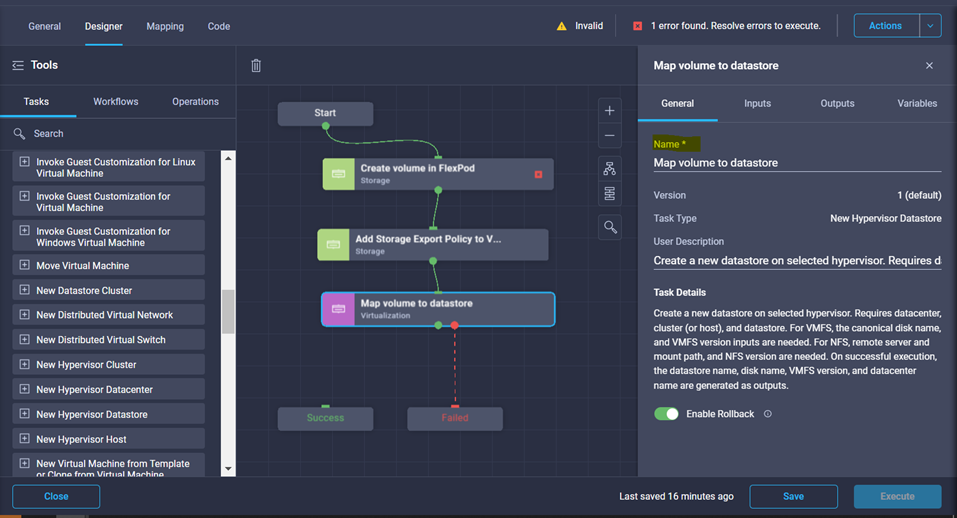
Procedure 4: Map FlexPod volume to datastore
-
Go to the Designer tab and click Tasks from the Tools section.
-
Drag and drop the Virtualization > New Hypervisor Datastore task from the Tools section in the Design area.
-
Use Connector to make a connection between the Add Storage Export Policy and New Hypervisor Datastore tasks. Click Save.
-
Click New Hypervisor Datastore. In the Task Properties area, click the General tab. Optionally, you can change the name and description for this task. In this example, the name of the task is Map volume to Datastore.
-
In the Task Properties area, click Inputs.
-
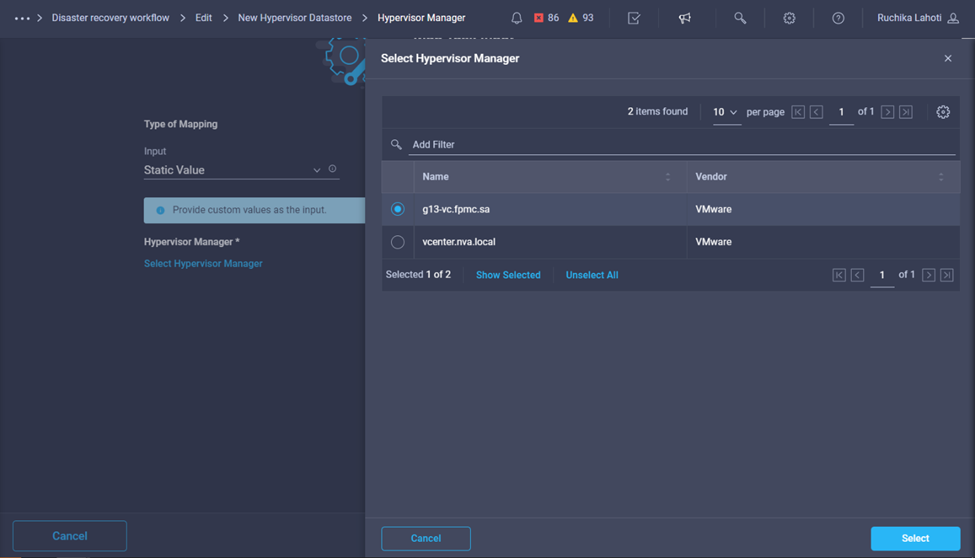
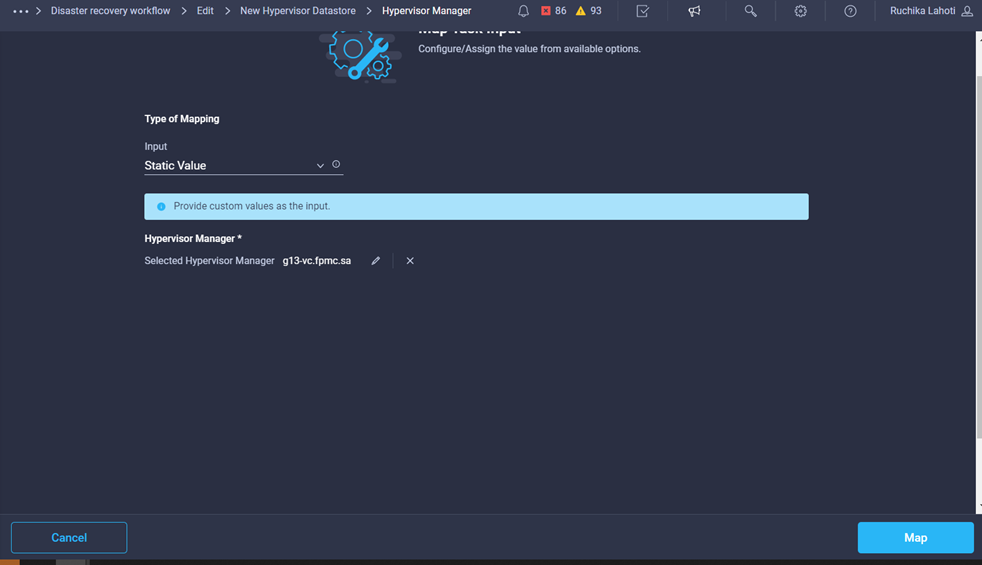
Click Map in the Hypervisor Manager field.
-
Choose Static Value and click Select Hypervisor Manager. Click the VMware vCenter target.
-
Click Map.
-
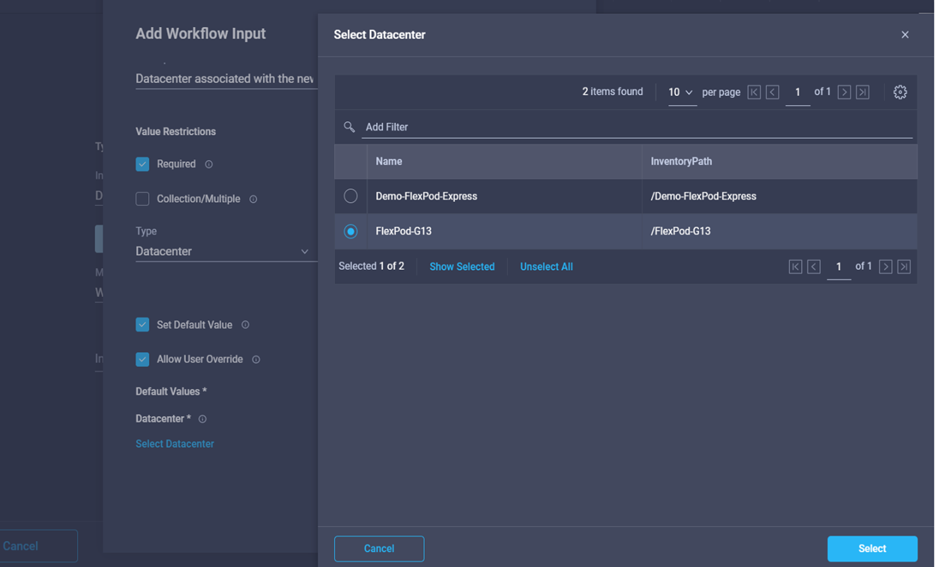
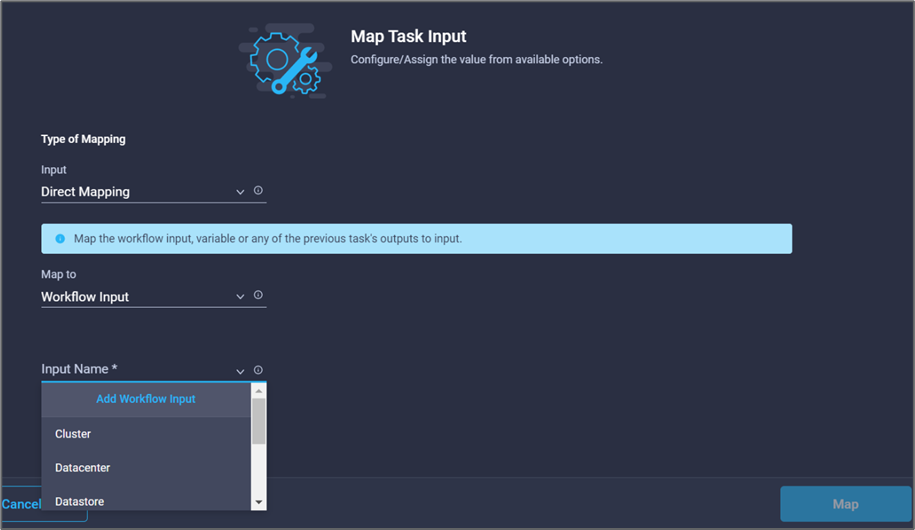
Click Map in the Data center field. This is the data center associated with the new datastore.
-
Choose Direct Mapping and click Workflow Input.
-
Click Input Name and then Create Workflow Input.
-
In the Add Input wizard, complete the following steps:
-
Provide a display name and reference name (optional).
-
Select Datacenter as the type.
-
Click Set Default Value and Override.
-
Click Select Datacenter.
-
Click the data center associated with the new datastore and then click Select.
-
Click Add.
-
-
-
Click Map.
-
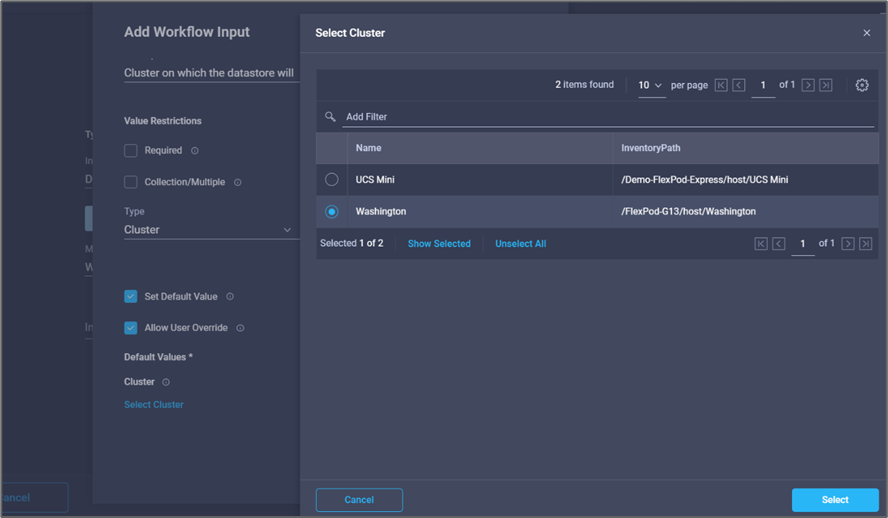
Click Map in the Cluster field.
-
Choose Direct Mapping and click Workflow Input.
-
In the Add Input wizard, complete the following steps:
-
Provide a display name and reference name (optional).
-
Click Required.
-
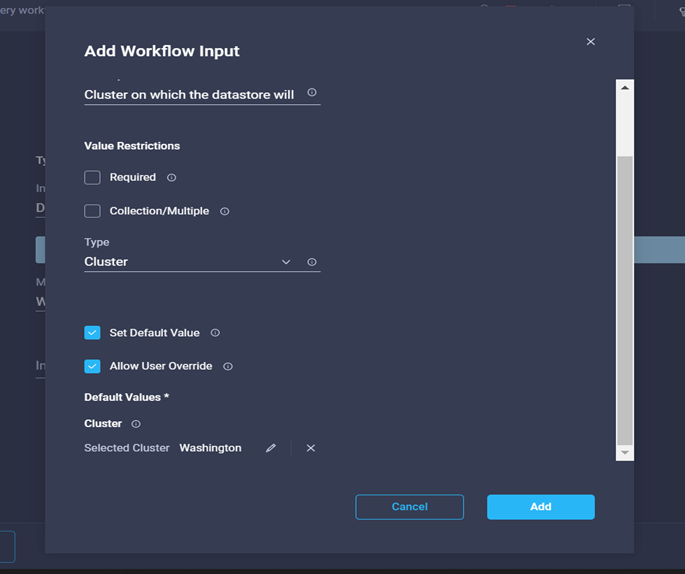
Select Cluster as the type.
-
Click Set Default Value and Override.
-
Click Select Cluster.
-
Click the cluster associated with the new datastore.
-
Click Select.
-
Click Add.
-
-
Click Map.
-
Click Map in the Host field.
-
Choose Static Value and click the host on which the datastore will be hosted. If a cluster is specified, then the host is ignored.
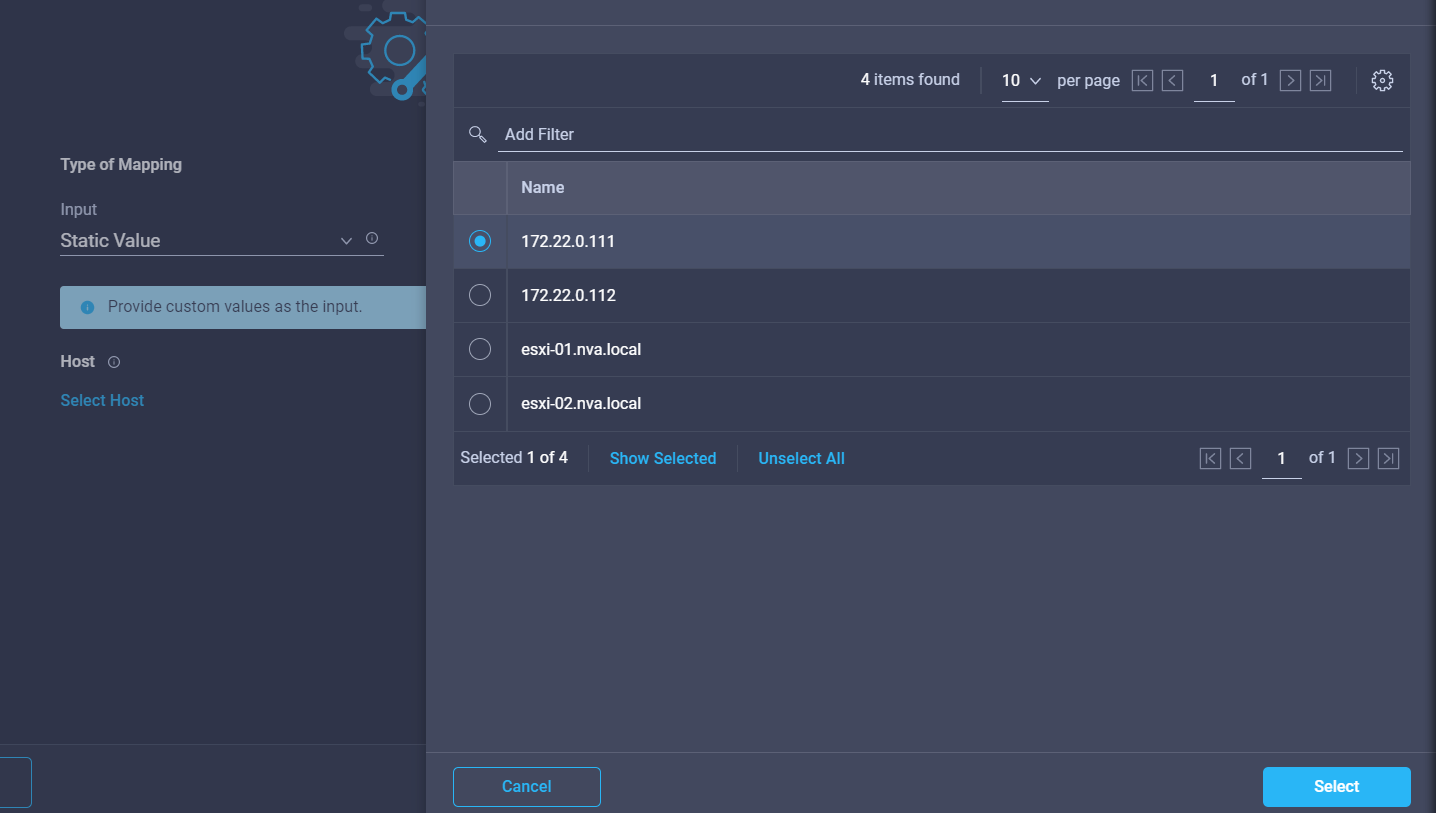
-
Click Select and Map.
-
Click Map in the Datastore field.
-
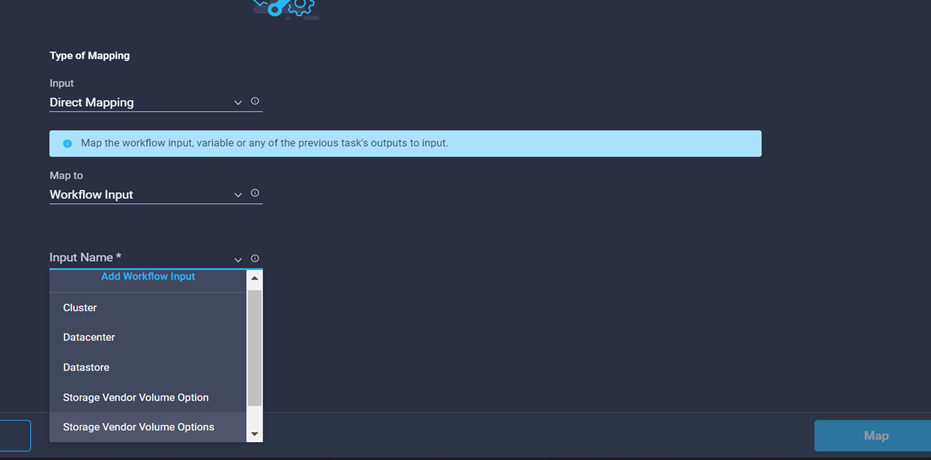
Choose Direct Mapping and click Workflow Input.
-
Click Input Name and Create Workflow Input.
-
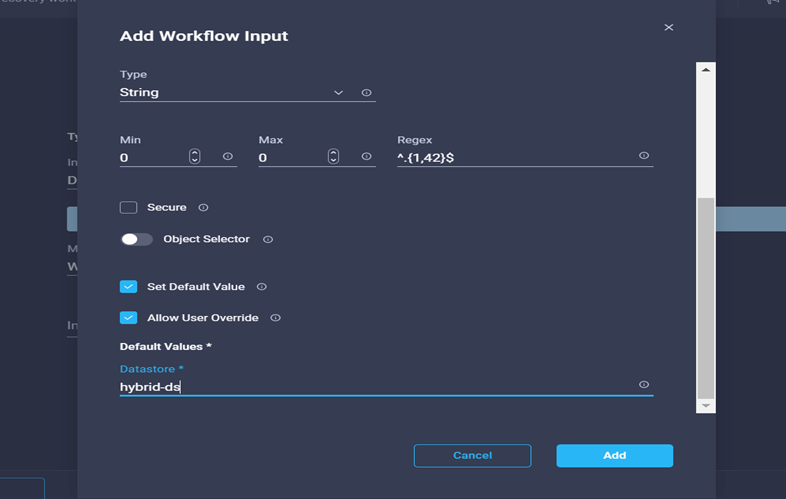
In the Add Input wizard:
-
Provide a display name and reference name (optional).
-
Click Required.
-
Click Set Default Value and Override.
-
Provide a default value for the datastore and click Add.
-
-
Click Map.
-
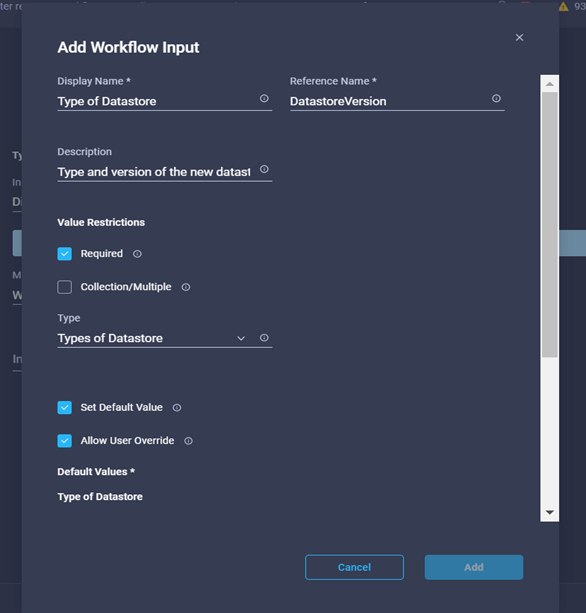
Click Map in the input field Type of Datastore.
-
Choose Direct Mapping and click Workflow Input.
-
Click Input Name and Create Workflow Input.
-
In the Add Input wizard, complete the following steps:
-
Provide a display name and reference name (optional) and click Required.
-
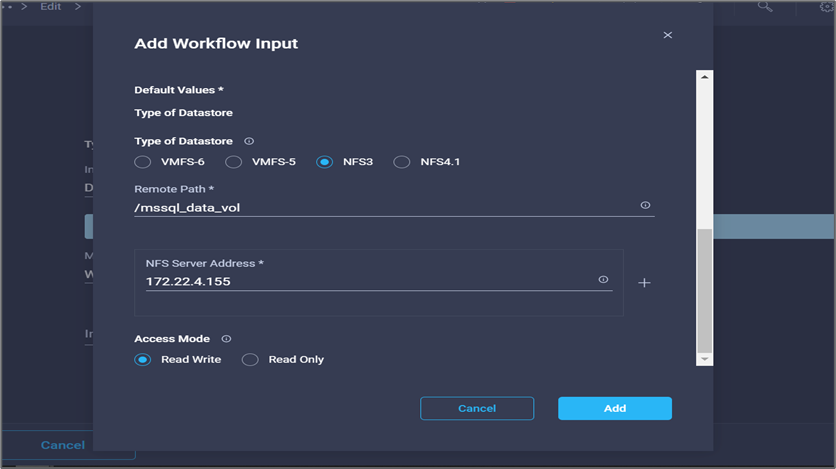
Make sure to select the type Types of Datastore and click Set Default Value and Override.
-
Provide the Remote Path. This is the remote path of the NFS mount point.
-
Provide the host names or IP addresses of remote NFS server in NFS Server Address.
-
Click the Access Mode. The Access mode is for the NFS server. Click read-only if volumes are exported as read-only. Click Add.
-
-
Click Map.
-
Click Save.
This completes the task of creating the datastore. All the tasks performed in the on- premises FlexPod Datacenter are completed.
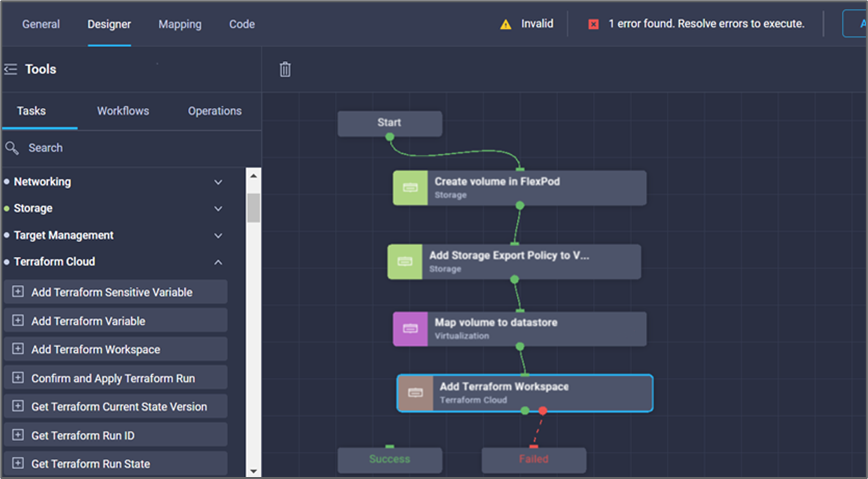
Procedure 5: Add a new Terraform workspace
-
Go to the Designer tab and click Tasks from the Tools section.
-
Drag and drop the Terraform Cloud > Add Terraform Workspace task from the Tools section in the Design area.
-
Use Connector to connect the Map volume to Datastore and Add Terraform Workspace tasks and click Save.
-
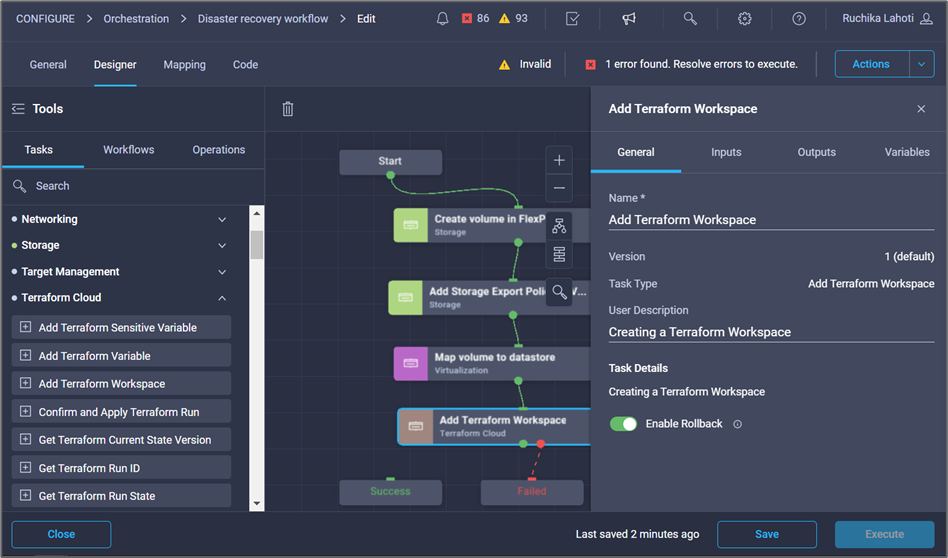
Click Add Terraform Workspace. In the Task Properties area, click the General tab. Optionally, you can change the Name and Description for this task.
-
In the Task Properties area, click Inputs.
-
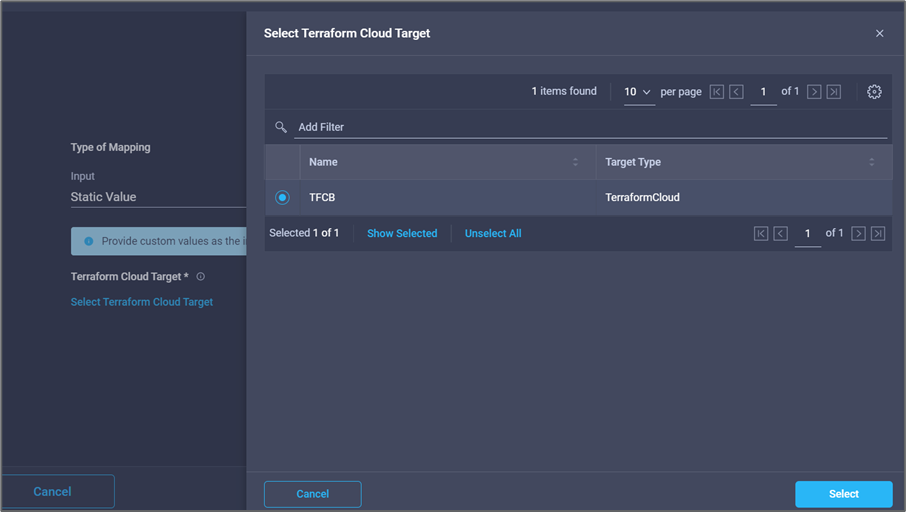
Click Map in the input field Terraform Cloud Target.
-
Choose Static Value and click Select Terraform Cloud Target. Select the Terraform Cloud for Business account that was added as explained in Configure Cisco Intersight Service for HashiCorp Terraform.”.
-
Click Map.
-
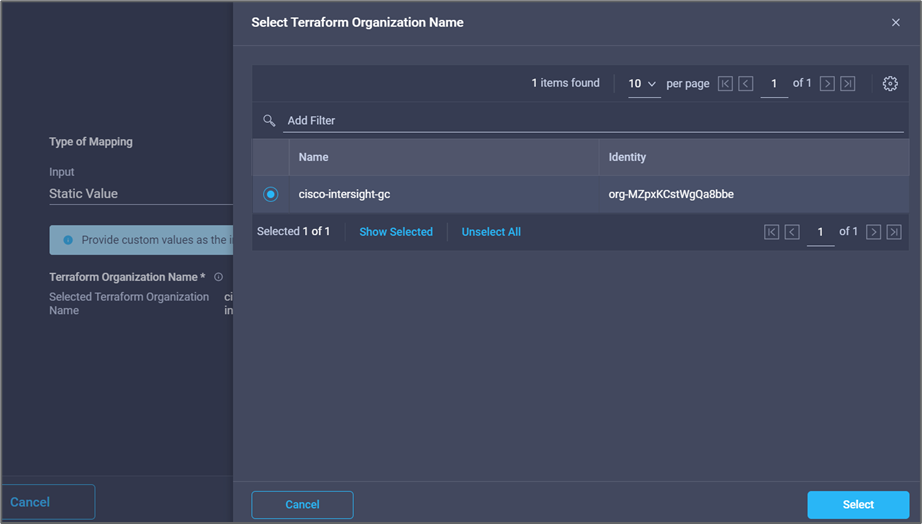
Click Map in the input field Terraform Organization Name.
-
Choose Static Value and then click Select Terraform Organization. Select the name of the Terraform Organization that you are part of in your Terraform Cloud for Business account.
-
Click Map.
-
Click Map in the Terraform Workspace Name field. This is the new workspace in the Terraform Cloud for Business account.
-
Choose Direct Mapping and click Workflow Input.
-
Click Input Name and Create Workflow Input.
-
In the Add Input wizard, complete the following steps:
-
Provide a display name and reference name (optional).
-
Click Required.
-
Make sure to select String for Type.
-
Click Set Default Value and Override.
-
Provide a default name for workspace.
-
Click Add.

-
-
Click Map.
-
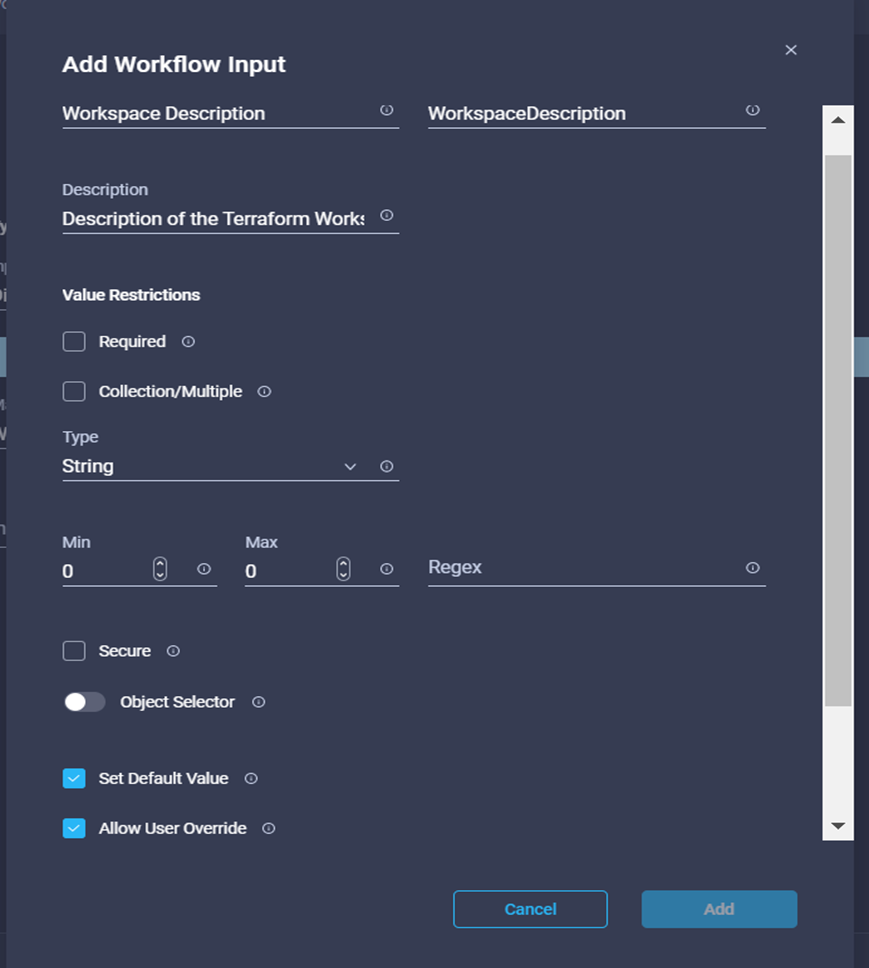
Click Map in the Workspace Description field.
-
Choose Direct Mapping and click Workflow Input.
-
Click Input Name and Create Workflow Input.
-
In the Add Input wizard, complete the following steps:
-
Provide a display name and reference name (optional).
-
Make sure to select String for Type.
-
Click Set Default Value and Override.
-
Provide a workspace description and click Add.
-
-
Click Map.
-
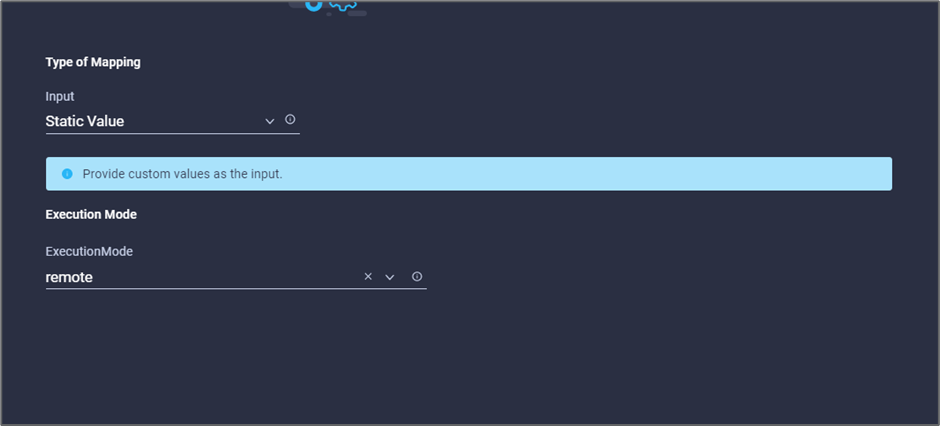
Click Map in the Execution Mode field.
-
Choose Static Value, click Execution Mode, and then click remote.
-
Click Map.
-
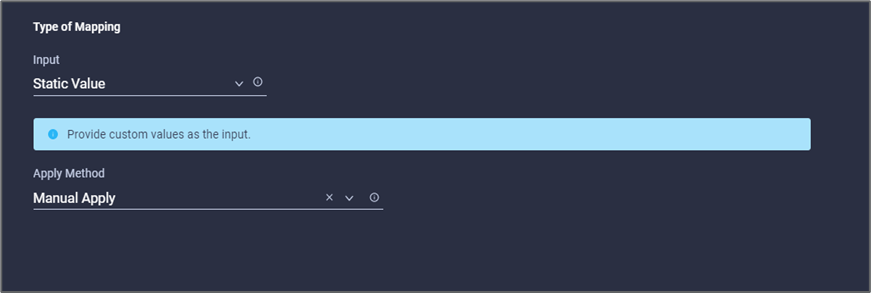
Click Map in the Apply Method field.
-
Choose Static Value and click Apply Method. Click Manual Apply.
-
Click Map.
-
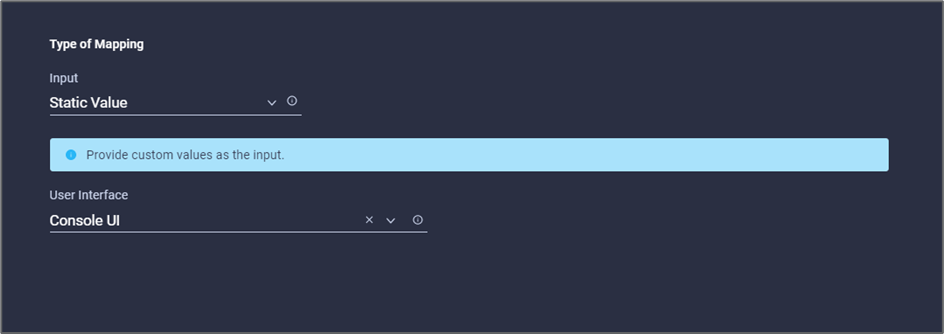
Click Map in the User Interface field.
-
Choose Static Value and click User Interface. Click Console UI.
-
Click Map.
-
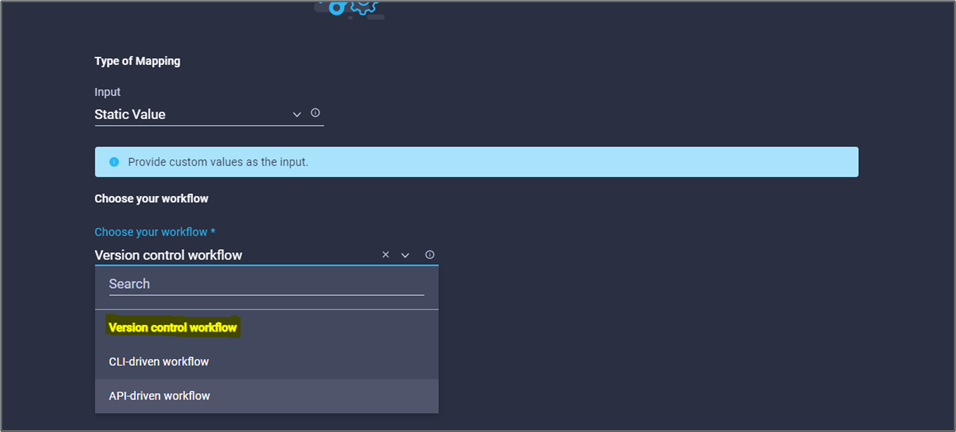
Click Map in the input field and select your workflow.
-
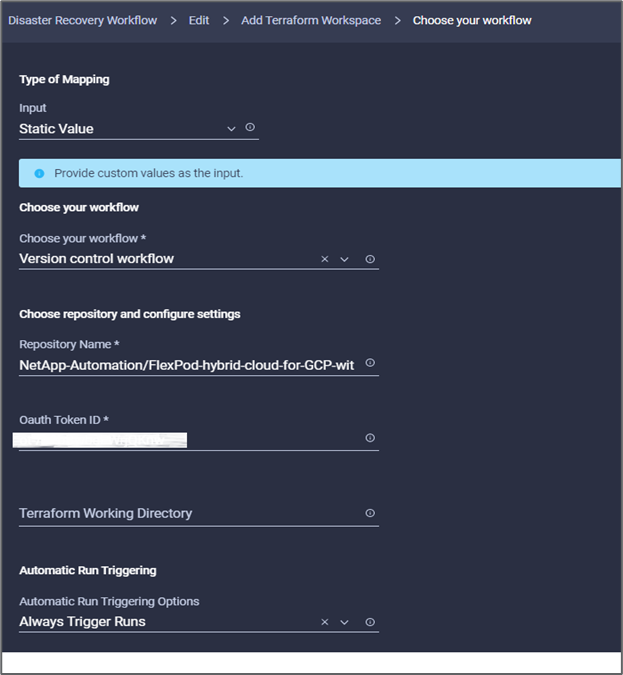
Select Static Value, and click Choose Your Workflow. Click Version Control Workflow.
-
Provide the following GitHub repository details:
-
In Repository Name, enter the name of the repository detailed in the section “Set up environment prerequisites”.
-
Provide the OAuth Token ID as detailed in the section “Set up environment prerequisites”.
-
Select the Automatic Run Triggering option.
-
-
Click Map.
-
Click Save.
This completes the task of creating a workspace in a Terraform Cloud for Business account.
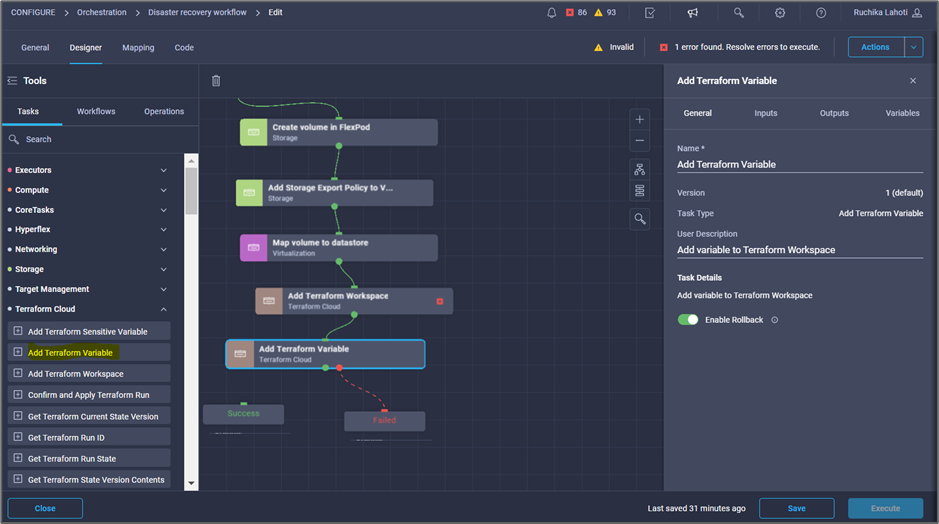
Procedure 6: Add non-sensitive variables to workspace
-
Go to the Designer tab and click the Workflows from Tools section.
-
Drag and drop the Terraform > Add Terraform Variables workflow from the Tools section in the Design area.
-
Use Connector to connect the Add Terraform Workspace and Add Terraform Variables tasks. Click Save.
-
Click Add Terraform Variables. In the Workflow Properties area, click the General tab. Optionally, you can change the name and description for this task.
-
In the Workflow Properties area, click Inputs.
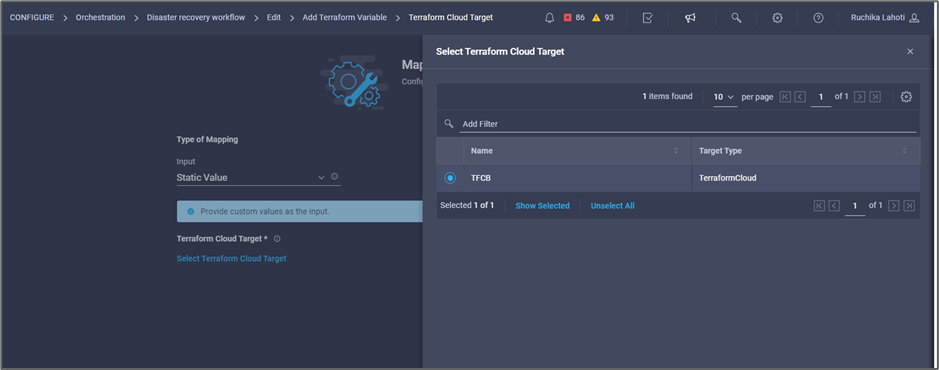
-
Click Map in the Terraform Cloud Target field.
-
Choose Static Value and click Select Terraform Cloud Target. Select the Terraform Cloud for Business account that was added as explained in Configure Cisco Intersight Service for HashiCorp Terraform.”.
-
Click Map.
-
Click Map in the *Terraform Organization Name *field.
-
Choose Static Value and click Select Terraform Organization. Select the name of the Terraform Organization that you are part of in your Terraform Cloud for Business account.

-
Click Map.
-
Click Map in the Terraform Workspace Name field.
-
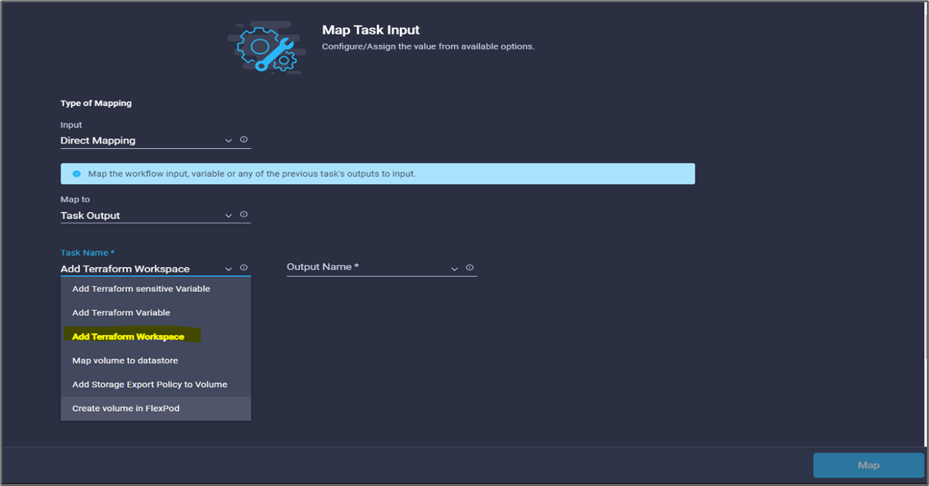
Choose Direct Mapping and click Task Output.
-
Click Task Name and click Add Terraform Workspace.
-
Click Output Name and click Workspace Name.
-
Click Map.
-
Click Map in the Add Variables Options field.
-
Choose Direct Mapping and click Workflow Input.
-
Click Input Name and Create Workflow Input.
-
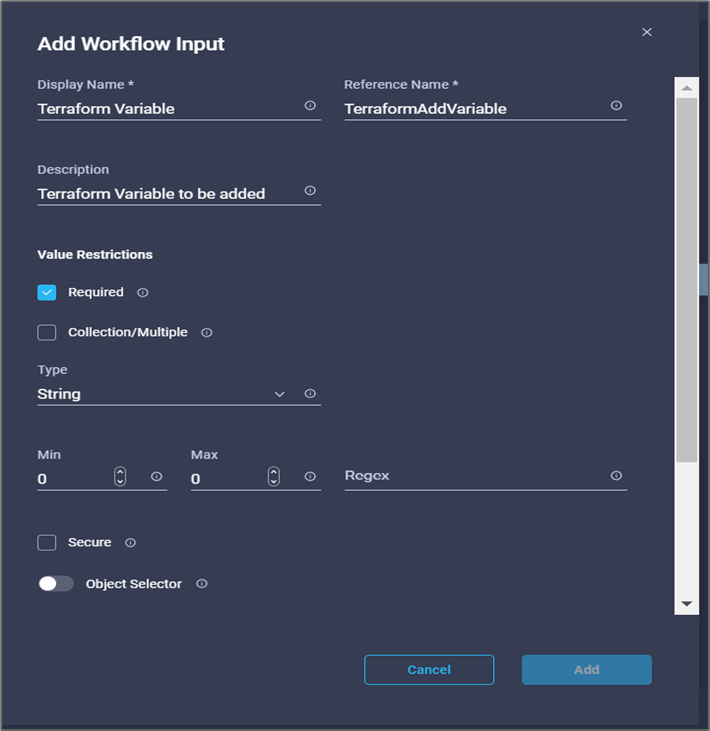
In the Add Input wizard, complete the following steps:
-
Provide a display name and reference name (Optional).
-
Make sure to select String for the Type.
-
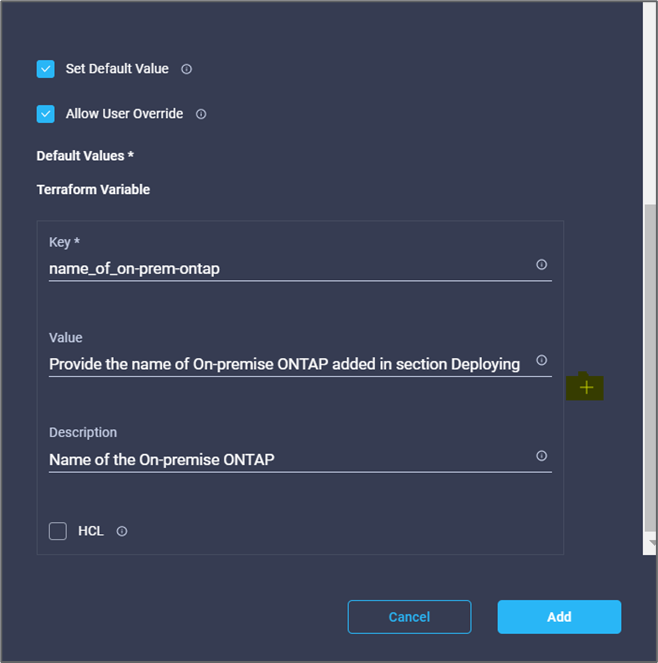
Click Set Default Value and Override.
-
Click Variable Type and then click Non-Sensitive Variables.
-
-
In the Add Terraform Variables section, provide the following information:
-
Key.
name_of_on-prem-ontap -
Value. Provide the name of on-premises ONTAP.
-
Description. Name of the on-premises ONTAP.
-
-
Click + to add additional variables.
-
Add all the Terraform Variables as shown in the following table. You can also provide a default value.
Terraform variable name Description name_of_on-prem-ontap
Name of the on-premises ONTAP (FlexPod)
on-prem-ontap_cluster_ip
The IP address of the storage cluster management interface
on-prem-ontap_user_name
Admin username for the storage cluster
Zone
GCP region where the working environment will be created
subnet_id
GCP subnet id where the working environment will be created
vpc_id
The VPC ID where the working environment will be created
capacity_package_name
The type of license to use
source_volume
The name of the source volume
source_storage_vm_name
The name of the source SVM
destination_volume
Name of volume on Cloud Volumes ONTAP
schedule_of_replication
The default is 1 hour
name_of_volume_to_create_on_cvo
Name of the cloud volume
workspace_id
The workspace_id where the working environment will be created
Project_id
The project_id where the working environment will be created
name_of_cvo_cluster
The name of the Cloud Volumes ONTAP working environment
gcp_service_account
gcp_service_account of Cloud Volumes ONTAP working environment
-
Click Map and then Save.
This completes the task of adding the required Terraform variables to the workspace. Next, add the required sensitive Terraform variables to the workspace. You can also combine both into a single task.
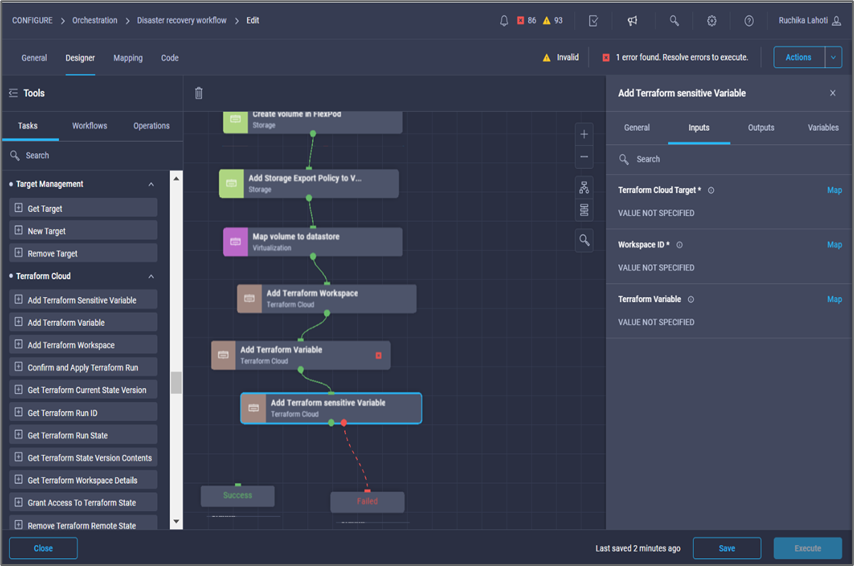
Procedure 7: Add sensitive variables to a workspace
-
Go to the Designer tab and click Workflows from the Tools section.
-
Drag and drop the Terraform > Add Terraform Variables workflow from the Tools section in the Design area.
-
Use Connector to connect the two Add Terraform Workspace tasks. Click Save.
A warning appears indicating that the two tasks have the same name. Ignore the error for now because you change the task name in the next step. -
Click Add Terraform Variables. In the Workflow Properties area, click the General tab. Change the name to Add Terraform Sensitive Variables.
-
In the Workflow Properties area, click Inputs.
-
Click Map in the Terraform Cloud Target field.
-
Choose Static Value and click Select Terraform Cloud Target. Select the Terraform Cloud for Business account that was added in the section Configure Cisco Intersight Service for HashiCorp Terraform.”
-
Click Map.
-
Click Map in the Terraform Organization Name field.
-
Choose Static Value and click Select Terraform Organization. Select the name of the Terraform Organization that you are part of in your Terraform Cloud for Business account.
-
Click Map.
-
Click Map in the Terraform Workspace Name field.
-
Choose Direct Mapping and click Task Output.
-
Click Task Name and then click Add Terraform Workspace.
-
Click Output Name and click the output Workspace Name.
-
Click Map.
-
Click Map in the Add Variables Options field.
-
Choose Direct Mapping and then click Workflow Input.
-
Click Input Name and Create Workflow Input.
-
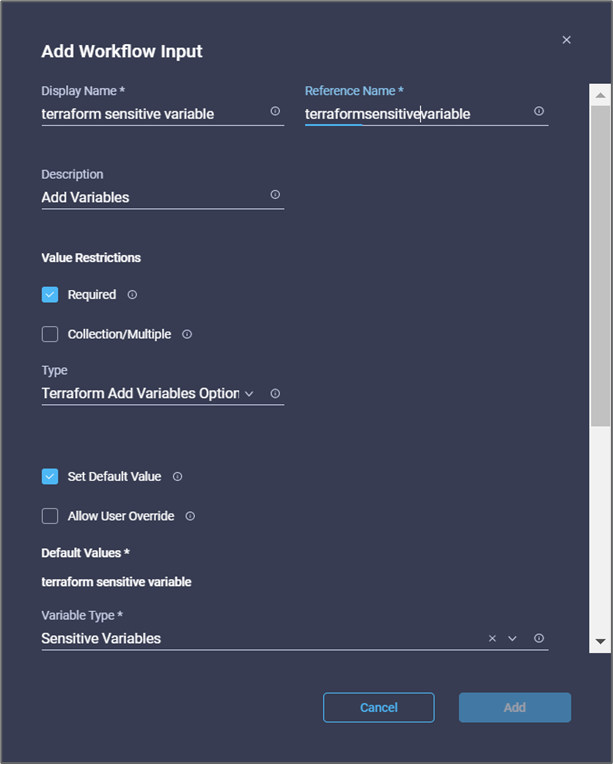
In the Add Input wizard, complete the following steps:
-
Provide a display name and reference name (optional).
-
Make sure to select Terraform Add Variables Options for the type.
-
Click Set Default Value.
-
Click Variable Type and then click Sensitive Variables.
-
Click Add.
-
-
In the Add Terraform Variables section, provide the following information:
-
Key.
cloudmanager_refresh_token. -
Value. Input the refresh token for NetApp Cloud Manager API operations.
-
Description. Refresh token.
For more information about obtaining a refresh token for the NetApp Cloud Manager API operations, see the section “Set up environment prerequisites.” 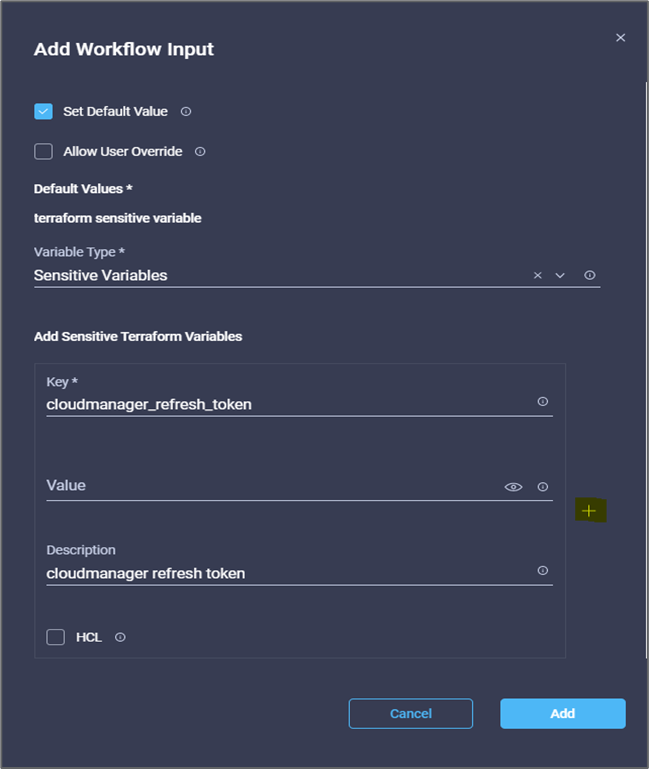
-
-
Add all the Terraform sensitive variables as shown in the table below. You can also provide a default value.
Terraform sensitive variable name Description cloudmanager_refresh_token
Refresh token. Obtain it from:
connector_id
The client ID of the Cloud Manager Connector. Obtain it from
cvo_admin_password
The admin password for Cloud Volumes ONTAP
on-prem-ontap_user_password
Admin password for the storage cluster
-
Click Map.This completes the task of adding the required Terraform sensitive variables to workspace. Next, start a new Terraform plan in the configured workspace.
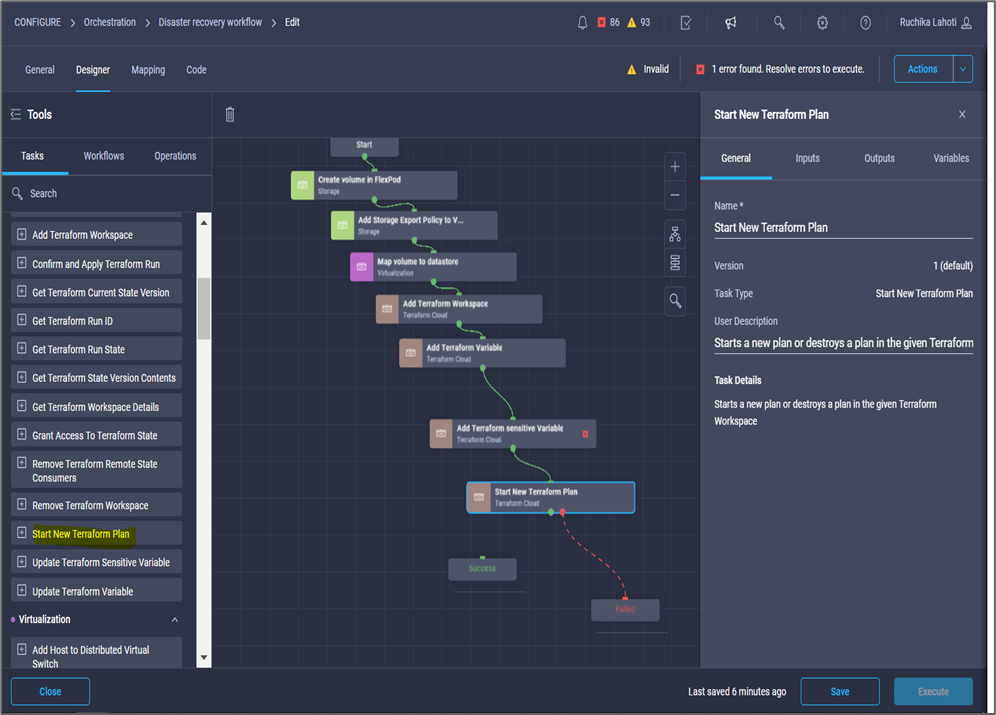
Procedure 8: Start a new Terraform plan
-
Go to the Designer tab and click Tasks from the Tools section.
-
Drag and drop the Terraform Cloud > Start New Terraform Plan task from the Tools section on the Design area.
-
Use Connector to connect between the tasks Add Terraform Sensitive Variables and Start New Terraform Plan tasks. Click Save.
-
Click Start New Terraform Plan. In the Task Properties area, click the General tab. Optionally, you can change the name and description for this task.
-
In the Task Properties area, click Inputs.
-
Click Map in the Terraform Cloud Target field.
-
Choose Static Value and click Select Terraform Cloud Target. Select the Terraform Cloud for Business account that was added in the section “Configuring Cisco Intersight Service for HashiCorp Terraform.”
-
Click Map.
-
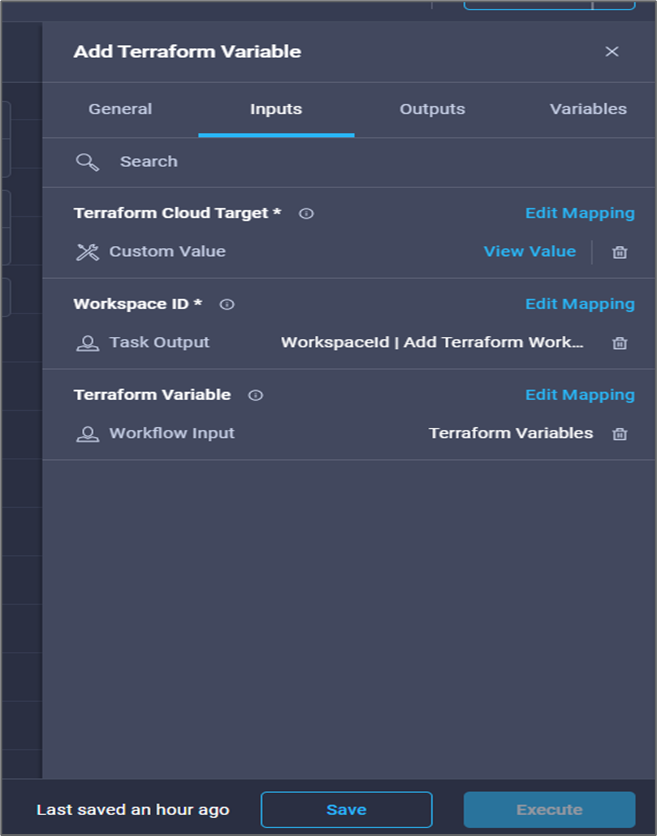
Click Map in the Workspace ID field.
-
Choose Direct Mapping and click Task Output.
-
Click Task Name and then click Add Terraform Workspace.
-
Click Output Name, Workspace ID, and then Map.
-
Click Map in the Reason for starting plan field.
-
Choose Direct Mapping and then click Workflow Input.
-
Click Input Name and then Create Workflow Input.
-
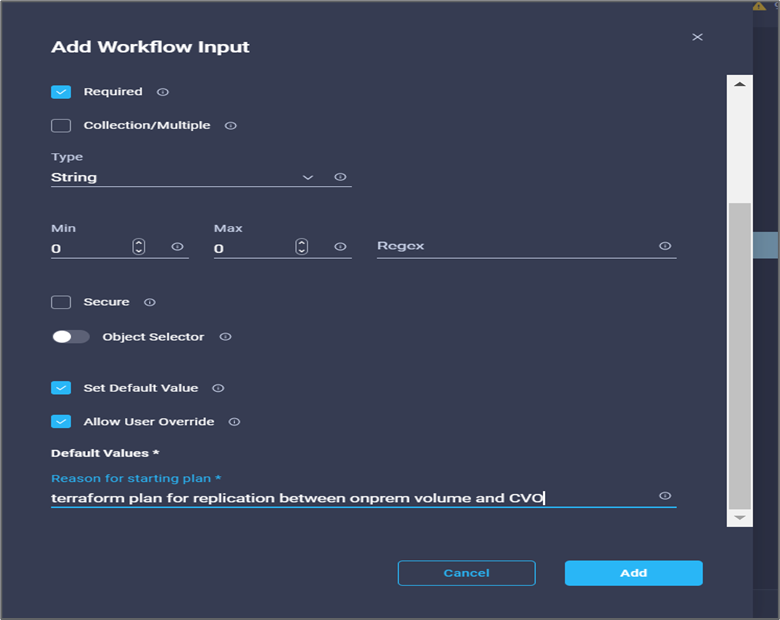
In the Add Input wizard, complete the following steps:
-
Provide a display name and reference name (optional).
-
Make sure to select String for the Type.
-
Click Set Default Value and Override.
-
Input a default value for Reason for starting plan and click Add.
-
-
Click Map.
-
Click Map in the Plan Operation field.
-
Choose Static Value and click Plan Operation. Click new plan.
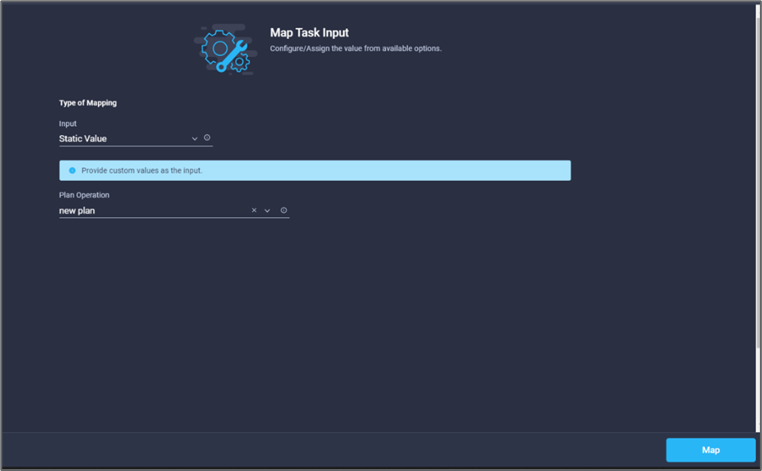
-
Click Map.
-
Click Save.
This completes the task of adding a Terraform Plan in Terraform Cloud for Business account. Next, create a sleep task for a few seconds.
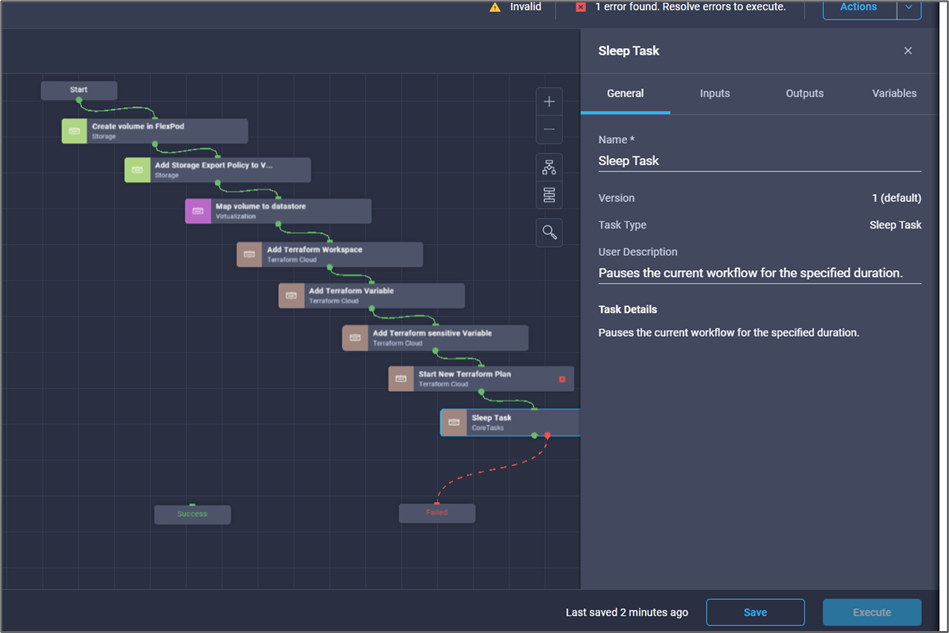
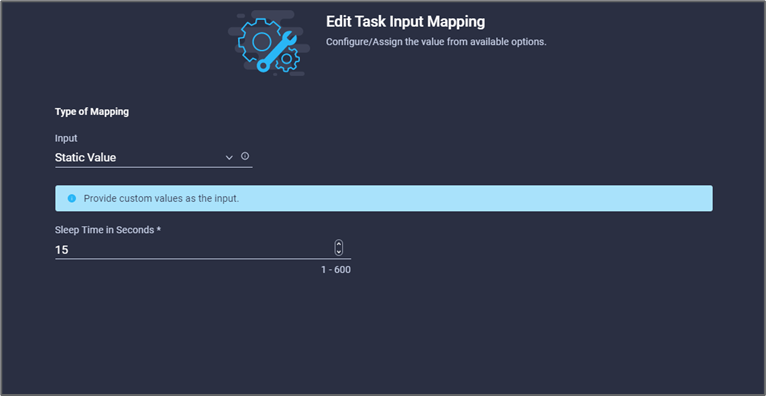
Procedure 9: Sleep task for synchronization
Terraform Apply requires RunID, which is generated as a part of the Terraform Plan task. Waiting a few seconds between the Terraform Plan and Terraform Apply actions avoids timing issues.
-
Go to the Designer tab and click Tasks from the Tools section.
-
Drag and drop the Core Tasks > Sleep Task from the Tools section in the Design area.
-
Use Connector to connect the tasks Start New Terraform Plan and Sleep Task. Click Save.
-
Click Sleep Task. In the Task Properties area, click the General tab. Optionally, you can change the name and description for this task. In this example, the name of the task is Synchronize.
-
In the Task Properties area, click Inputs.
-
Click Map in the Sleep Time in Seconds field.
-
Choose Static Value and input 15 in for the Sleep Time in Seconds.
-
Click Map.
-
Click Save.
This completes the sleep task. Next, create the last task of this workflow, confirming and applying the Terraform Run.
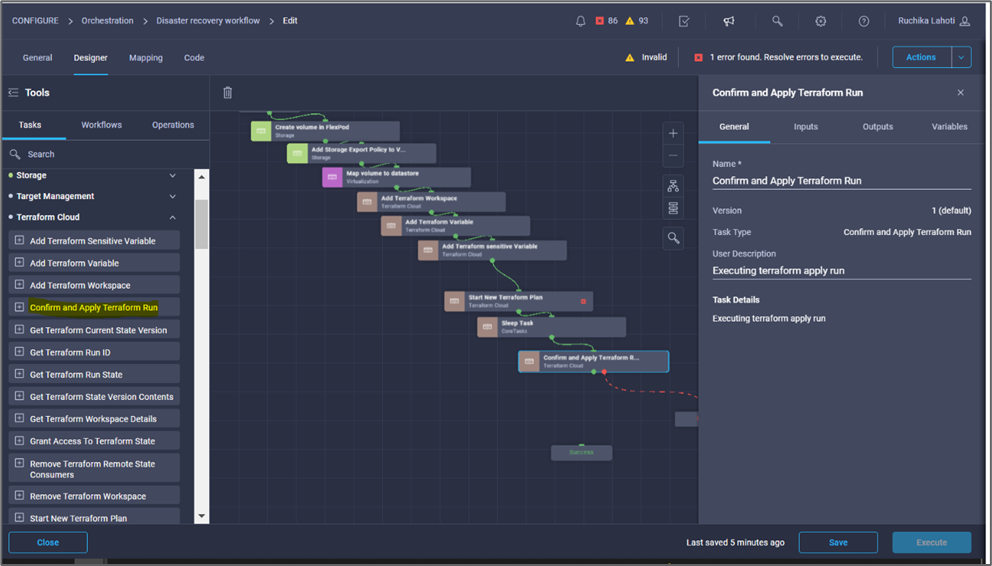
Procedure 10: Confirm and apply Terraform Run
-
Go to the Designer tab and click Tasks from the Tools section.
-
Drag and drop the Terraform Cloud > Confirm and Apply Terraform Run task from the Tools section in the Design area.
-
Use connector to connect the tasks Synchronize and Confirm and Apply Terraform Run. Click Save.
-
Click Confirm and Apply Terraform Run. In the Task Properties area, click the General tab. Optionally, you can change the name and description for this task.
-
In the Task Properties area, click Inputs.
-
Click Map in the Terraform Cloud Target field.
-
Choose Static Value and click Select Terraform Cloud Target. Select the Terraform Cloud for Business account that was added in Configure Cisco Intersight Service for HashiCorp Terraform.”
-
Click Map.
-
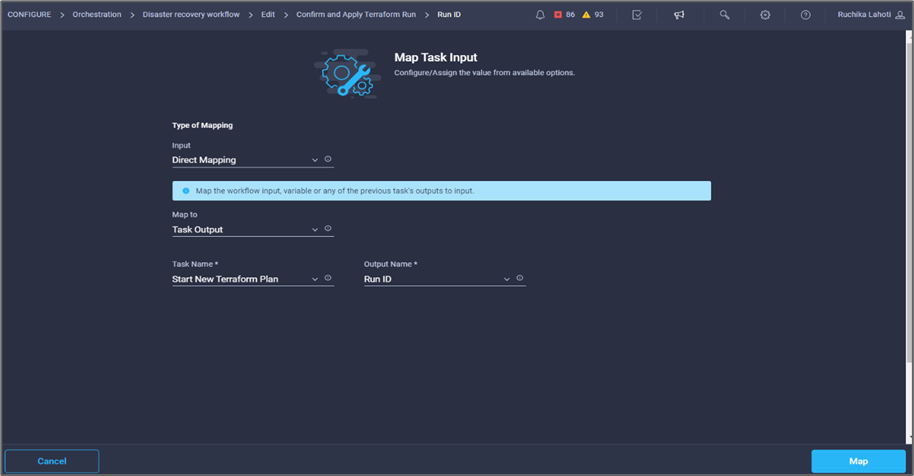
Click Map in the Run ID field.
-
Choose Direct Mapping and click Task Output.
-
Click Task Name and click Start New Terraform Plan.
-
Click Output Name and then click Run ID.
-
Click Map.
-
Click Save.
-
Click Auto Align Workflow so that all tasks are aligned. Click Save.
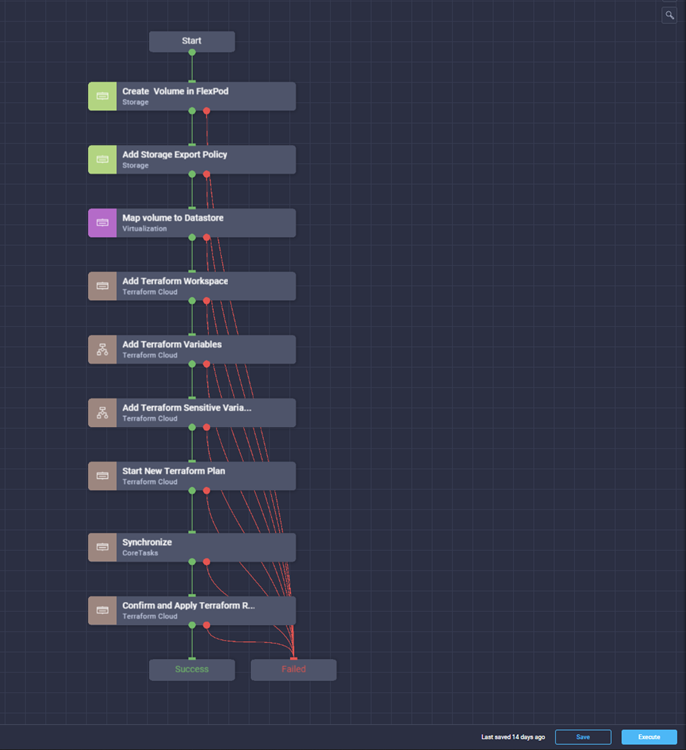
This completes the Confirm and Apply Terraform Run task. Use Connector to connect between the Confirm and Apply Terraform Run task and the Success and Failed tasks.
Procedure 11: Import a Cisco-built workflow
Cisco Intersight Cloud Orchestrator enables you to export workflows from a Cisco Intersight account to your system and then import them to another account. A JSON file was created by exporting the built workflow that can be imported to your account.
A JSON file for the workflow component is available in the GitHub repository.