

Configure Keystone Collector
 Suggest changes
You need to complete a few configuration tasks to enable Keystone Collector to collect usage data in your storage environment. This is a one-time activity to activate and associate the required components with your storage environment.

|
|
-
Start the Keystone Collector management TUI utility:
$ keystone-collector-tui -
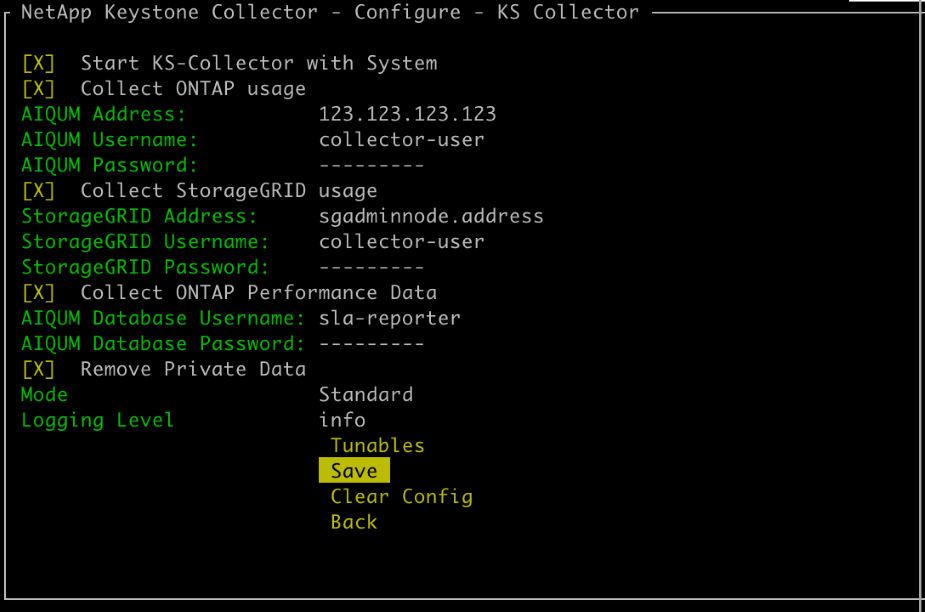
Go to Configure > KS-Collector to open the Keystone Collector configuration screen to view the available options for update.
-
Update the required options.
For ONTAP
-
Collect ONTAP usage: This option enables collection of usage data for ONTAP. Add the details of the Active IQ Unified Manager (Unified Manager) server and service account.
-
Collect ONTAP Performance Data: This option enables collection of performance data for ONTAP. This is disabled by default. Enable this option if performance monitoring is required in your environment for SLA purposes. Provide the Unified Manager Database user account details. For information about creating database users, see Create Unified Manager users.
-
Remove Private Data: This option removes specific private data of customers and is enabled by default. For information about what data is excluded from the metrics if this option is enabled, see Limit collection of private data.
For StorageGRID
-
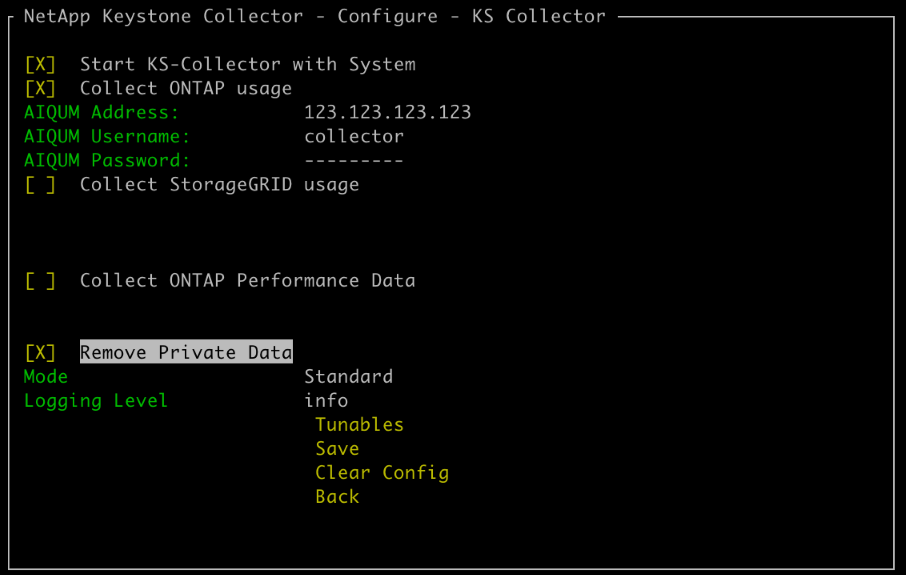
Collect StorageGRID usage: This option enables collection of node usage details. Add the StorageGRID node address and user details.
-
Remove Private Data: This option removes specific private data of customers and is enabled by default. For information about what data is excluded from the metrics if this option is enabled, see Limit collection of private data.
-
-
Toggle the Start KS-Collector with System field.
-
Click Save.
-
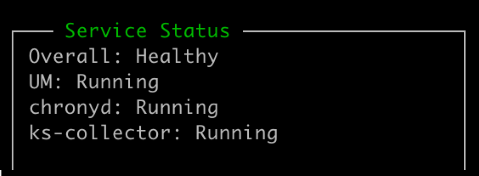
Ensure that Keystone Collector is in a healthy state by returning to the main screen of the TUI and verifying the Service Status information. The system should show that the services are in an Overall: Healthy status.
-
Exit the Keystone Collector management TUI by selecting the Exit to Shell option on the home screen.
Configure HTTP Proxy on Keystone Collector
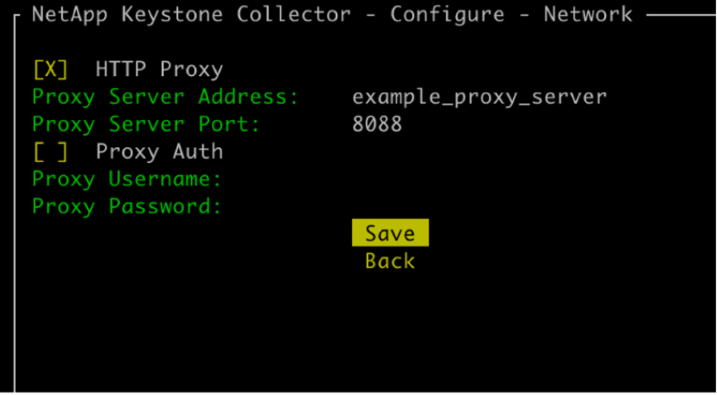
The Collector software supports using a HTTP proxy to communicate with the internet. This can be configured in the TUI.
-
Restart the Keystone Collector management TUI utility if already closed:
$ keystone-collector-tui -
Toggle on the HTTP Proxy field, and add the details for the HTTP proxy server, port, and credentials, if authentication is required.
-
Click Save.
Limit collection of private data
Keystone Collector gathers limited configuration, status, and performance information required to perform subscription metering. There is an option to further limit the information collected by masking sensitive information from the content uploaded. This does not impact billing calculation. However, limiting the information might impact usability of the reporting information, as some elements, which can be easily identified by users, such as volume name, is replaced with UUIDs.
Limiting the collection of specific customer data is a configurable option on the Keystone Collector TUI screen. This option, Remove Private Data, is enabled by default.
For information about the items removed on limiting private data access in both ONTAP and StorageGRID, see List of items removed on limiting private data access.
Trust a custom root CA
Verification of certificates against a public root certificate authority (CA) is a part of the Keystone Collector security features. However, if required, you can configure Keystone Collector to trust a custom root CA.
If you use SSL/TLS inspection in your system firewall, it results in the internet-based traffic to be re-encrypted with your custom CA certificate. It is necessary to configure the settings to verify the source as a trusted CA before accepting the root certificate and allowing connections to occur. Follow these steps:
-
Prepare the CA certificate. It should be in base64-encoded X.509 file format.
The supported file extensions are .pem,.crt,.cert. Ensure that the certificate is in one of these formats. -
Copy the certificate to the Keystone Collector server. Make a note of the location where the file is copied.
-
Open a terminal on the server and run the management TUI utility.
$ keystone-collector-tui -
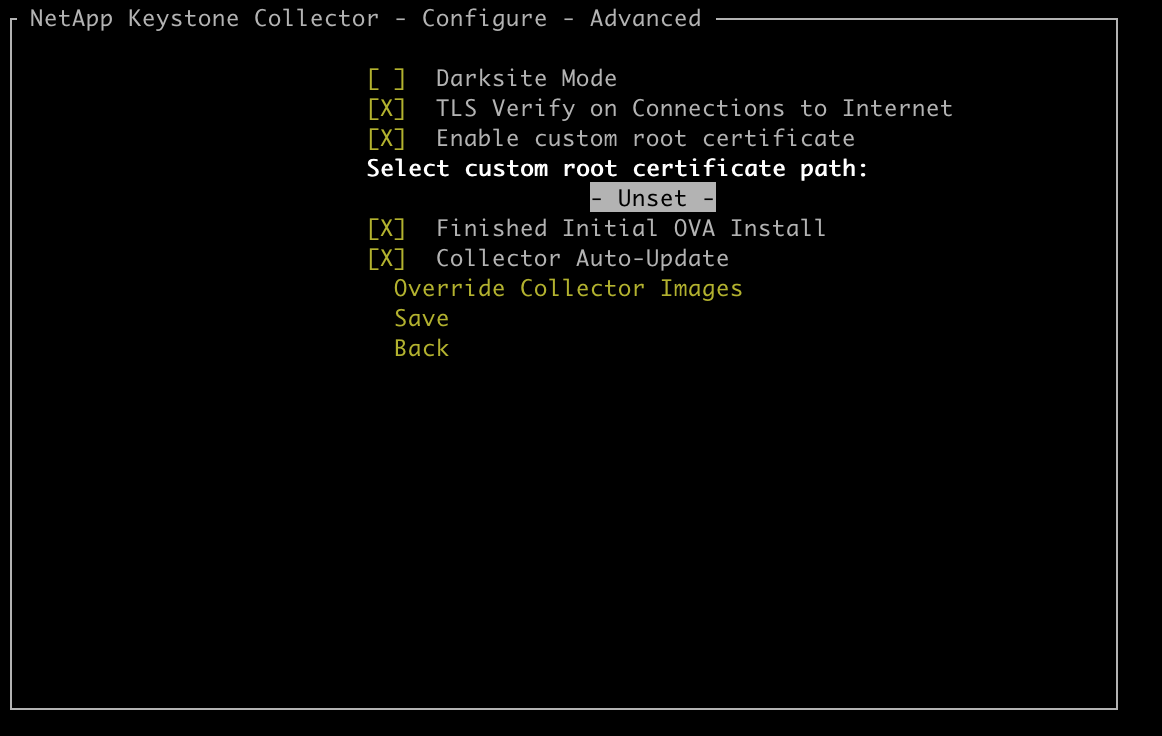
Go to Configuration > Advanced.
-
Enable the option Enable custom root certificate.
-
For Select custom root certificate path:, select
- Unset - -
Press Enter. A dialog box for selecting the certificate path is displayed.
-
Select the root certificate from the file system browser or enter the exact path.
-
Press Enter. You return to the Advanced screen.
-
Select Save. The configuration is applied.
|
|
The CA certificate is copied to /opt/netapp/ks-collector/ca.pem on the Keystone Collector server.
|
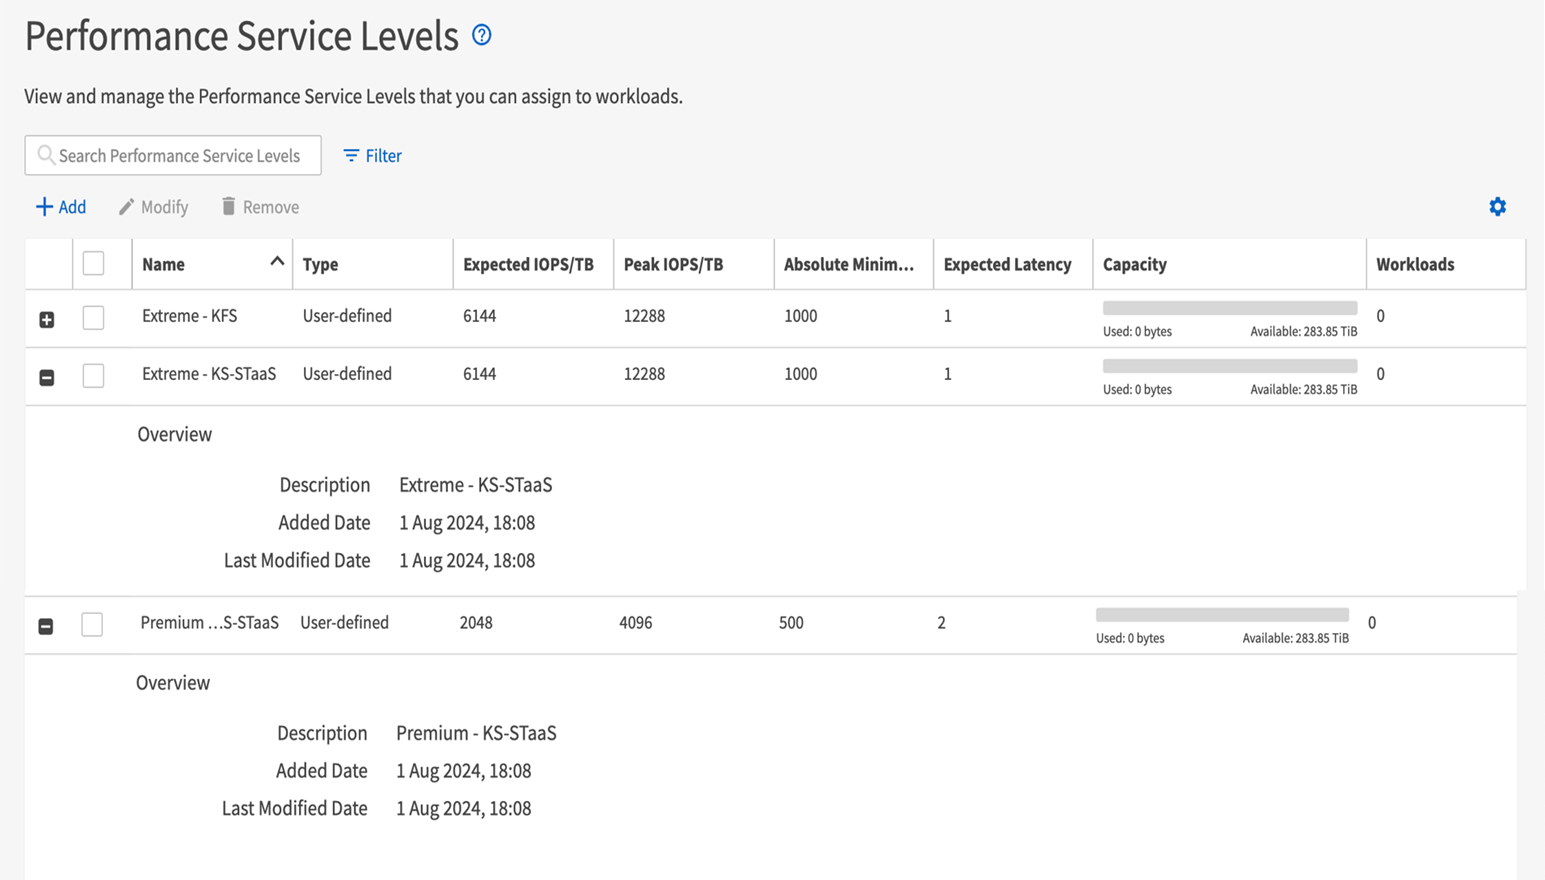
Create Performance Service Levels
You can create Performance Service Levels (PSLs) using the Keystone Collector management TUI utility. Creating PSLs through the TUI automatically selects the default values set for each performance service level, reducing the chance of errors that might occur when manually setting these values while creating PSLs through Active IQ Unified Manager.
To learn more about PSLs, refer to Performance Service Levels.
To learn more about service levels, refer to Service levels in Keystone.
-
Start the Keystone Collector management TUI utility:
$ keystone-collector-tui -
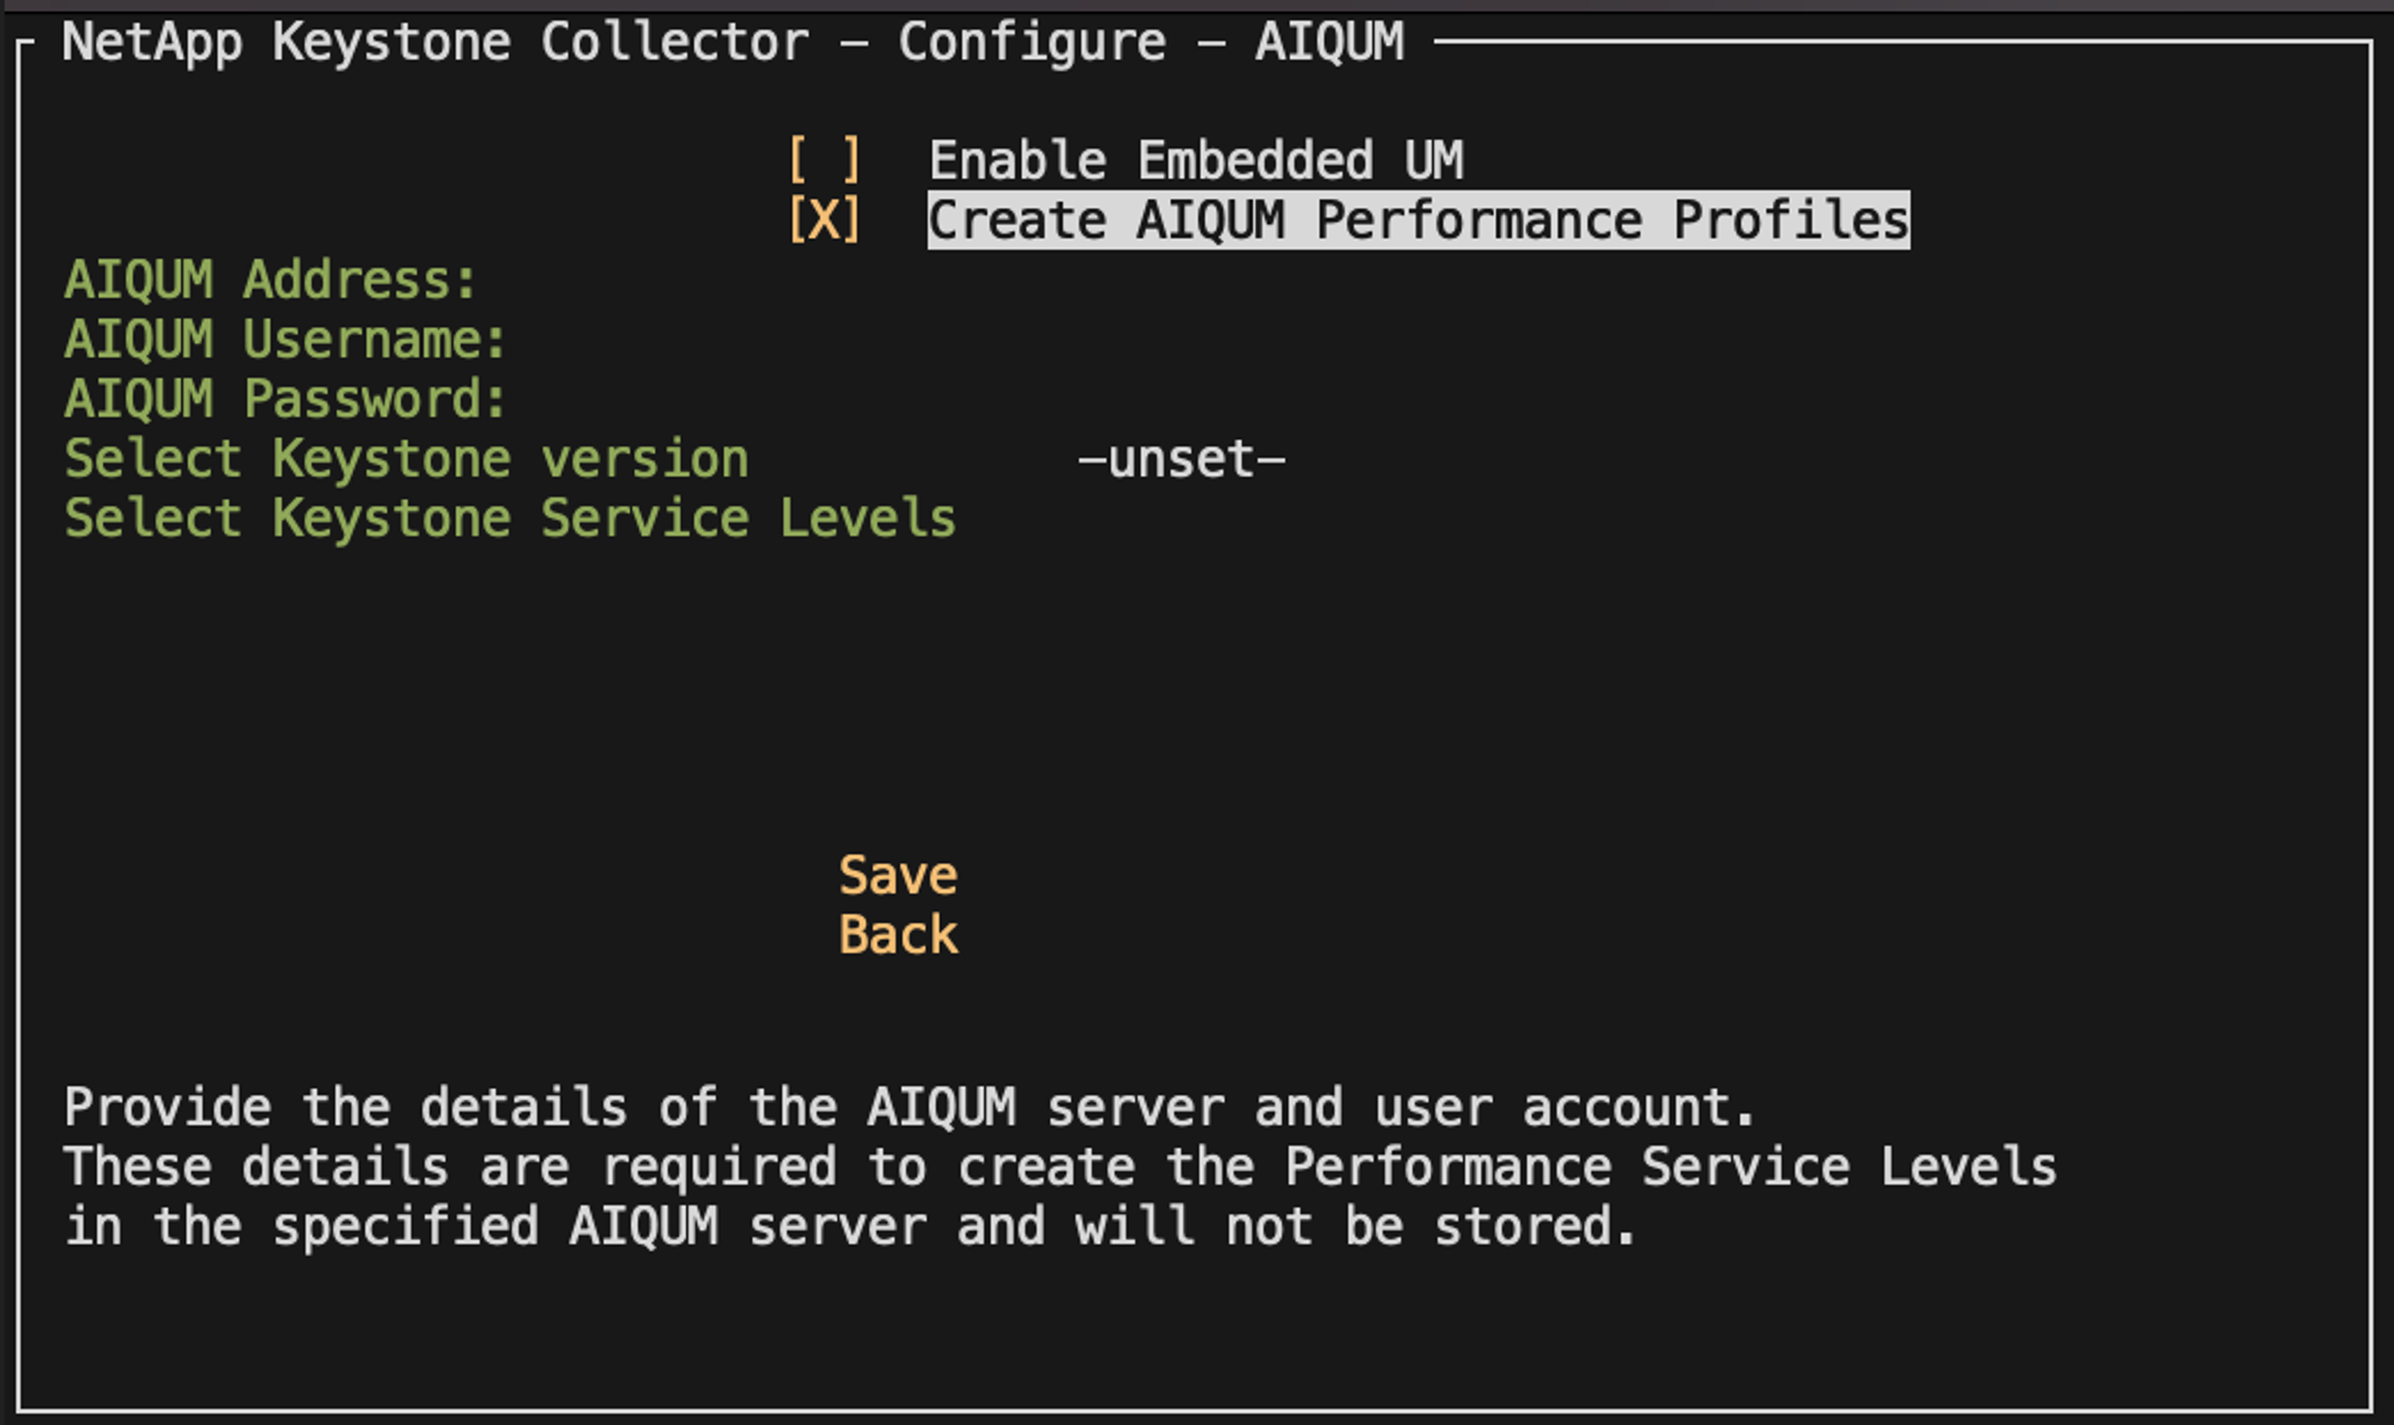
Go to Configure>AIQUM to open the AIQUM screen.
-
Enable the option Create AIQUM Performance Profiles.
-
Enter the details of the Active IQ Unified Manager server and user account. These details are required to create PSLs and will not be stored.
-
For Select Keystone version, select
-unset-. -
Press Enter. A dialog box for selecting the Keystone version is displayed.
-
Highlight STaaS to specify the Keystone version for Keystone STaaS, and then press Enter.
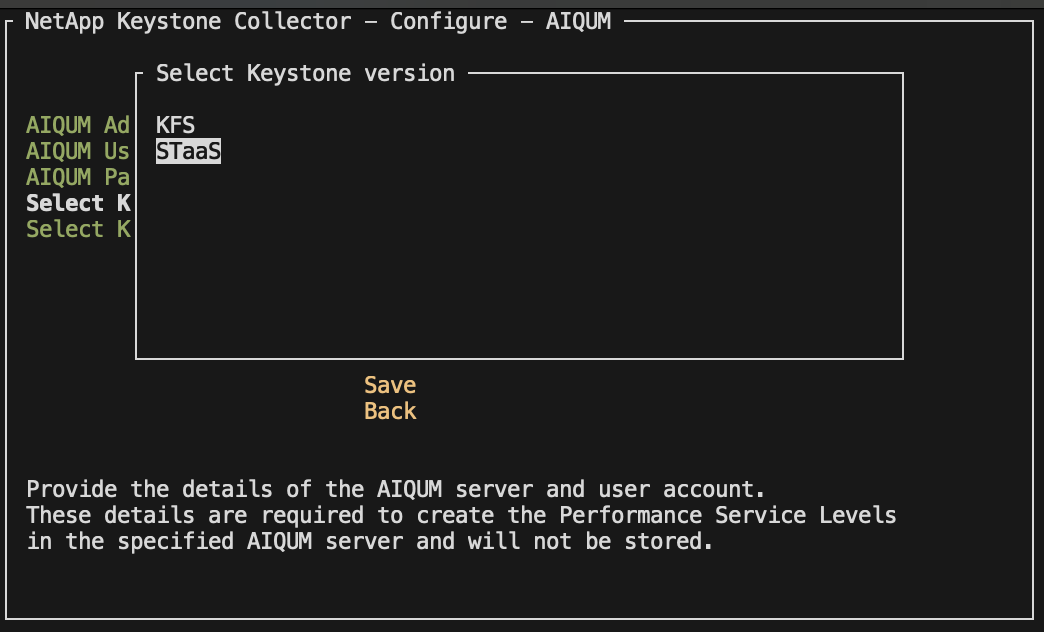
You can highlight the KFS option for Keystone subscription services version 1. Keystone subscription services differ from Keystone STaaS in the constituent performance service levels, service offerings, and billing principles. To learn more, refer to Keystone subscription services | Version 1. -
All supported Keystone performance service levels will be displayed within the Select Keystone Service Levels option for the specified Keystone version. Enable the desired performance service levels from the list.
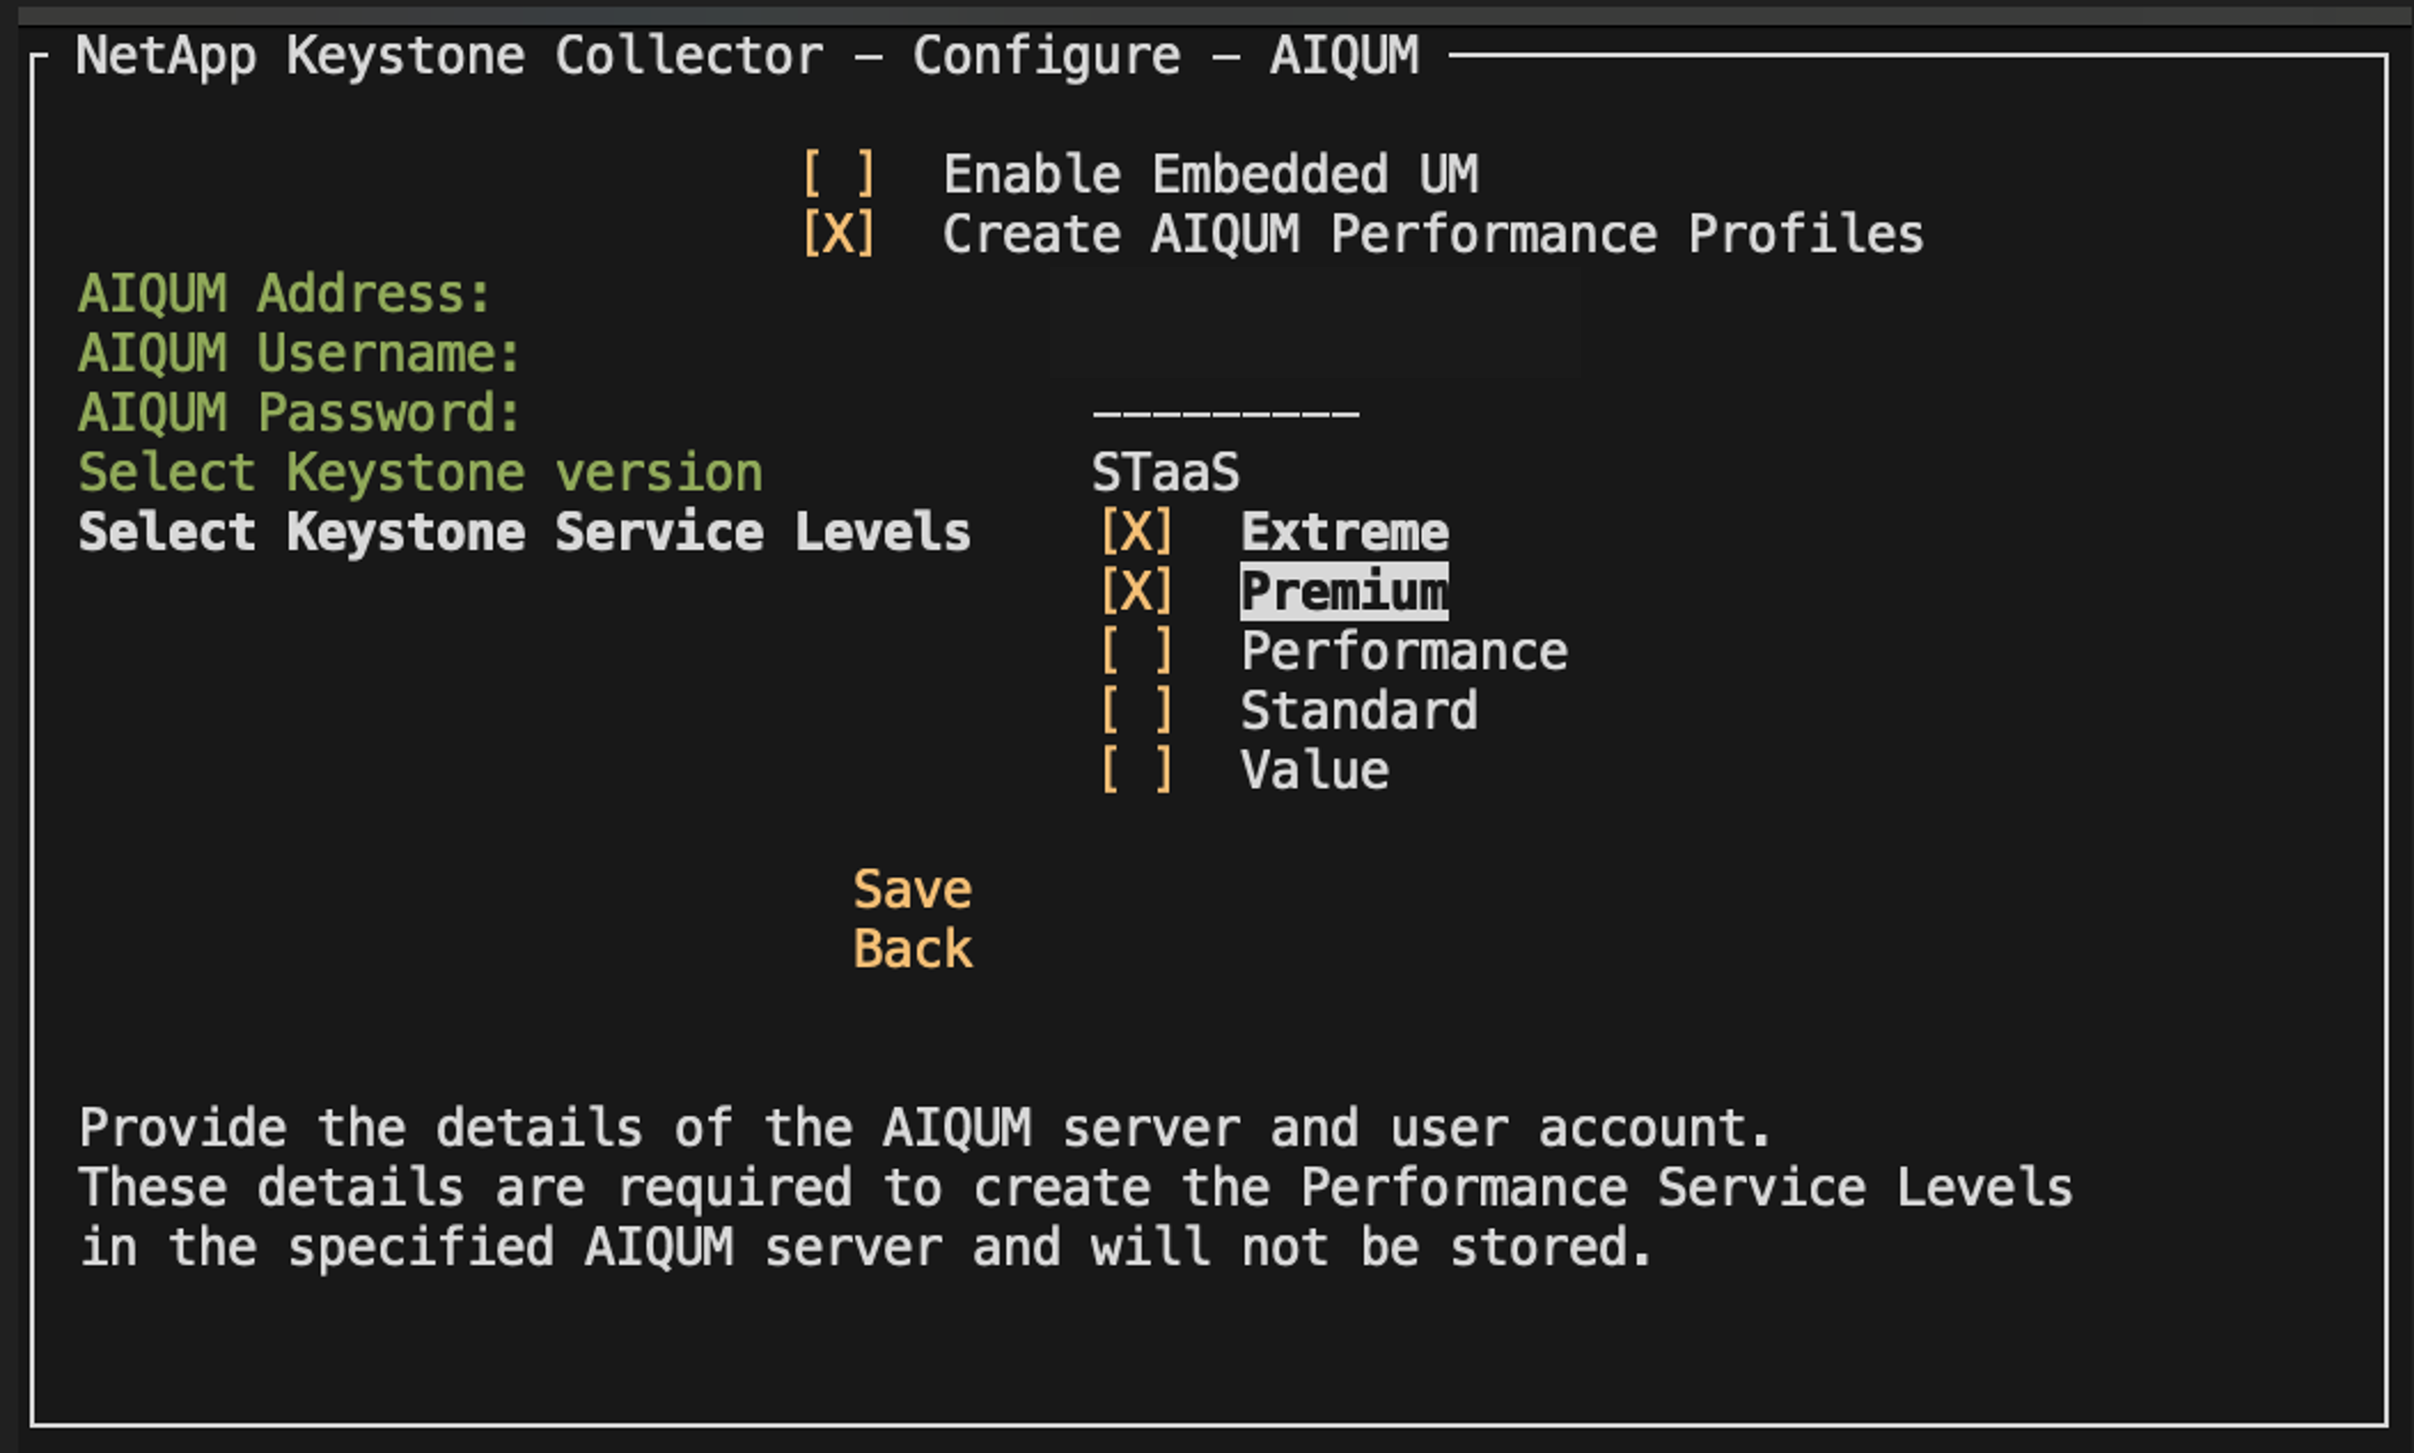
You can select multiple performance service levels simultaneously to create PSLs. -
Select Save and press Enter. Performance Service Levels will be created.
You can view the created PSLs, such as Premium-KS-STaaS for STaaS or Extreme KFS for KFS, on the Performance Service Levels page in Active IQ Unified Manager. If the created PSLs do not meet your requirements, then you can modify PSLs to meet your needs. To learn more, refer to Creating and editing Performance Service Levels.

|
If a PSL for the selected performance service level already exist on the specified Active IQ Unified Manger server, then you cannot create it again. If you attempt to do so, you will receive an error message.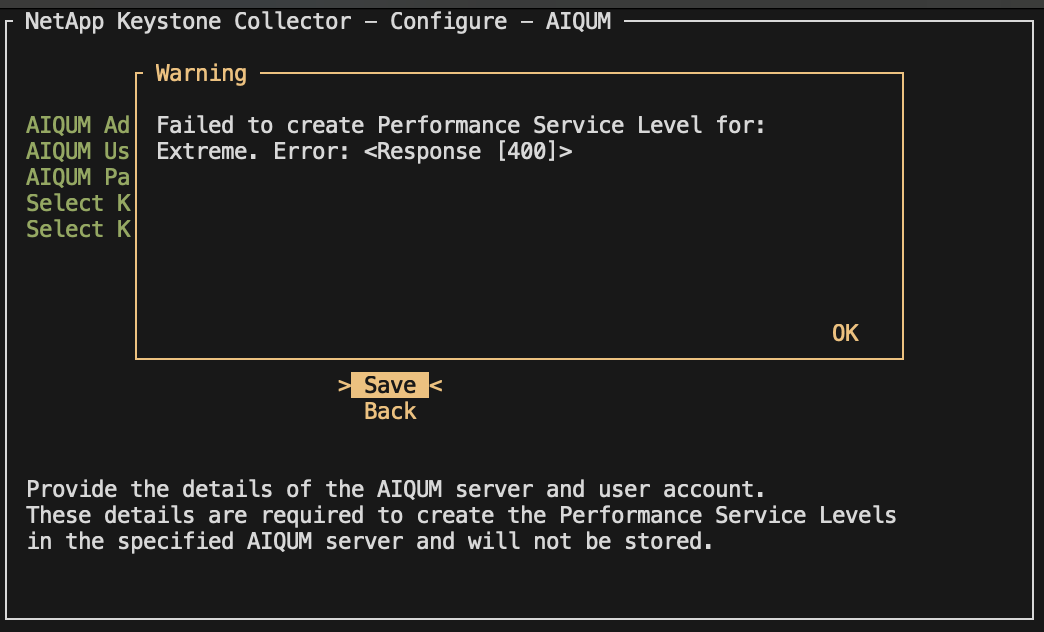
|