

 Best Practices

SAP HANA system refresh with SnapCenter
 Suggest changes
The following section provides a step-by-step description for the different system refresh operation options of an SAP HANA database.
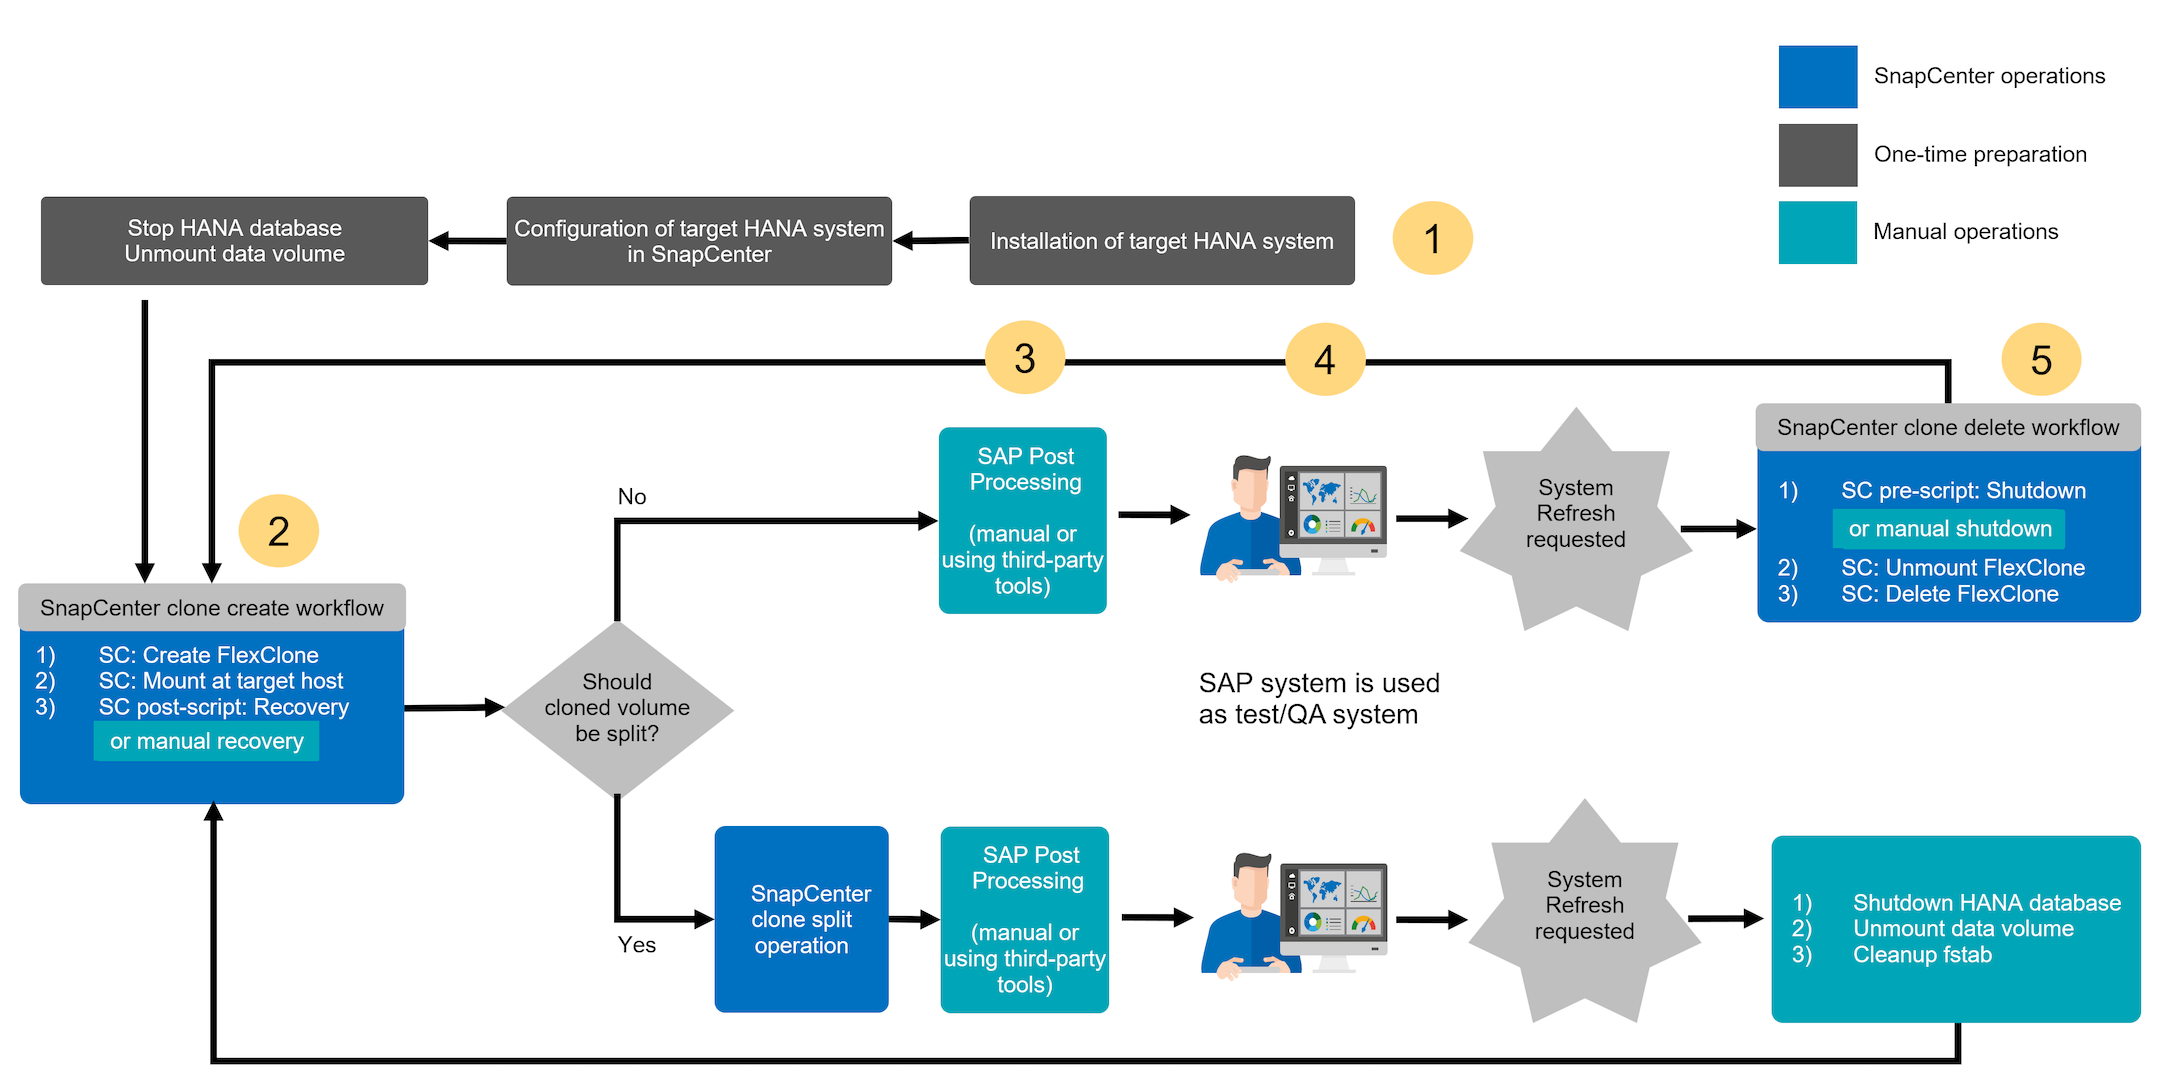
Depending on the SAP HANA database configuration additional steps are executed or need to be prepared. The table below provides a summary.
| Source system | Source system configuration | SnapCenter and SAP HANA operations |
|---|---|---|
MDC single tenant |
Standard configuration |
SnapCenter clone operation and optional recovery script execution. |
SAP HANA persistence encryption |
Initially, or if root keys have been changed at the source system, root key backup(s) must be imported at the target system before recovery can be executed. |
|
SAP HANA system replication source |
No additional steps required. If target system has no HSR configured it will stay a standalone system. |
|
SAP HANA multiple partitions |
No additional steps required, but mount points for SAP HANA volume partitions must be available at the target system with same naming convention (only SID is different). |
|
MDC multiple tenants or MDC single tenant |
Standard configuration |
SnapCenter clone operation and optional recovery script execution. Script recovers all tenants. If tenants or tenant names does not exist at the target system names, required directories will be automatically created during the SAP HANA recovery operation. Tenant names will be same as source and need to be renamed after recovery, if required. |
SAP HANA persistence encryption |
If a DBID of the source system does not exist before at the target system, the system database must be recovered first, before the root key backup of this tenant can be imported. |
|
HANA system replication source |
No additional steps required. If target system has no HSR configured it will stay a standalone system. |
|
HANA multiple partitions |
No additional steps required, but mount points for SAP HANA volume partitions must be available at the target system with same naming convention (only SID is different). |
Within this section, the following scenarios are covered.
-
SAP HANA system refresh without a clone split operation.
-
Cloning from primary storage with tenant name equal to the SID
-
Cloning from off-site backup storage
-
Cloning from primary storage with multiple tenants
-
Clone delete operation
-
SAP HANA system refresh with a clone split operation
-
Cloning from primary storage with tenant name equal to the SID
-
Clone split operation
Prerequisites and limitations
The workflows described in the following sections have a few prerequisites and limitations regarding the SAP HANA system architecture and the SnapCenter configuration.
-
The described workflows are only valid for the SnapCenter 5.0 release or higher.
-
The described workflows are valid for single host SAP HANA MDC systems with single or multiple tenants. SAP HANA multiple host systems are not covered.
-
The SnapCenter SAP HANA plug-in must be deployed on the target host to enable SnapCenter auto discovery and the execution of automation scripts.
-
The workflows are valid for SAP HANA systems using NFS or FCP on physical hosts, or for virtual hosts using in-guest NFS mounts.
Lab setup
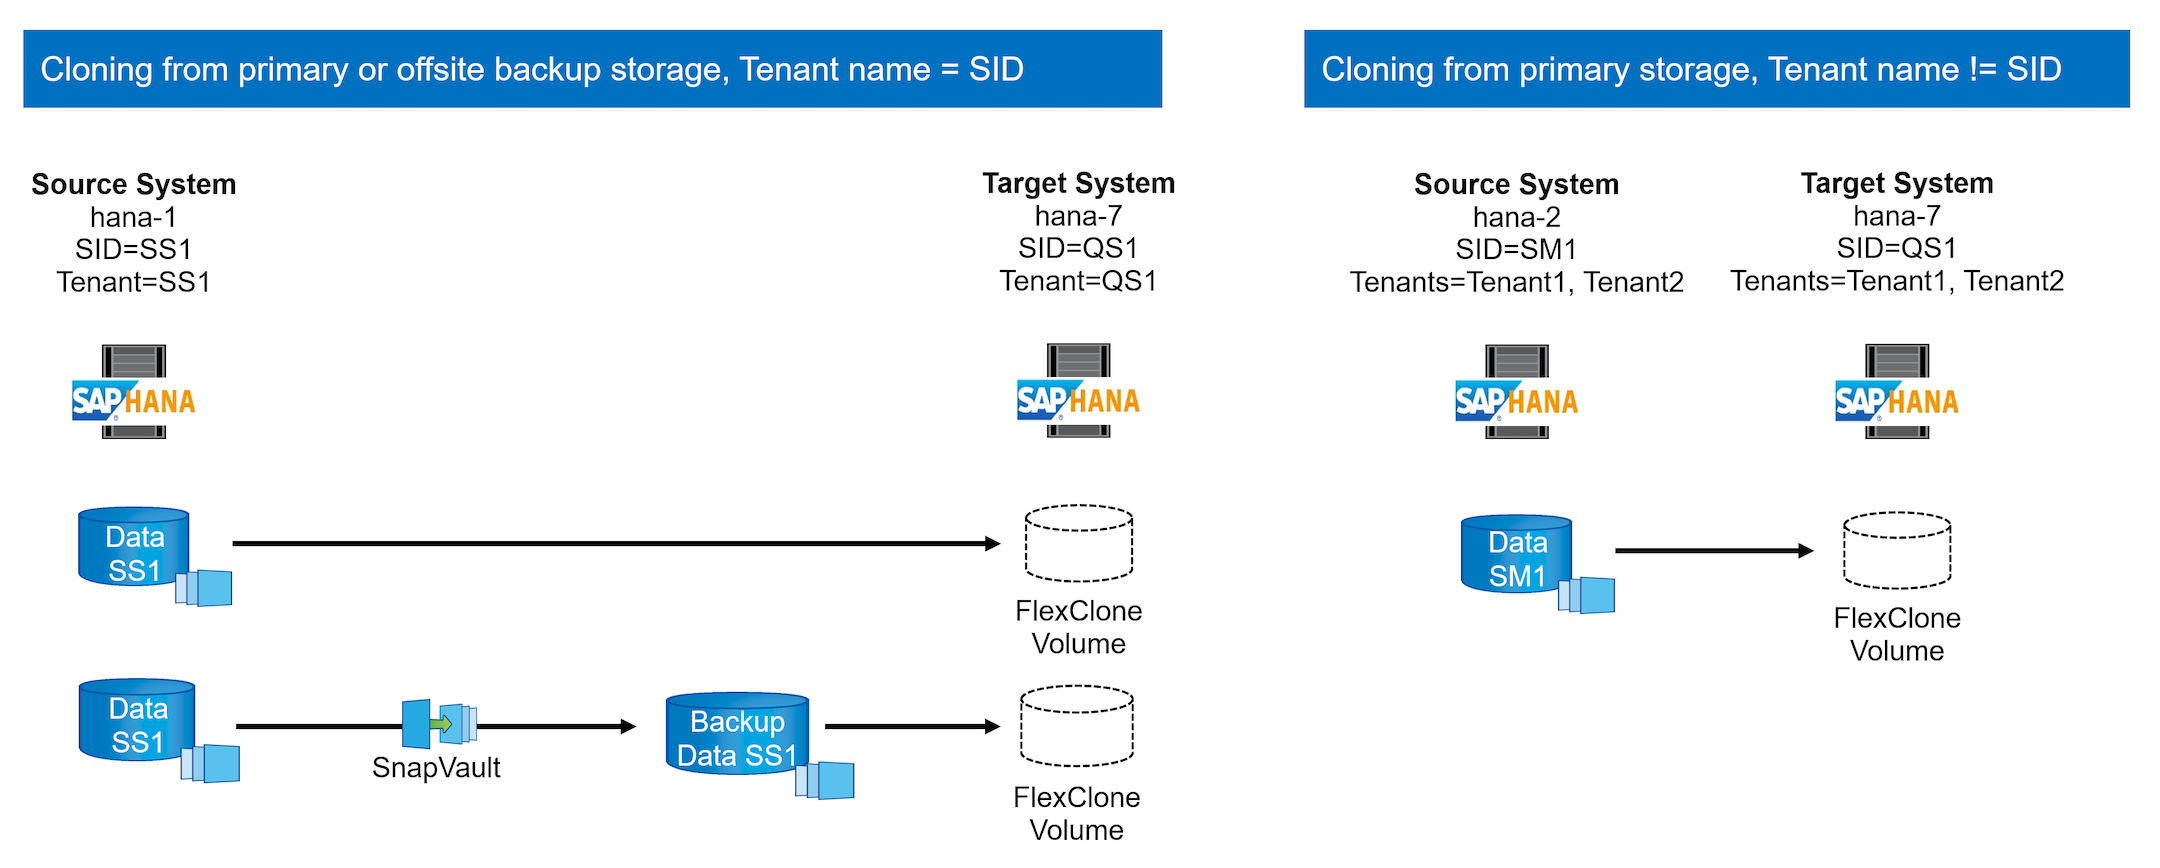
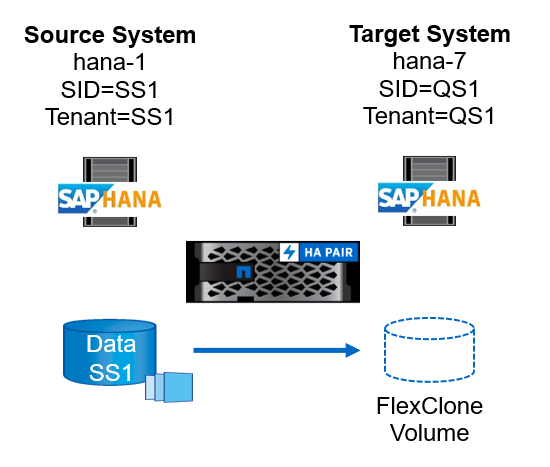
The figure below shows the lab setup that was used for the different system refresh operation options.
-
Cloning from primary storage or off-site backup storage; tenant name is equal to the SID.
-
Source SAP HANA system: SS1 with Tenant SS1
-
Target SAP HANA system: QS1 with Tenant QS1
-
-
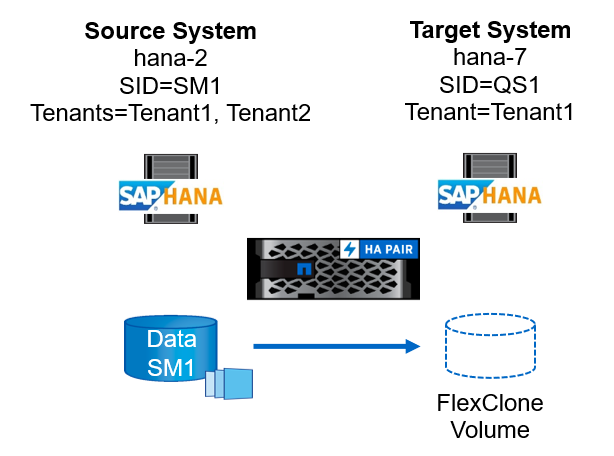
Cloning from primary storage; multiple tenants.
-
Source SAP HANA system: SM1 with Tenant1 and Tenant2
-
Target SAP HANA system: QS1 with Tenant1 and Tenant2
-
The following software versions were used:
-
SnapCenter 5.0
-
SAP HANA systems: HANA 2.0 SPS7 rev.73
-
SLES 15
-
ONTAP 9.14P1
All SAP HANA systems must be configured based on the configuration guide SAP HANA on NetApp AFF systems with NFS. SnapCenter and the SAP HANA resources were configured based on the best practice guide SAP HANA Backup and Recovery with SnapCenter.
Initial one-time preparation steps
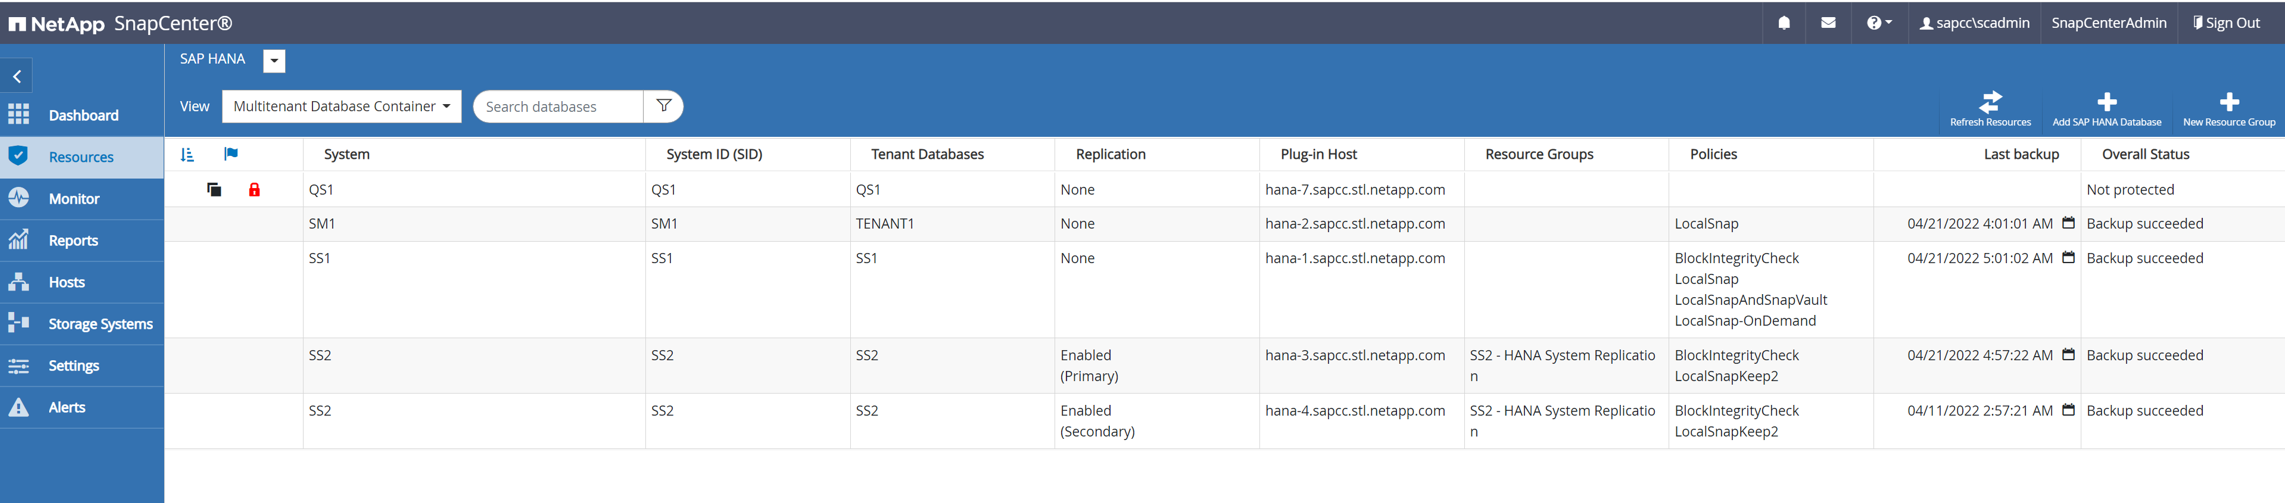
As an initial step, the target SAP HANA system must be configured within SnapCenter.
-
Installation of SAP HANA target system
-
Configuration of SAP HANA system in SnapCenter
as described in TR-4614: SAP HANA Backup and Recovery with SnapCenter-
Configuration of SAP HANA database user for SnapCenter backup operations
This user must be identical at the source and the target system. -
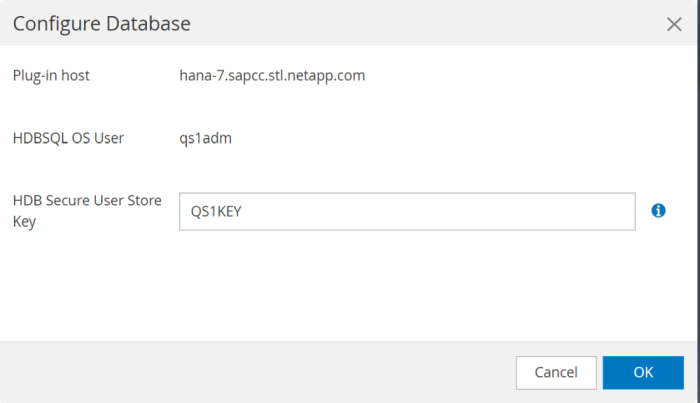
Configuration of hdbuserstore key for the <sid>adm with above backup user. If the automation script is used for recovery the key name must be <SID>KEY
-
Deployment of SnapCenter SAP HANA plug-in at target host. SAP HANA system is auto discovered by SnapCenter.
-
Configuration of SAP HANA resource protection (optional)
-
The first SAP system refresh operation after the initial installation is prepared with the following steps:
-
Shutdown target SAP HANA system
-
Unmount SAP HANA data volume.
You must add the scripts that should be executed at the target system to the SnapCenter allowed commands config file.
hana-7:/opt/NetApp/snapcenter/scc/etc # cat /opt/NetApp/snapcenter/scc/etc/allowed_commands.config
command: mount
command: umount
command: /mnt/sapcc-share/SAP-System-Refresh/sc-system-refresh.sh
hana-7:/opt/NetApp/snapcenter/scc/etc #
Cloning from primary storage with tenant name equal to SID
This section describes the SAP HANA system refresh workflow where the tenant name at the source and the target system is identical to the SID. The storage cloning is executed at the primary storage and the recovery is automated with the script sc-system-refresh.sh.
The workflow consists of the following steps:
-
If SAP HANA persistence encryption is enabled at the source system, the encryption root keys must be imported once. An import is also required if the keys have been changed at the source system. See chapter “Considerations for SAP HANA system refresh operations using storage snapshot backups”
-
If the target SAP HANA system has been protected in SnapCenter, the protection must be removed first.
-
SnapCenter clone create workflow.
-
Select Snapshot backup from the source SAP HANA system SS1.
-
Select target host and provide storage network interface of target host.
-
Provide SID of the target system, in our example QS1
-
Optionally, provide script for recovery as a post-clone operation.
-
-
SnapCenter cloning operation.
-
Creates FlexClone volume based on selected Snapshot backup of source SAP HANA system.
-
Exports FlexClone volume to target host storage network interface or igroup.
-
Executes mount operation of Mounts FlexClone volume at target host.
-
Executes post-clone operation recovery script, if configured before. Otherwise, recovery needs to be done manually when SnapCenter workflow is finished.
-
Recovery of system database.
-
Recovery of tenant database with tenant name = QS1.
-
-
-
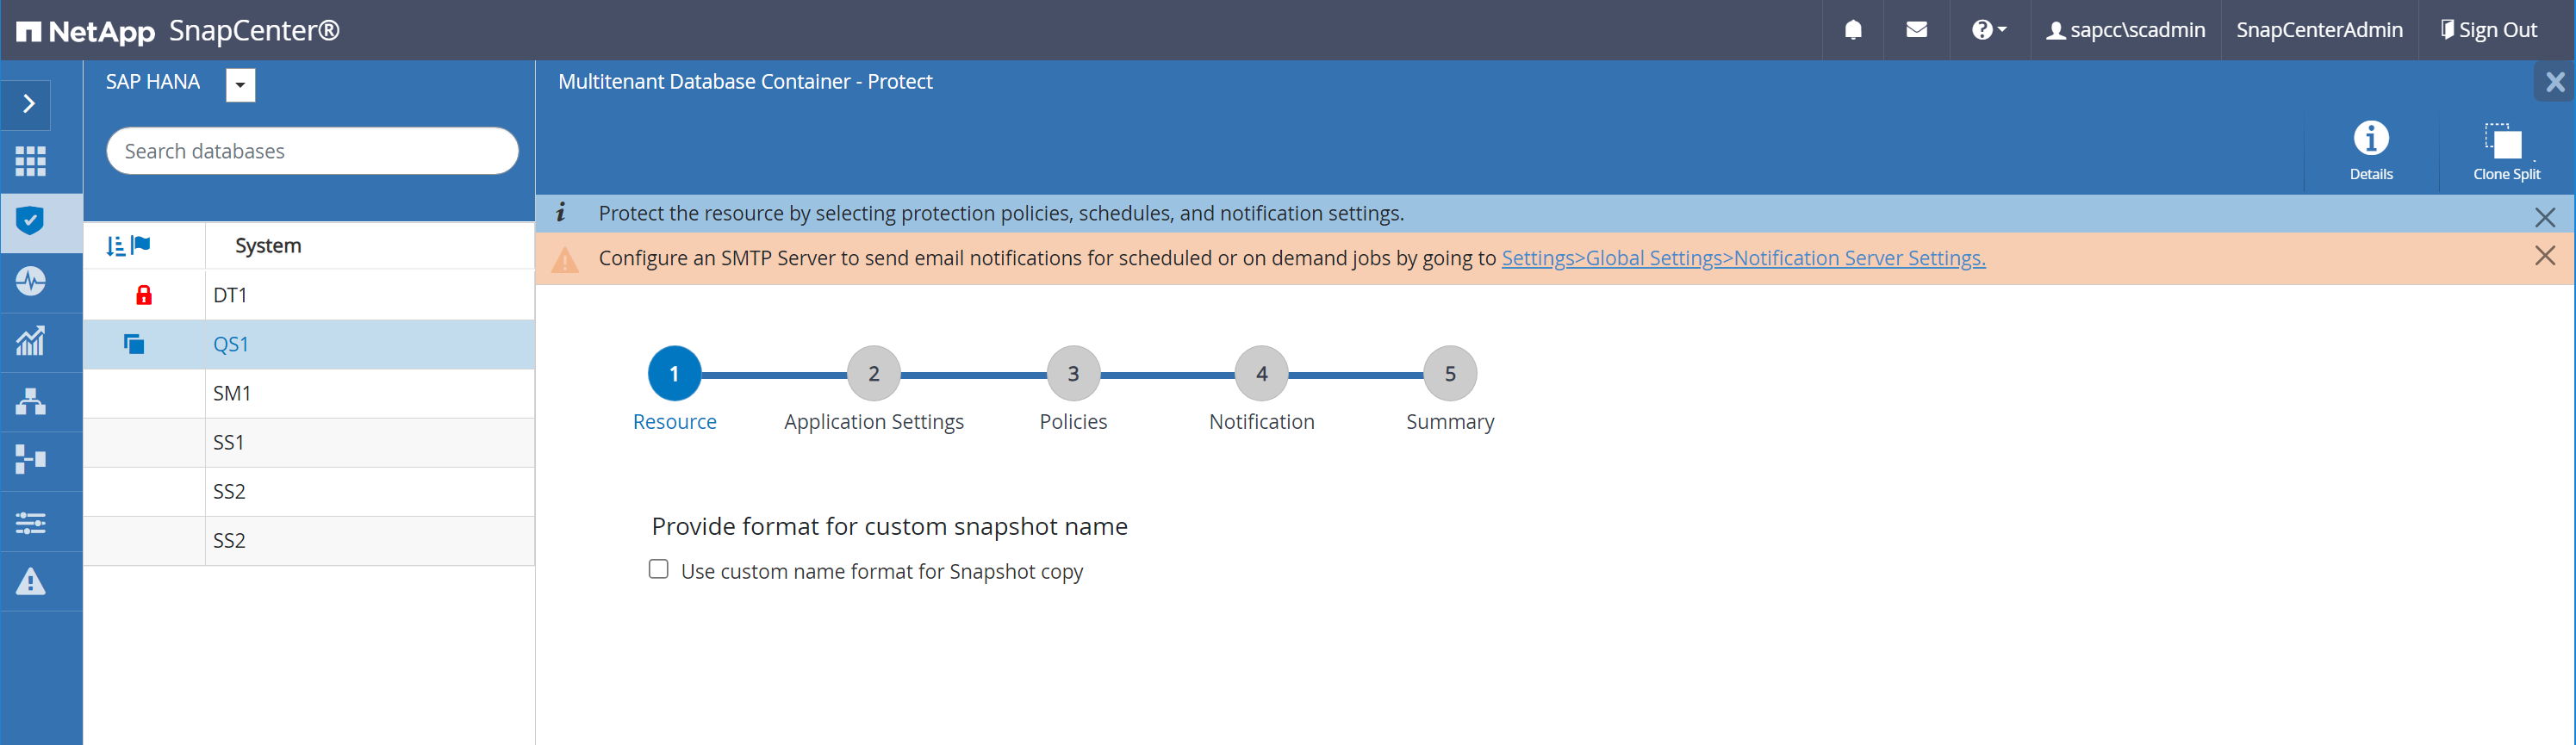
Optionally, protect the target SAP HANA resource in SnapCenter.
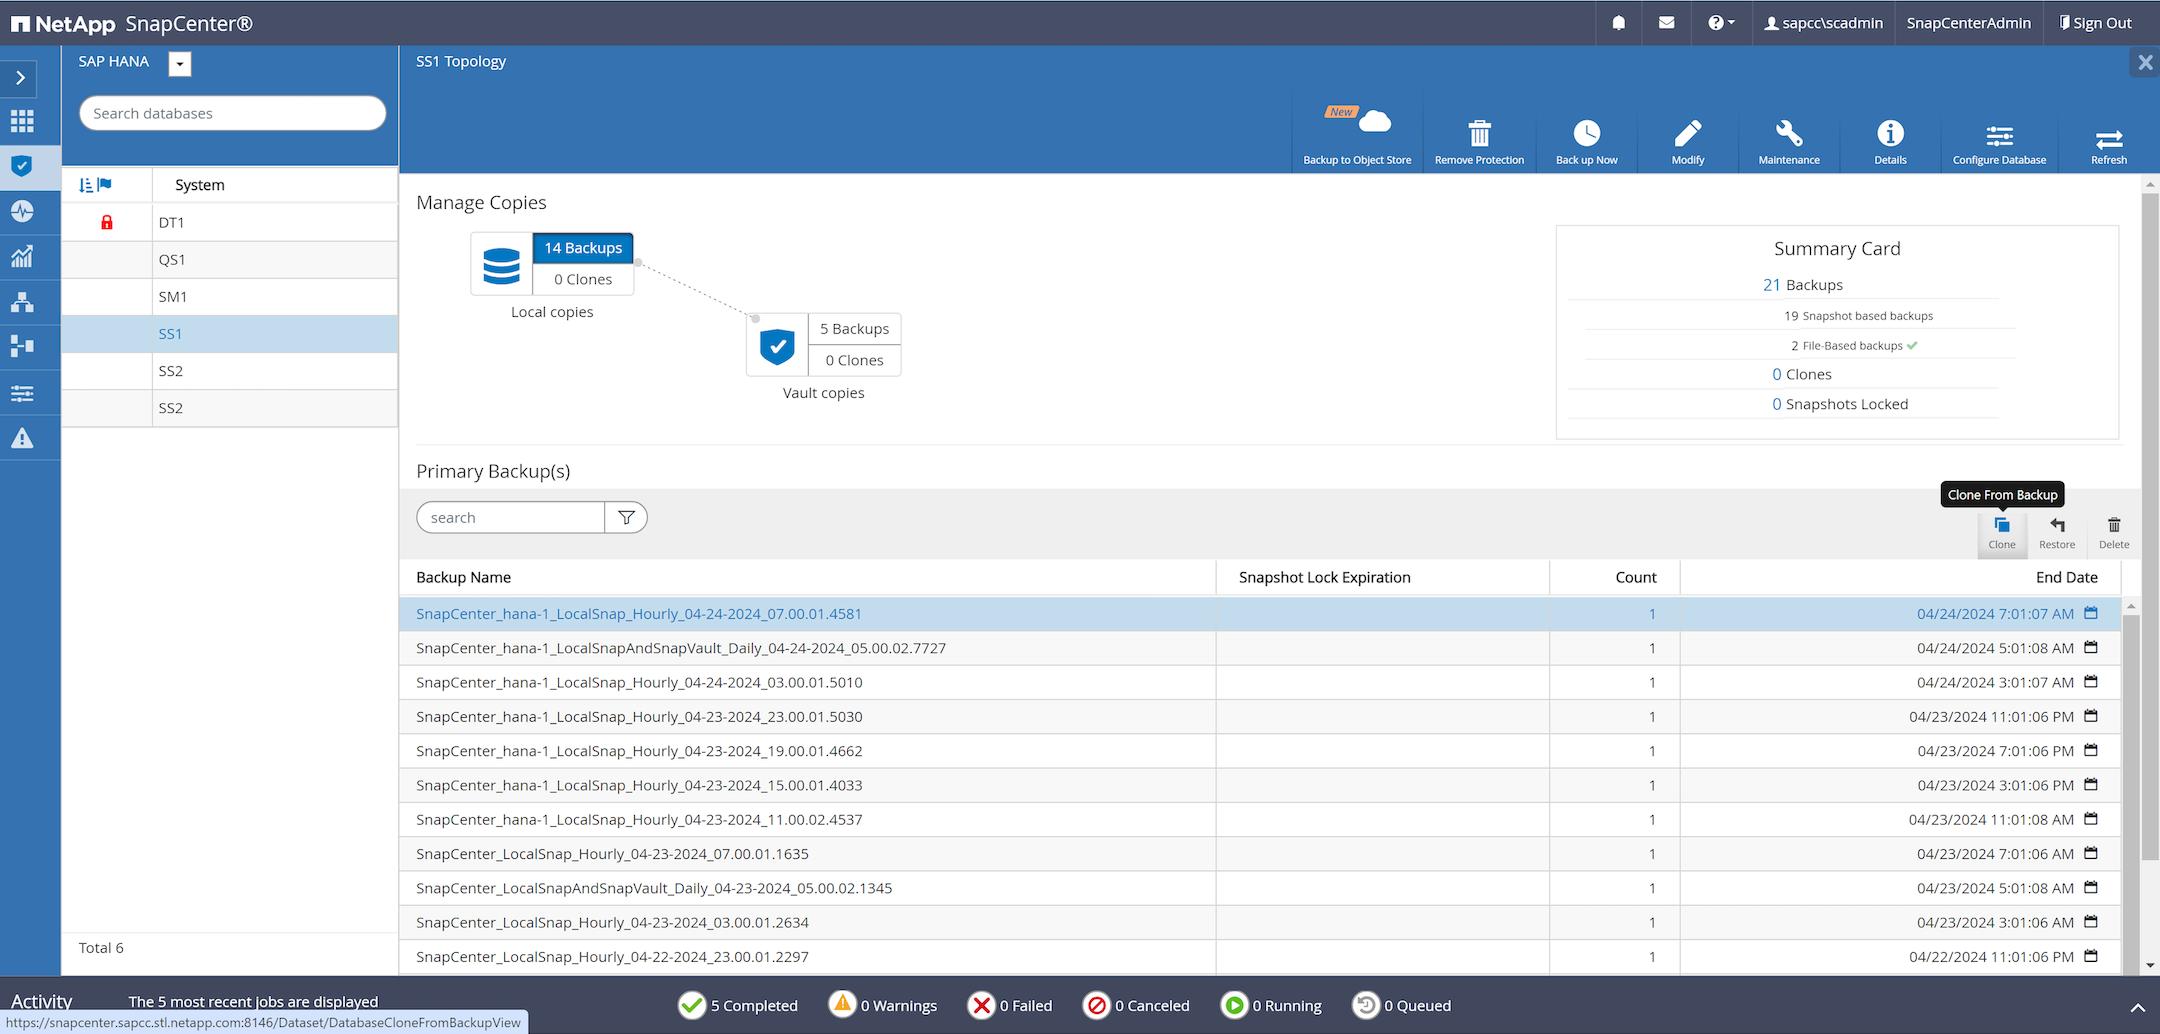
The following screenshots show the required steps.
-
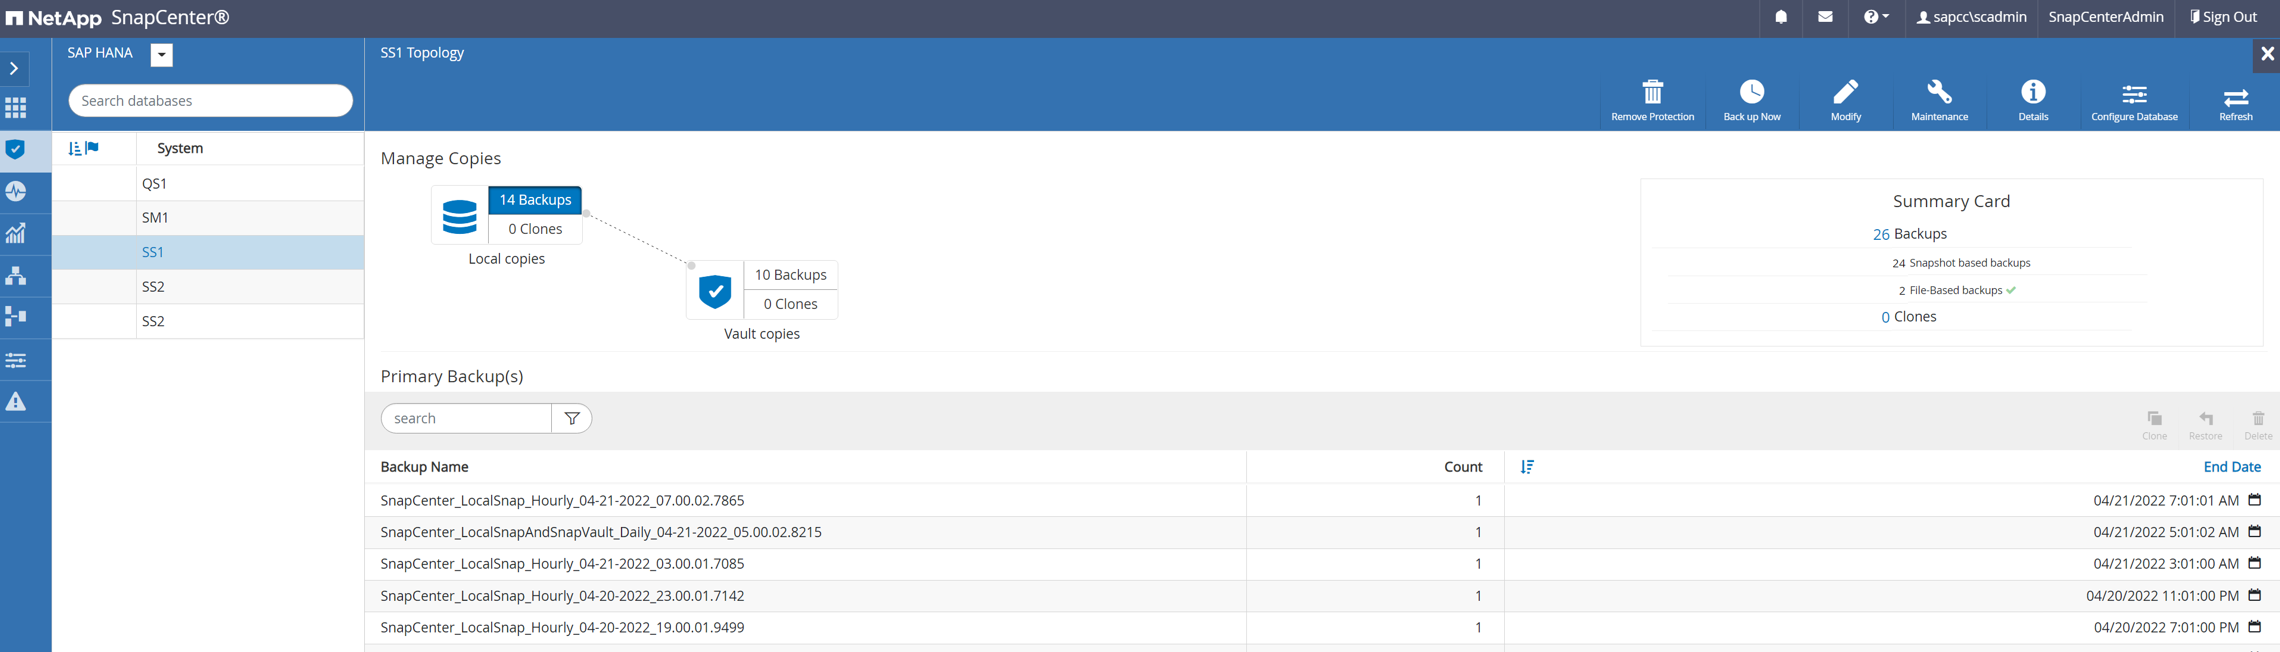
Select a Snapshot backup from the source system SS1 and click Clone.
-
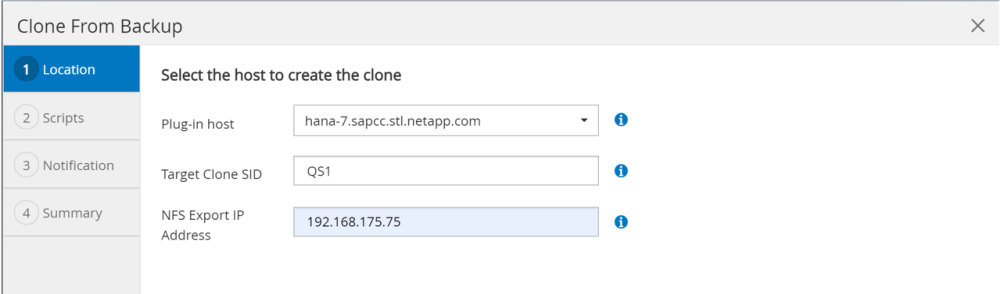
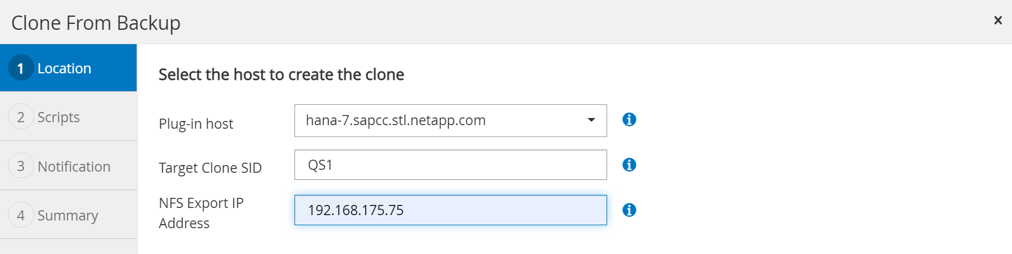
Select the host where the target system QS1 is installed. Enter QS1 as the target SID. The NFS export IP address must be the storage network interface of the target host.

The target SID which is entered controls how SnapCenter manages the cloned resource. If a resource with the target SID is already configured in SnapCenter and matches the plug-in host, SnapCenter just assigns the clone to this resource. If the SID is not configured on the target host, SnapCenter creates a new resource.
It is crucial that the target system resource and host has been configured in SnapCenter before you start the cloning workflow. Otherwise, the new resource created by SnapCenter will not support auto discovery and the described workflows won’t work.
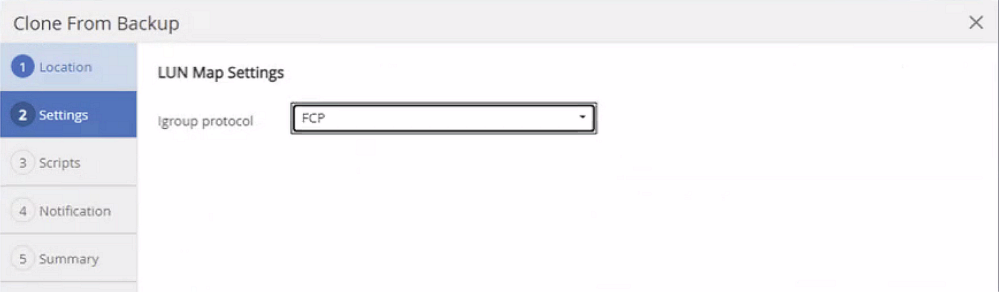
In a Fibre Channel SAN setup, no export IP address is required, but you need to provide the used protocol in the next screen.
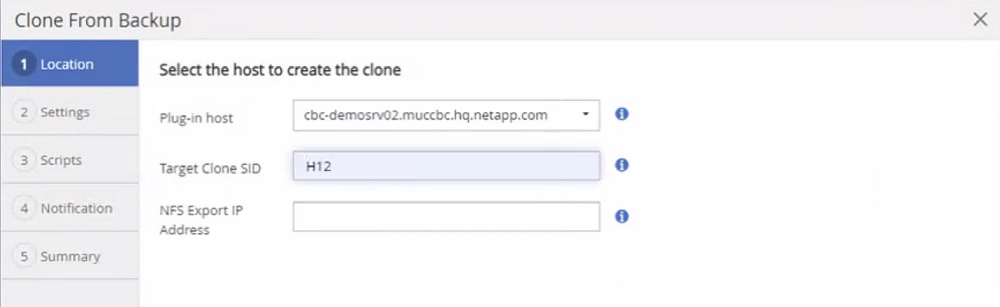
|
|
The screenshots show a different lab setup using a FibreChannel connectivity. |
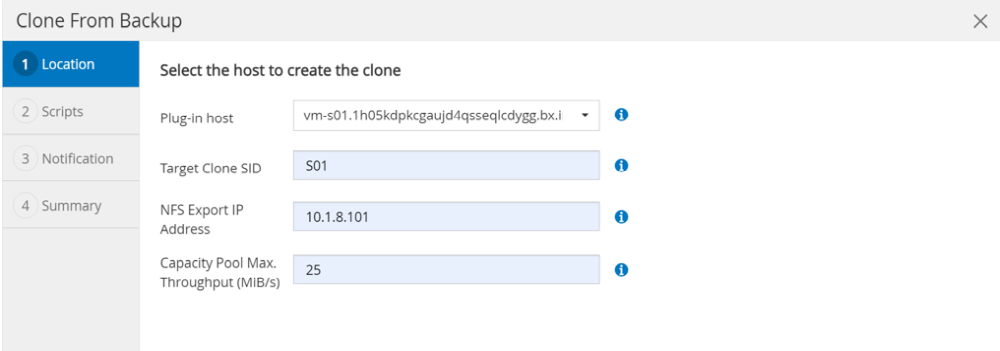
With Azure NetApp Files and a manual QoS capacity pool, you need to provide the maximum throughput for the new volume. Make sure that the capacity pool has enough headroom, otherwise the cloning workflow will fail.
|
|
The screenshots show a different lab setup running in Microsoft Azure with Azure NetApp Files. |
-
Enter the optional post-clone scripts with the required command-line options. With our example we use a post clone script to execute the SAP HANA database recovery.
|
|
As discussed before, the usage of the recovery script is optional. The recovery can also be done manually after the SnapCenter cloning workflow is finished. |
|
|
The script for the recovery operation recovers the SAP HANA database to the point in time of the Snapshot using the clear logs operation and does not execute any forward recovery. If a forward recovery to a specific point in time is required, the recovery must be performed manually. A manual forward recovery also requires that the log backups from the source system are available at the target host. |
-
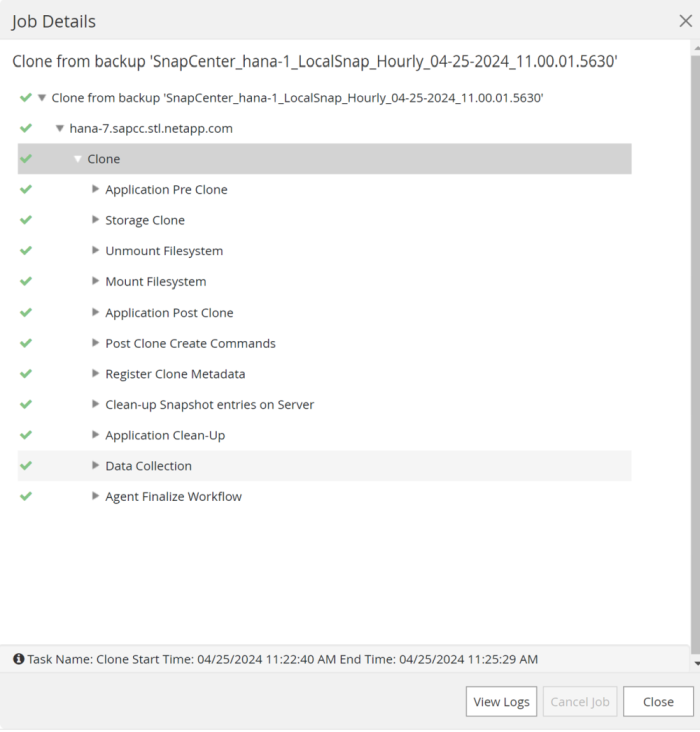
The Job Details screen in SnapCenter shows the progress of the operation. The job details also show that the overall runtime including database recovery has been less than 3 minutes.
-
The logfile of the
sc-system-refreshscript shows the different steps that were executed for the recovery operation. The script reads the list of tenants from the system database and executes a recovery of all existing tenants.
20240425112328###hana-7###sc-system-refresh.sh: Script version: 3.0
hana-7:/mnt/sapcc-share/SAP-System-Refresh # cat sap-system-refresh-QS1.log
20240425112328###hana-7###sc-system-refresh.sh: ******************* Starting script: recovery operation **************************
20240425112328###hana-7###sc-system-refresh.sh: Recover system database.
20240425112328###hana-7###sc-system-refresh.sh: /usr/sap/QS1/HDB11/exe/Python/bin/python /usr/sap/QS1/HDB11/exe/python_support/recoverSys.py --command "RECOVER DATA USING SNAPSHOT CLEAR LOG"
20240425112346###hana-7###sc-system-refresh.sh: Wait until SAP HANA database is started ....
20240425112347###hana-7###sc-system-refresh.sh: Status: YELLOW
20240425112357###hana-7###sc-system-refresh.sh: Status: YELLOW
20240425112407###hana-7###sc-system-refresh.sh: Status: YELLOW
20240425112417###hana-7###sc-system-refresh.sh: Status: YELLOW
20240425112428###hana-7###sc-system-refresh.sh: Status: YELLOW
20240425112438###hana-7###sc-system-refresh.sh: Status: YELLOW
20240425112448###hana-7###sc-system-refresh.sh: Status: GREEN
20240425112448###hana-7###sc-system-refresh.sh: HANA system database started.
20240425112448###hana-7###sc-system-refresh.sh: Checking connection to system database.
20240425112448###hana-7###sc-system-refresh.sh: /usr/sap/QS1/SYS/exe/hdb/hdbsql -U QS1KEY 'select * from sys.m_databases;'
DATABASE_NAME,DESCRIPTION,ACTIVE_STATUS,ACTIVE_STATUS_DETAILS,OS_USER,OS_GROUP,RESTART_MODE,FALLBACK_SNAPSHOT_CREATE_TIME
"SYSTEMDB","SystemDB-QS1-11","YES","","","","DEFAULT",?
"QS1","QS1-11","NO","ACTIVE","","","DEFAULT",?
2 rows selected (overall time 16.225 msec; server time 860 usec)
20240425112448###hana-7###sc-system-refresh.sh: Succesfully connected to system database.
20240425112449###hana-7###sc-system-refresh.sh: Tenant databases to recover: QS1
20240425112449###hana-7###sc-system-refresh.sh: Found inactive tenants(QS1) and starting recovery
20240425112449###hana-7###sc-system-refresh.sh: Recover tenant database QS1.
20240425112449###hana-7###sc-system-refresh.sh: /usr/sap/QS1/SYS/exe/hdb/hdbsql -U QS1KEY RECOVER DATA FOR QS1 USING SNAPSHOT CLEAR LOG
0 rows affected (overall time 22.138599 sec; server time 22.136268 sec)
20240425112511###hana-7###sc-system-refresh.sh: Checking availability of Indexserver for tenant QS1.
20240425112511###hana-7###sc-system-refresh.sh: Recovery of tenant database QS1 succesfully finished.
20240425112511###hana-7###sc-system-refresh.sh: Status: GREEN
20240425112511###hana-7###sc-system-refresh.sh: ******************* Finished script: recovery operation **************************
hana-7:/mnt/sapcc-share/SAP-System-Refresh
-
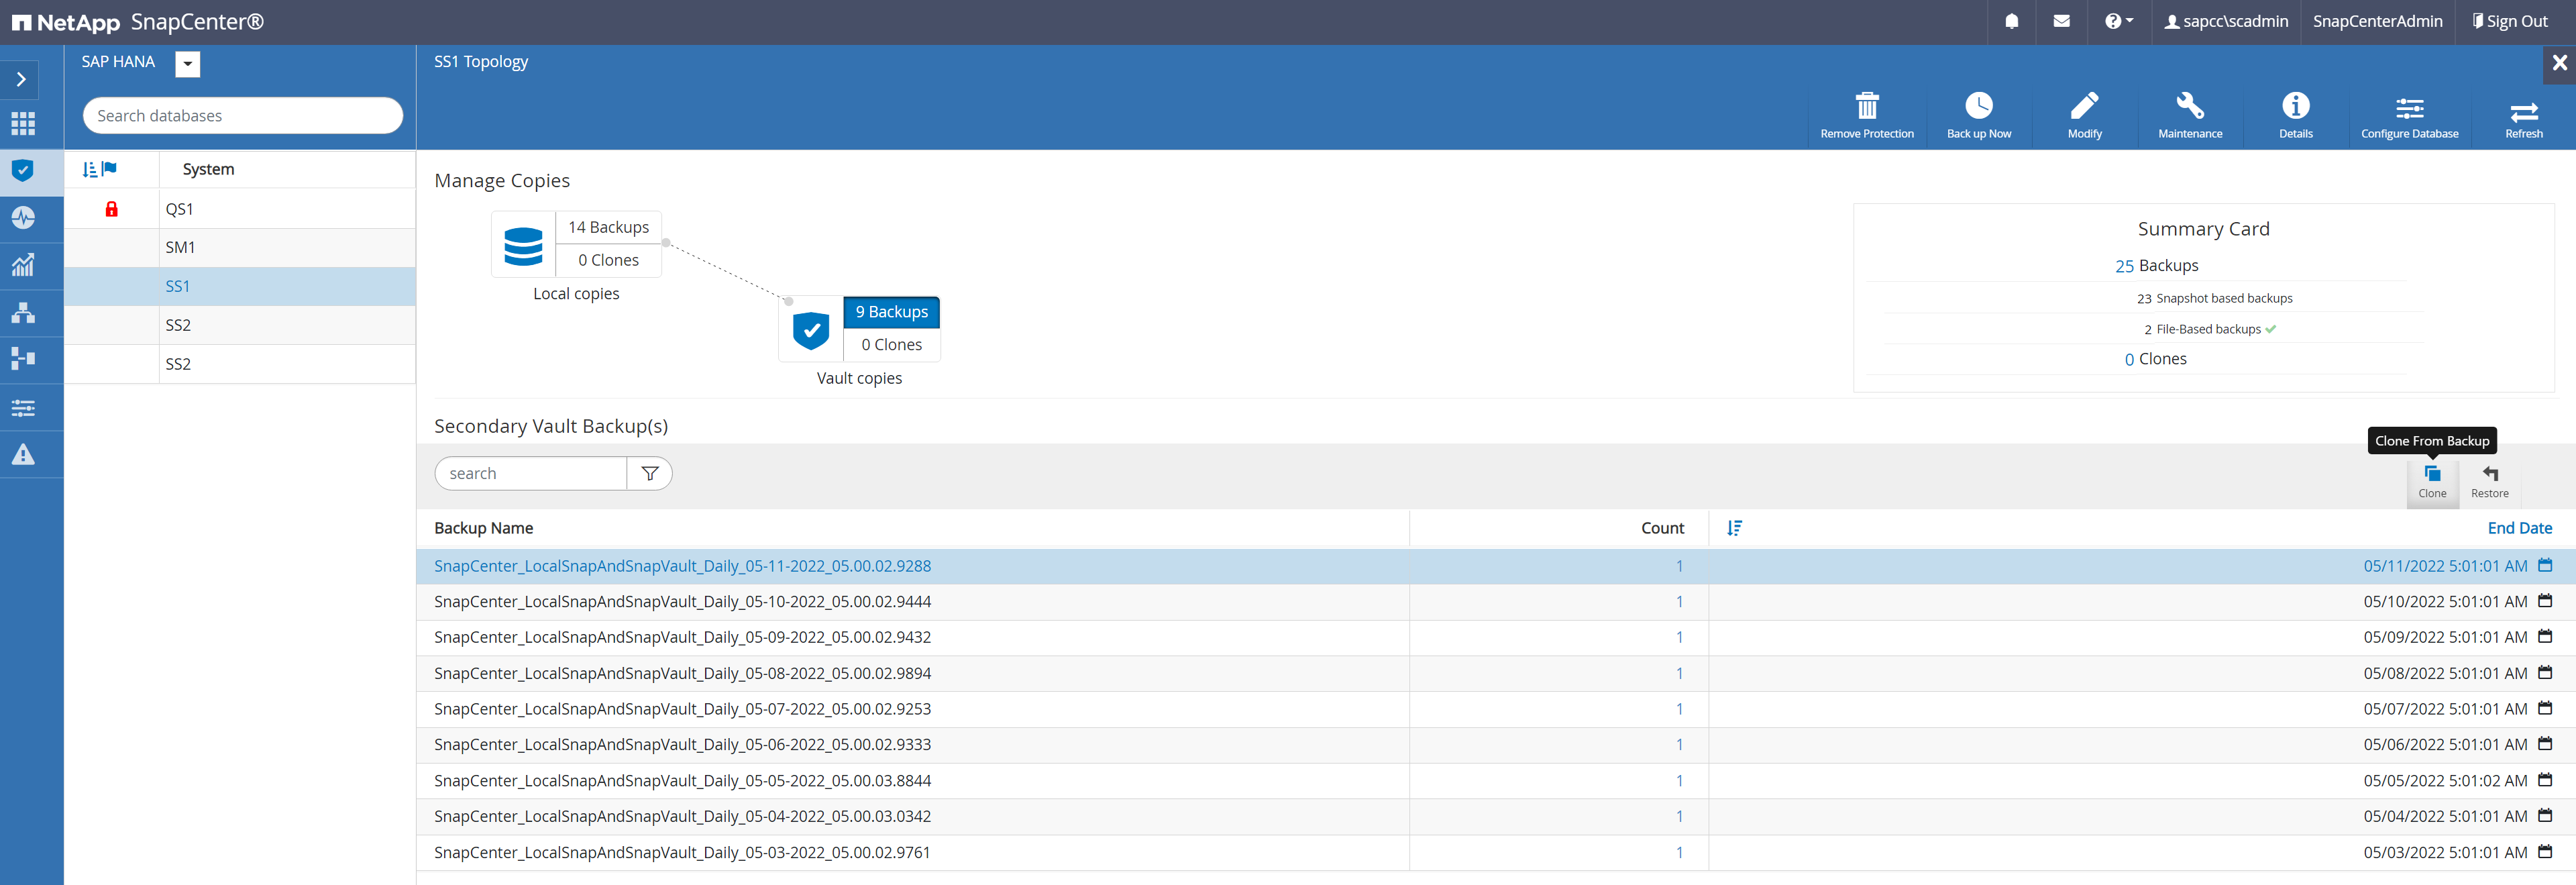
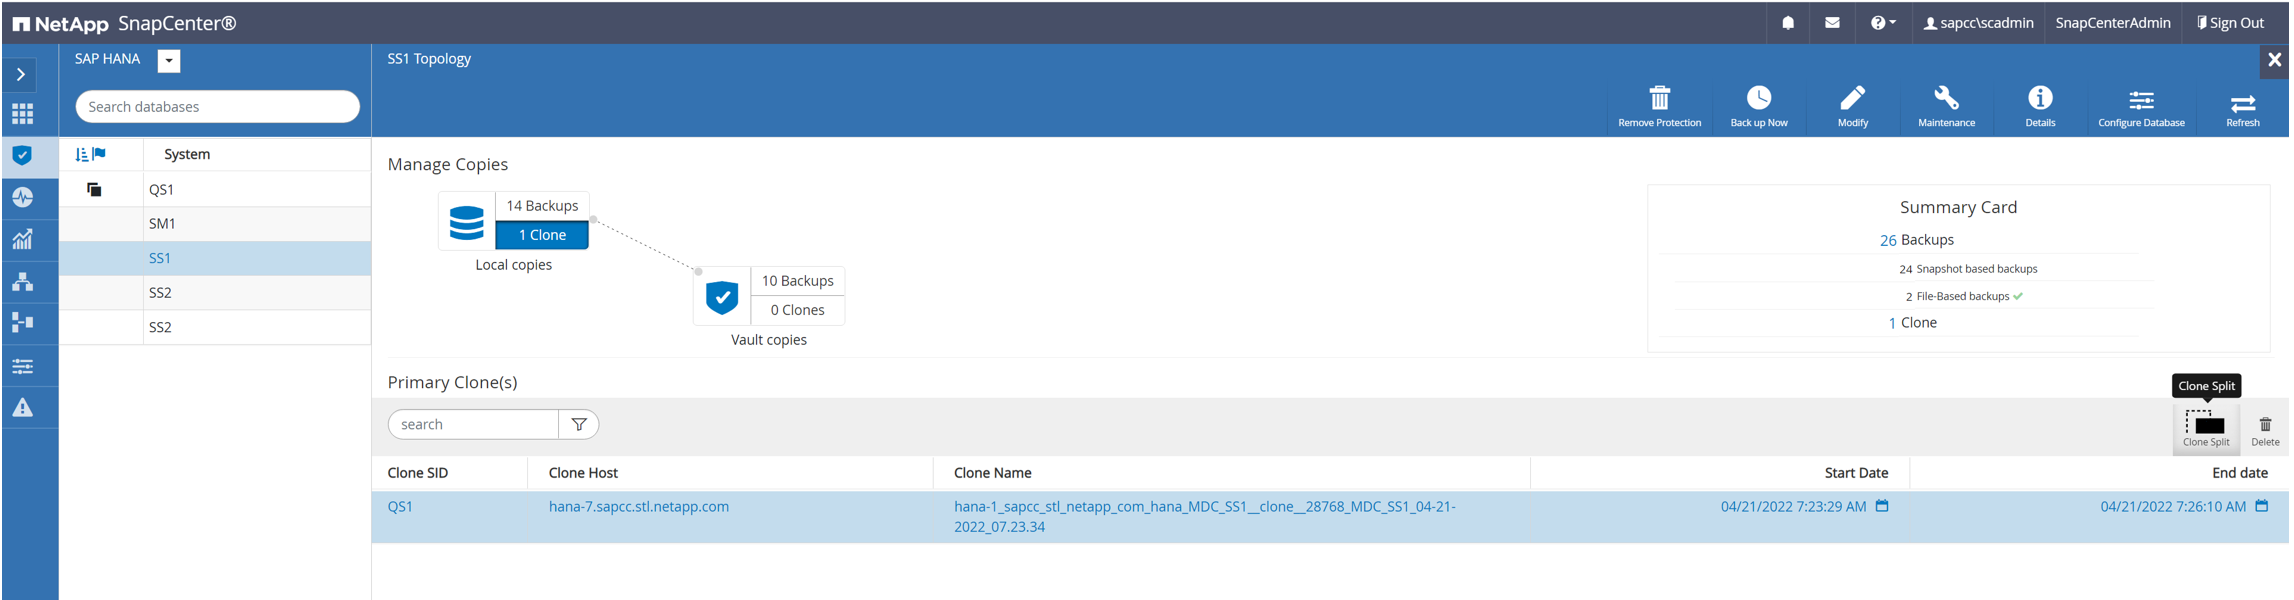
When the SnapCenter job is finished, the clone is visible within the topology view of the source system.
-
The SAP HANA database is now running.
-
If you want to protect the target SAP HANA system, you need to run the auto discovery by clicking on the target system resource.
When the auto discovery process is finished, the new cloned volume is listed in the storage footprint section.
By clicking on the resource again, data protection can be configured for the refreshed QS1 system.
Cloning from off-site backup storage
This section describes the SAP HANA system refresh workflow for which the tenant name at the source and the target system is identical to the SID. Storage cloning is executed at the off-site backup storage and further automated using the script sc-system-refresh.sh.

The only difference in the SAP HANA system refresh workflow between primary and off-site backup storage cloning is the selection of the Snapshot backup in SnapCenter. For off-site backup storage cloning, the secondary backups must be selected first, followed by the selection of the Snapshot backup.

If there are multiple secondary storage locations for the selected backup, you need to choose the required destination volume.
All subsequent steps are identical to the workflow for cloning from primary storage.
Cloning a SAP HANA system with multiple tenants
This section describes the SAP HANA system refresh workflow with multiple tenants. Storage cloning is executed at the primary storage and further automated using the script sc-system-refresh.sh.
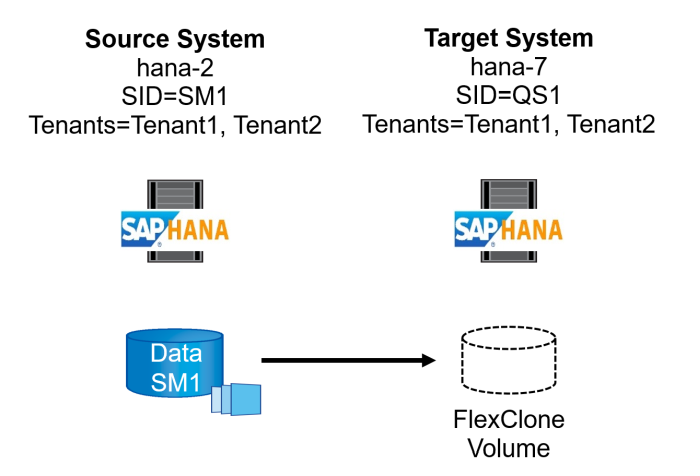
The required steps in SnapCenter are identical to what has been described in the section “Cloning from primary storage with tenant name equal to SID.” The only difference is in the tenant recovery operation within the script sc-system-refresh.sh, where all tenants are recovered.
20240430070214###hana-7###sc-system-refresh.sh: **********************************************************************************
20240430070214###hana-7###sc-system-refresh.sh: Script version: 3.0
20240430070214###hana-7###sc-system-refresh.sh: ******************* Starting script: recovery operation **************************
20240430070214###hana-7###sc-system-refresh.sh: Recover system database.
20240430070214###hana-7###sc-system-refresh.sh: /usr/sap/QS1/HDB11/exe/Python/bin/python /usr/sap/QS1/HDB11/exe/python_support/recoverSys.py --command "RECOVER DATA USING SNAPSHOT CLEAR LOG"
[140310725887808, 0.008] >> starting recoverSys (at Tue Apr 30 07:02:15 2024)
[140310725887808, 0.008] args: ()
[140310725887808, 0.008] keys: \{'command': 'RECOVER DATA USING SNAPSHOT CLEAR LOG'}
using logfile /usr/sap/QS1/HDB11/hana-7/trace/backup.log
recoverSys started: ============2024-04-30 07:02:15 ============
testing master: hana-7
hana-7 is master
shutdown database, timeout is 120
stop system
stop system on: hana-7
stopping system: 2024-04-30 07:02:15
stopped system: 2024-04-30 07:02:15
creating file recoverInstance.sql
restart database
restart master nameserver: 2024-04-30 07:02:20
start system: hana-7
sapcontrol parameter: ['-function', 'Start']
sapcontrol returned successfully:
2024-04-30T07:02:32-04:00 P0023828 18f2eab9331 INFO RECOVERY RECOVER DATA finished successfully
recoverSys finished successfully: 2024-04-30 07:02:33
[140310725887808, 17.548] 0
[140310725887808, 17.548] << ending recoverSys, rc = 0 (RC_TEST_OK), after 17.540 secs
20240430070233###hana-7###sc-system-refresh.sh: Wait until SAP HANA database is started ....
20240430070233###hana-7###sc-system-refresh.sh: Status: GRAY
20240430070243###hana-7###sc-system-refresh.sh: Status: GRAY
20240430070253###hana-7###sc-system-refresh.sh: Status: GRAY
20240430070304###hana-7###sc-system-refresh.sh: Status: GRAY
20240430070314###hana-7###sc-system-refresh.sh: Status: GREEN
20240430070314###hana-7###sc-system-refresh.sh: HANA system database started.
20240430070314###hana-7###sc-system-refresh.sh: Checking connection to system database.
20240430070314###hana-7###sc-system-refresh.sh: /usr/sap/QS1/SYS/exe/hdb/hdbsql -U QS1KEY 'select * from sys.m_databases;'
20240430070314###hana-7###sc-system-refresh.sh: Succesfully connected to system database.
20240430070314###hana-7###sc-system-refresh.sh: Tenant databases to recover: TENANT2
TENANT1
20240430070314###hana-7###sc-system-refresh.sh: Found inactive tenants(TENANT2
TENANT1) and starting recovery
20240430070314###hana-7###sc-system-refresh.sh: Recover tenant database TENANT2.
20240430070314###hana-7###sc-system-refresh.sh: /usr/sap/QS1/SYS/exe/hdb/hdbsql -U QS1KEY RECOVER DATA FOR TENANT2 USING SNAPSHOT CLEAR LOG
20240430070335###hana-7###sc-system-refresh.sh: Checking availability of Indexserver for tenant TENANT2.
20240430070335###hana-7###sc-system-refresh.sh: Recovery of tenant database TENANT2 succesfully finished.
20240430070335###hana-7###sc-system-refresh.sh: Status: GREEN
20240430070335###hana-7###sc-system-refresh.sh: Recover tenant database TENANT1.
20240430070335###hana-7###sc-system-refresh.sh: /usr/sap/QS1/SYS/exe/hdb/hdbsql -U QS1KEY RECOVER DATA FOR TENANT1 USING SNAPSHOT CLEAR LOG
20240430070349###hana-7###sc-system-refresh.sh: Checking availability of Indexserver for tenant TENANT1.
20240430070350###hana-7###sc-system-refresh.sh: Recovery of tenant database TENANT1 succesfully finished.
20240430070350###hana-7###sc-system-refresh.sh: Status: GREEN
20240430070350###hana-7###sc-system-refresh.sh: ******************* Finished script: recovery operation **************************
Clone delete operation
A new SAP HANA system refresh operation is started by cleaning up the target system using the SnapCenter clone delete operation.
If the target SAP HANA system has been protected in SnapCenter, the protection must be removed first. Within the topology view of the target system, click Remove Protection.
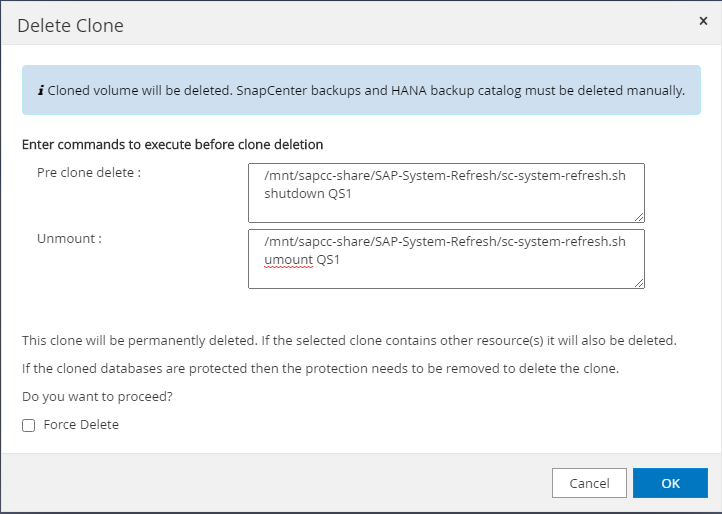
The clone delete workflow is now executed with the following steps.
-
Select the clone within the topology view of the source system and click Delete.
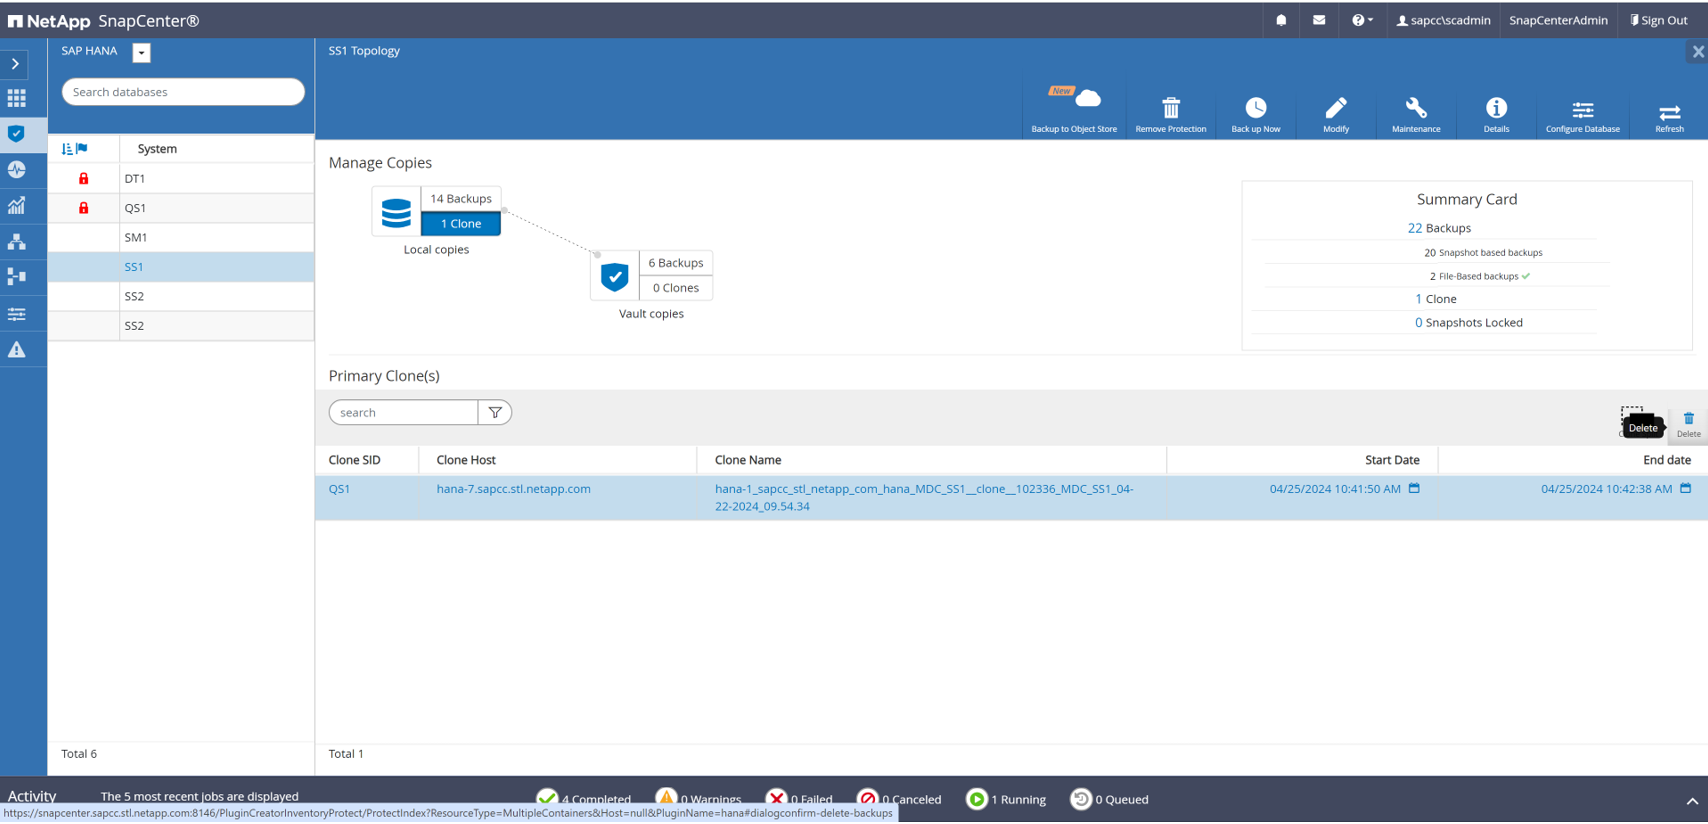
-
Enter the pre-clone and unmount scripts with the required command line options.
-
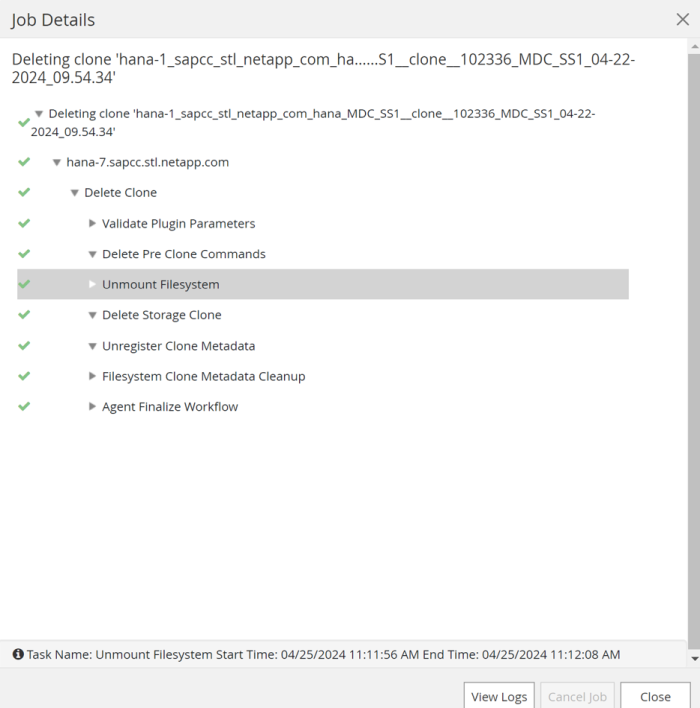
The job details screen in SnapCenter shows the progress of the operation.
-
The log file of the
sc-system-refreshscript shows the shutdown and unmount operation steps.
20240425111042###hana-7###sc-system-refresh.sh: **********************************************************************************
20240425111042###hana-7###sc-system-refresh.sh: Script version: 3.0
20240425111042###hana-7###sc-system-refresh.sh: ******************* Starting script: shutdown operation **************************
20240425111042###hana-7###sc-system-refresh.sh: Stopping HANA database.
20240425111042###hana-7###sc-system-refresh.sh: sapcontrol -nr 11 -function StopSystem HDB
25.04.2024 11:10:42
StopSystem
OK
20240425111042###hana-7###sc-system-refresh.sh: Wait until SAP HANA database is stopped ....
20240425111042###hana-7###sc-system-refresh.sh: Status: GREEN
20240425111052###hana-7###sc-system-refresh.sh: Status: YELLOW
20240425111103###hana-7###sc-system-refresh.sh: Status: YELLOW
20240425111113###hana-7###sc-system-refresh.sh: Status: YELLOW
20240425111123###hana-7###sc-system-refresh.sh: Status: YELLOW
20240425111133###hana-7###sc-system-refresh.sh: Status: YELLOW
20240425111144###hana-7###sc-system-refresh.sh: Status: YELLOW
20240425111154###hana-7###sc-system-refresh.sh: Status: GRAY
20240425111154###hana-7###sc-system-refresh.sh: SAP HANA database is stopped.
20240425111154###hana-7###sc-system-refresh.sh: ******************* Finished script: shutdown operation **************************
-
The SAP HANA refresh operation can now be started again using the SnapCenter clone create operation.
SAP HANA system refresh with clone split operation
If the target system of the system refresh operation is planned to be used for a longer timeframe, it makes sense to split the FlexClone volume as part of the system refresh operation.
|
|
The clone split operation does not block the use of the cloned volume and can therefore be executed at any time while the SAP HANA database is in use. |
|
|
With Azure NetApp Files, the clone split operation is not available, since Azure NetApp Files always splits the clone after creation. |
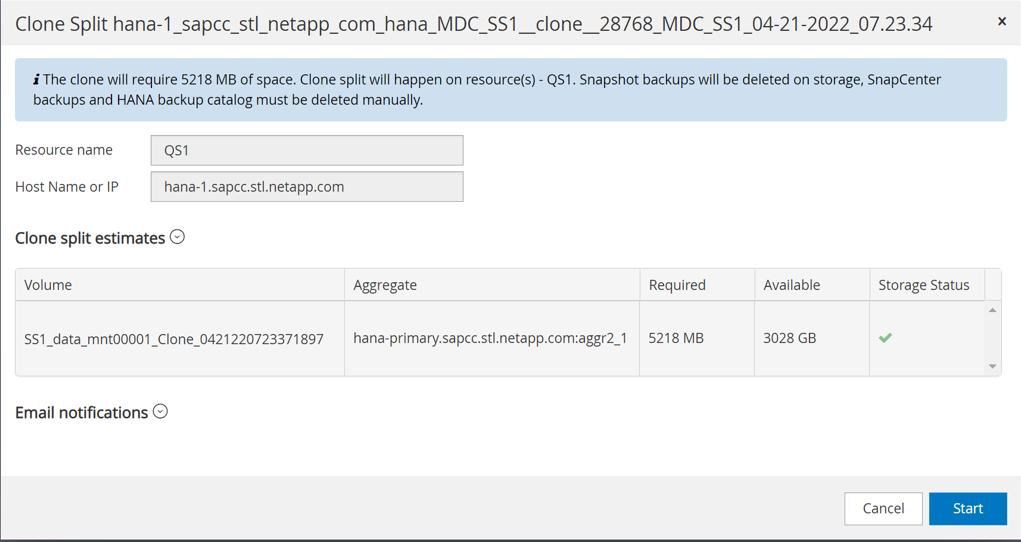
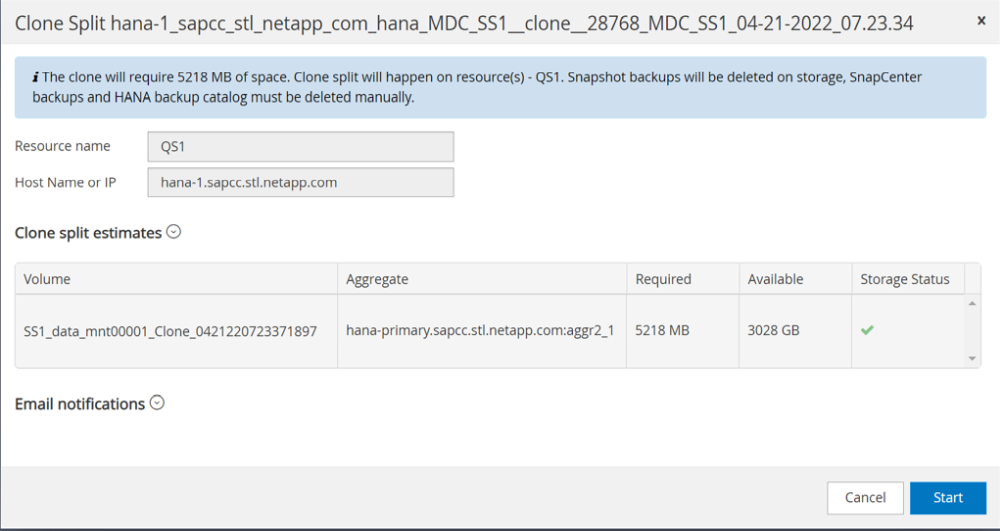
The clone split workflow in SnapCenter is initiated in the topology view of the source system by selecting the clone and clicking on clone split.
A preview is shown in the next screen, which provides information on the required capacity for the split volume.
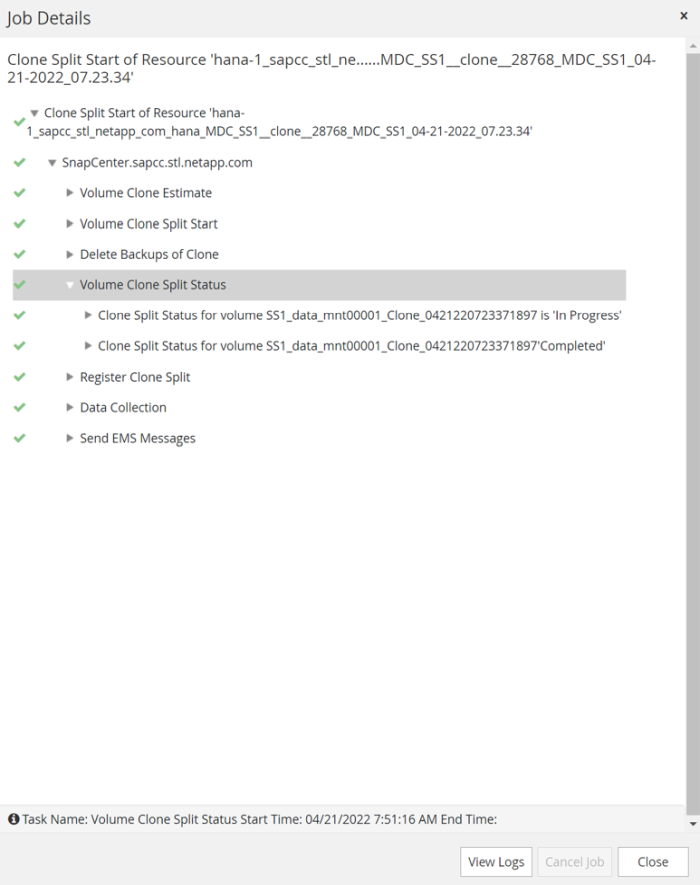
The SnapCenter job log shows the progress of the clone split operation.
In the resource view in SnapCenter the target system QS1 is now not marked as a cloned resource anymore. When going back to the topology view of the source system, the clone is not visible anymore. The split volume is now independent from the Snapshot backup of the source system.
The refresh workflow after a clone split operation looks slightly different than the operation without clone split. After a clone split operation, there is no clone delete operation required, because the target data volume is not a FlexClone volume anymore.
The workflow consists of the following steps:
-
If the target SAP HANA system has been protected in SnapCenter, the protection must be removed first.
-
The SAP HANA database must be shut down, the data volume must be unmounted and the fstab entry created by SnapCenter must be removed. These steps need to be executed manually.
-
Now the SnapCenter clone create workflow can be executed as described in sections before.
-
After the refresh operation, the old target data volume still exists and it must be deleted manually with, for example, ONTAP System Manager.
SnapCenter workflow automation with PowerShell scripts
In the previous sections, the different workflows were executed using the SnapCenter UI. All the workflows can also be executed with PowerShell scripts or REST API calls, allowing further automation. The following sections describe basic PowerShell script examples for the following workflows.
-
Create clone
-
Delete clone
The example scripts are provided as is and are not supported by NetApp.
All scripts must be executed in a PowerShell command window. Before the scripts can be run, a connection to the SnapCenter server must be established using the Open-SmConnection command.
Create clone
The simple script below demonstrates how a SnapCenter clone create operation can be executed using PowerShell commands. The SnapCenter New-SmClone command is executed with the required command line option for the lab environment and the automation script discussed before.
$BackupName='SnapCenter_hana-1_LocalSnap_Hourly_06-25-2024_03.00.01.8458'
$JobInfo=New-SmClone -AppPluginCode hana -BackupName $BackupName -Resources @\{"Host"="hana-1.sapcc.stl.netapp.com";"UID"="MDC\SS1"} -CloneToInstance hana-7.sapcc.stl.netapp.com -postclonecreatecommands '/mnt/sapcc-share/SAP-System-Refresh/sc-system-refresh.sh recover' -NFSExportIPs 192.168.175.75 -CloneUid 'MDC\QS1'
# Get JobID of clone create job
$Job=Get-SmJobSummaryReport | ?\{$_.JobType -eq "Clone" } | ?\{$_.JobName -Match $BackupName} | ?\{$_.Status -eq "Running"}
$JobId=$Job.SmJobId
Get-SmJobSummaryReport -JobId $JobId
# Wait until job is finished
do \{ $Job=Get-SmJobSummaryReport -JobId $JobId; write-host $Job.Status; sleep 20 } while ( $Job.Status -Match "Running" )
Write-Host " "
Get-SmJobSummaryReport -JobId $JobId
Write-Host "Clone create job has been finshed."
The screen output shows the execution of the clone create PowerShell script.
PS C:\Windows\system32> C:\NetApp\clone-create.ps1
SmJobId : 110382
JobCreatedDateTime :
JobStartDateTime : 6/26/2024 9:55:34 AM
JobEndDateTime :
JobDuration :
JobName : Clone from backup 'SnapCenter_hana-1_LocalSnap_Hourly_06-25-2024_03.00.01.8458'
JobDescription :
Status : Running
IsScheduled : False
JobError :
JobType : Clone
PolicyName :
JobResultData :
Running
Running
Running
Running
Running
Running
Running
Running
Running
Running
Completed
SmJobId : 110382
JobCreatedDateTime :
JobStartDateTime : 6/26/2024 9:55:34 AM
JobEndDateTime : 6/26/2024 9:58:50 AM
JobDuration : 00:03:16.6889170
JobName : Clone from backup 'SnapCenter_hana-1_LocalSnap_Hourly_06-25-2024_03.00.01.8458'
JobDescription :
Status : Completed
IsScheduled : False
JobError :
JobType : Clone
PolicyName :
JobResultData :
Clone create job has been finshed.
Delete clone
The simple script below demonstrates how a SnapCenter clone delete operation can be executed using PowerShell commands. The SnapCenter Remove-SmClone command is executed with the required command line option for the lab environment and the automation script discussed before.
$CloneInfo=Get-SmClone |?\{$_.CloneName -Match "hana-1_sapcc_stl_netapp_com_hana_MDC_SS1" }
$JobInfo=Remove-SmClone -CloneName $CloneInfo.CloneName -PluginCode hana -PreCloneDeleteCommands '/mnt/sapcc-share/SAP-System-Refresh/sc-system-refresh.sh shutdown QS1' -UnmountCommands '/mnt/sapcc-share/SAP-System-Refresh/sc-system-refresh.sh umount QS1' -Confirm: $False
Get-SmJobSummaryReport -JobId $JobInfo.Id
# Wait until job is finished
do \{ $Job=Get-SmJobSummaryReport -JobId $JobInfo.Id; write-host $Job.Status; sleep 20 } while ( $Job.Status -Match "Running" )
Write-Host " "
Get-SmJobSummaryReport -JobId $JobInfo.Id
Write-Host "Clone delete job has been finshed."
PS C:\NetApp>
The screen output shows the execution of the clone –delete.ps1 PowerShell script.
PS C:\Windows\system32> C:\NetApp\clone-delete.ps1
SmJobId : 110386
JobCreatedDateTime :
JobStartDateTime : 6/26/2024 10:01:33 AM
JobEndDateTime :
JobDuration :
JobName : Deleting clone 'hana-1_sapcc_stl_netapp_com_hana_MDC_SS1__clone__110382_MDC_SS1_04-22-2024_09.54.34'
JobDescription :
Status : Running
IsScheduled : False
JobError :
JobType : DeleteClone
PolicyName :
JobResultData :
Running
Running
Running
Running
Completed
SmJobId : 110386
JobCreatedDateTime :
JobStartDateTime : 6/26/2024 10:01:33 AM
JobEndDateTime : 6/26/2024 10:02:38 AM
JobDuration : 00:01:05.5658860
JobName : Deleting clone 'hana-1_sapcc_stl_netapp_com_hana_MDC_SS1__clone__110382_MDC_SS1_04-22-2024_09.54.34'
JobDescription :
Status : Completed
IsScheduled : False
JobError :
JobType : DeleteClone
PolicyName :
JobResultData :
Clone delete job has been finshed.
PS C:\Windows\system32>
