


Manage StorageGRID tenant groups


 Suggest changes

 PDFs
PDFs
Manage your tenant groups as needed to view, edit, or duplicate a group, and more.
-
You are signed in to the Tenant Manager using a supported web browser.
-
You belong to a user group that has the Root access permission.
View or edit group
You can view and edit the basic information and details for each group.
-
Select Access Management > Groups.
-
Review the information provided on the Groups page, which lists basic information for all local and federated groups for this tenant account.
If the tenant account has the Use grid federation connection permission and you are viewing groups on the tenant's source grid:
-
If any groups weren't synced to the tenant on the destination grid, follow the steps to retry a group sync.
-
-
If you want to change the group's name:
-
Select the checkbox for the group.
-
Select Actions > Edit group name.
-
Enter the new name.
-
Select Save changes.
-
-
If you want to view more details or make additional edits, do either of the following:
-
Select the group name.
-
Select the checkbox for the group, and select Actions > View group details.
-
-
Review the Overview section, which shows the following information for each group:
-
Display name
-
Unique name
-
Type
-
Access mode
-
Permissions
-
S3 Policy
-
Number of users in this group
-
Additional fields if the tenant account has the Use grid federation connection permission and you are viewing the group on the tenant's source grid:
-
Sync status, either Succeeded or Failed
-
For federated groups, a blue banner indicates that if you edit or delete this group, your changes won't be synced to the other grid.
-
-
-
Edit group settings as needed. Refer to Create groups for an S3 tenant for details about what to enter.
-
In the Overview section, change the display name by selecting the name or the edit icon
 .
. -
On the Group permissions tab, update the permissions, and select Save changes.
-
On the Group policy tab, make any changes, and select Save changes.
Optionally select a different S3 group policy or enter the JSON string for a custom policy as required.
-
-
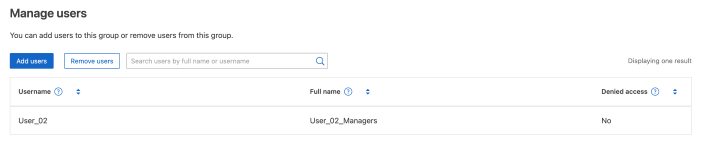
To add one or more existing local users to the group:
-
Select the Users tab.
-
Select Add users.
-
Select the existing users you want to add, and select Add users.
A success message appears in the upper right.
-
-
To remove local users from the group:
-
Select the Users tab.
-
Select Remove users.
-
Select the users you want to remove, and select Remove users.
A success message appears in the upper right.
-
-
Confirm that you selected Save changes for each section you changed.
Duplicate group
You can duplicate an existing group to create new groups more quickly.

|
If your tenant account has the Use grid federation connection permission and you duplicate a group from the tenant's source grid, the duplicated group will be synced to the tenant's destination grid. |
-
Select Access Management > Groups.
-
Select the checkbox for the group you want to duplicate.
-
Select Actions > Duplicate group.
-
See Create groups for an S3 tenant for details about what to enter.
-
Select Create group.
Retry group sync
If any group failed to sync, "Failed" appears in the Sync status column for the group. A banner appears above the table to indicate that one or more groups failed to sync.
To retry syncing:
-
On the banner, select Retry sync. This operation retries syncing for all groups that failed to sync.
-
To retry syncing an individual group, select the group name. On the group details page, select Retry sync.
-
View the status of the sync operation from the details page of each group you're syncing.
If the retry is successful, "Succeeded" appears in the Sync status column for each group that was successfully synced, and the banner disappears.
For additional information, see Sync tenant groups and users.
Delete one or more groups
You can delete one or more groups. Any users who belong only to a group that is deleted will no longer be able to sign in to the Tenant Manager or use the tenant account.
-
Select Access Management > Groups.
-
Select the checkbox for each group you want to delete.
-
Select Actions > Delete group or Actions > Delete groups.
A confirmation dialog box appears.
-
Select Delete group or Delete groups.
Set up AssumeRole
You must be an administrator to set up AssumeRole.
To set up AssumeRole, create the target group to be assumed, if the group doesn't already exist. Edit the group's S3 policy to specify the permitted actions of assuming this group. Edit the group's S3 trust policy to specify the trusted users allowed to assume the group with the AssumeRole API.
Temporary security credentials created from assuming this group are valid for a limited duration. The session is between 15 minutes and 12 hours, and the default session is 1 hour. When you remove the user from the group's S3 trust policy, the user can no longer assume this group.
-
Select Access Management > Groups.
-
Select the group name.
-
Select the S3 trust policy tab.
-
Add your S3 trust policy, including a list of users that can perform AssumeRole.
-
Select Save changes.
-
Select the S3 group policy tab.
-
Edit the S3 policy to specify only the required S3 actions for the trusted users added in this group's S3 trust policy.
-
Select Save changes.
Example of an AssumeRole S3 trust policy
{
    "Statement": [
        {
            "Effect": "Allow",
            "Action": "sts:AssumeRole",
            "Principal": {
                "AWS": [
                    "urn:sgws:identity::1234567890:user/user1",
                    "arn:aws:iam::1234567890:user/user2"
                ]
            }
        }
    ]
}
The Principal:
-
"Principal": "*"matches everyone, including anonymous (unsigned) requests -
"Principal": { "AWS": "*" }matches any authenticated identity or user (doesn't match anonymous requests) -
Only applies for bucket policies
-
The principal is the account(s)/user(s) being granted or denied the permissions
After configuration is complete, users listed in the S3 trust policy can perform AssumeRole and receive credentials. The final permissions are determined by group policy, bucket policy, and session policy. For more information see Use access policies.