

Replace a power supply unit
 Suggest changes
Each chassis includes two power supply units for power redundancy. If a power supply unit is faulty, you should replace it as soon as possible to ensure that the chassis has a redundant power source.
-
You have determined that the power supply unit is faulty.
-
You have a replacement power supply unit.
-
You have verified that the second power supply unit is operating.
-
You have an electrostatic discharge (ESD) wristband, or you have taken other antistatic precautions.
The replacement procedure applies to the following node models:
-
Two rack unit (2U), four-node NetApp HCI chassis
-
One rack unit (1U) H610S storage chassis

In the case of H610S, the terms "node" and "chassis" are used interchangeably because node and chassis are not separate components, unlike in the case of the 2U, four-node chassis.
Alarms in the Element UI provide information about the failed power supply unit, referring to it as PS1 or PS2. In a NetApp HCI 2U, four-node chassis, PS1 refers to the unit on the top row of the chassis and PS2 refers to the unit on the bottom row of the chassis. You can replace the faulty power supply unit while your chassis is powered on and working, as long as the redundant power supply unit is functioning.
|
|
If you are replacing both PSUs in a node, the PSUs must have the same part number and wattage. Mismatched PSUs could damage the system. |
-
Locate the faulty power supply unit in the chassis. The LED on the faulty unit displays amber.
The power supply units are located differently based on the type of chassis. See the images below for the locations of the power supply units:
Model Location of the power supply units 2U, four-node NetApp HCI storage chassis
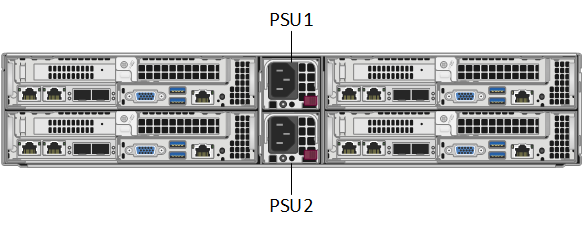
The nodes in your chassis might look different depending on the type of nodes (storage or compute) you have. H610S chassis

-
Identify the correct node using the blue pullout tag or serial number. The blue pull-out tag lists the serial number (S/N) and drive layout. Confirm the node’s serial number to be serviced.
-
If you are replacing both power supply units, continue to step 3.
-
If you are replacing only one power supply unit, skip to step 4.
-
-
Confirm that the node has been powered down or is ready to be powered down for service. Note the following:
-
A node that has been powered down does not display any blue power LEDs on the drives or power button.
-
A node that has not yet been shut down displays blue LEDs on the drives and power button.
-
A node that has been shut down and is ready for service displays a blinking PSU LED that blinks on (green) and off (no color).
-
A node that has not yet been shut down displays solid green LEDs on the power supplies.
-
-
Unplug the power cord from the power supply unit or both power cords, if replacing both units.
-
Lift the cam handle, and press the blue latch to slide out the power supply unit.
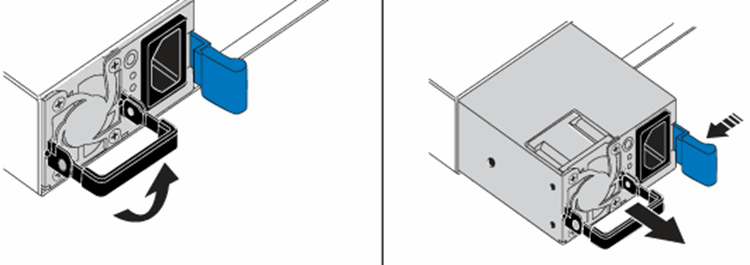
The illustration is an example. The location(s) of the power supply unit(s) in the chassis and the color of the release button vary depending on the type of chassis you have. 
Ensure that you use both hands to support the weight of the power supply unit. Repeat steps 3, 4, and 5 if replacing a second power supply unit.
-
Locate the label on the power supply unit that you removed from the chassis. The label contains details of the manufacturer and output wattage.
Do not replace the power supply unit if the wattage of the power supply from your RMA does not match the wattage of the removed power supply. Contact NetApp Support for next steps. -
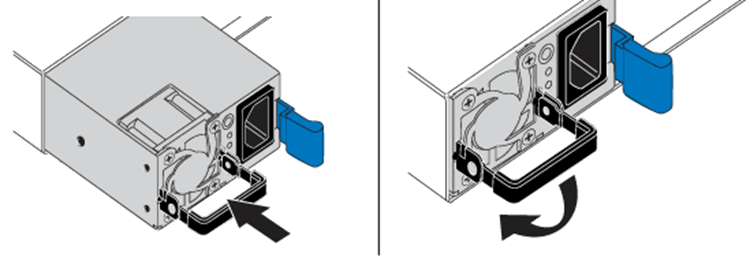
Using both hands, align the edges of the power supply unit with the opening in the chassis, gently push the unit into the chassis using the cam handle until it locks into place, and return the cam handle to the upright position.
-
Plug in one or both power cords.
-
If you replaced both power supply units, go to the front of the node and press the power button to power on the nodes. After power on, the power button LED illuminates a solid blue color. The blue LEDs for the drives and the identification button will start blinking.
-
Return the faulty unit to NetApp by following the instructions in the box that was shipped to you.