9. Deploy Additional User Clusters: NetApp HCI with Anthos
 Suggest changes


With Anthos, organizations can scale their environments to incorporate multiple user clusters and segregate workloads between teams. A single admin cluster can support up to five user clusters, and each user cluster can support up to twenty-five nodes.
To add additional user clusters to your deployment, complete the following steps:
-
Copy the
config.yamlfile to a new file namedanthos-cluster02-config.yaml.ubuntu@Anthos-Admin-Workstation:~$ cp config.yaml anthos-cluster02-config.yaml
-
Make the following edits to the newly created file:
-
Comment out the sections that refer to the existing admin cluster with (#).
-
When you get to the
userclustersection, update the following fields:-
Update the partition name under the
bigipsection. -
Update the
controlplanvipandingressvipvalues under thevipsection. -
Update the
clusternamevalue.usercluster: # In-Cluster vCenter configuration vcenter: # If specified it overwrites the network field in global vcenter configuration network: "" # # The absolute or relative path to the yaml file to use for static IP allocation. # # Do not include if using DHCP # ipblockfilepath: "" # # Specify pre-defined nodeports if using "manual" load balancer mode # manuallbspec: # ingresshttpnodeport: 30243 # ingresshttpsnodeport: 30879 # controlplanenodeport: 30562 # addonsnodeport: 0 # Specify the already-existing partition and credentials to use with F5 bigip: # To re-use credentials across clusters we recommend using YAML node anchors. # See https://yaml.org/spec/1.2/spec.html#id2785586 credentials: address: "172.21.224.22" username: "admin" password: "NetApp!23" partition: "Anthos-Cluster02-Part" # # Optionally specify a pool name if using SNAT # snatpoolname: "" # The VIPs to use for load balancing vips: # Used to connect to the Kubernetes API controlplanevip: "10.63.172.108" # Shared by all services for ingress traffic ingressvip: "10.63.172.109" # # Used for admin cluster addons (needed for multi cluster features). Must be the same # # across clusters # addonsvip: "" # A unique name for this cluster clustername: "anthos-cluster02" # User cluster master nodes must have either 1 or 3 replicas masternode: cpus: 4 memorymb: 8192 # How many machines of this type to deploy replicas: 1 # The number of worker nodes to deploy and their size. Min. 2 replicas workernode: cpus: 4 memorymb: 8192 # How many machines of this type to deploy replicas: 3 # The Kubernetes service CIDR range for the cluster serviceiprange: 10.96.0.0/12 # The Kubernetes pod CIDR range for the cluster podiprange: 192.168.0.0/16
-
-
-
Run the following command to check the config file again to verify that there are no syntax errors. Because you have removed the admin section, you must reference the
kubeconfigfile for the admin cluster namedkubeconfig(found in the working directory).ubuntu@Anthos-Admin-Workstation:~$ gkectl check-config --config anthos-cluster02-config.yaml --kubeconfig kubeconfig - Validation Category: Config Check - [SUCCESS] Config - Validation Category: Docker Registry - [SUCCESS] gcr.io/gke-on-prem-release access - Validation Category: vCenter - [SUCCESS] Credentials - [SUCCESS] Datacenter - [SUCCESS] Datastore - [FAILURE] Data Disk: vCenter data disk already exists - [SUCCESS] Resource Pool - [SUCCESS] Network - Validation Category: F5 BIG-IP - [SUCCESS] Credentials - [SUCCESS] Partition - Validation Category: Network Configuration - [SUCCESS] CIDR, VIP and static IP (availability and overlapping) - Validation Category: VIPs - [SUCCESS] ping (availability) - Validation Category: Node IPs - [SUCCESS] ping (availability) Some validations FAILED or SKIPPED. Check report above. -
If all the checks succeed as expected, you can deploy this new user cluster in a manner very similar to the first cluster creation, referencing the
kubeconfigfile from the admin cluster.ubuntu@Anthos-Admin-Workstation:~$ gkectl create cluster --config anthos-cluster02-config.yaml --kubeconfig kubeconfig
-
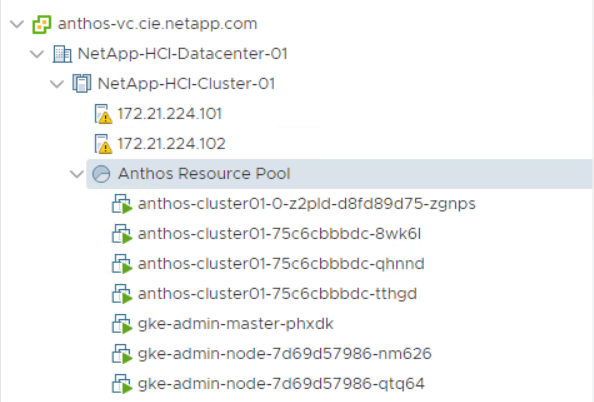
As with the previous deployment, the process runs for several minutes and can be monitored on screen and in vCenter by watching the resource pool as the VMs populate. When complete, you should be able to see the new user cluster (four nodes).
-
You can access and execute commands against the deployed user cluster using the kubectl command line tool and the
kubeconfigfile generated by the process (stored in the working directory).ubuntu@Anthos-Admin-Workstation:~$ kubectl get nodes --kubeconfig anthos-cluster02-kubeconfig NAME STATUS ROLES AGE VERSION anthos-cluster02-84744f5bd8-8rqk6 Ready <none> 9m16s v1.13.7-gke.20 anthos-cluster02-84744f5bd8-fl786 Ready <none> 9m28s v1.13.7-gke.20 anthos-cluster02-84744f5bd8-fnsmp Ready <none> 9m21s v1.13.7-gke.20


