

 Private Cloud
4. Deploy the RHV-H Hypervisor on the HCI Compute Nodes: NetApp HCI with RHV
 Suggest changes
This solution employs the recommended self-hosted engine architecture of RHV deployment with the minimum setup (two self-hosted engine nodes). These steps begin after the nodes have been racked and cabled and the IPMI port has been configured on each node for using the console. To deploy the RHV-H hypervisor on HCI compute nodes, complete the following steps:
-
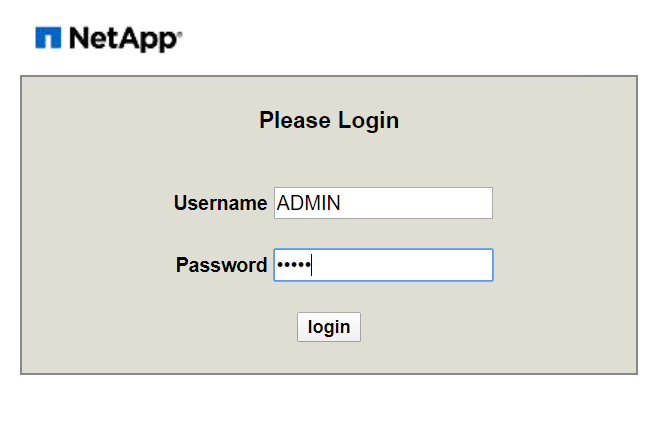
Access the out-of-band management console for the compute nodes in the cluster and log in with the default credentials ADMIN/ADMIN.
-
Click the Remote Console Preview image in the center of the screen to download a JNLP file launched by Java Web Start, which launches an interactive console to the system.
-
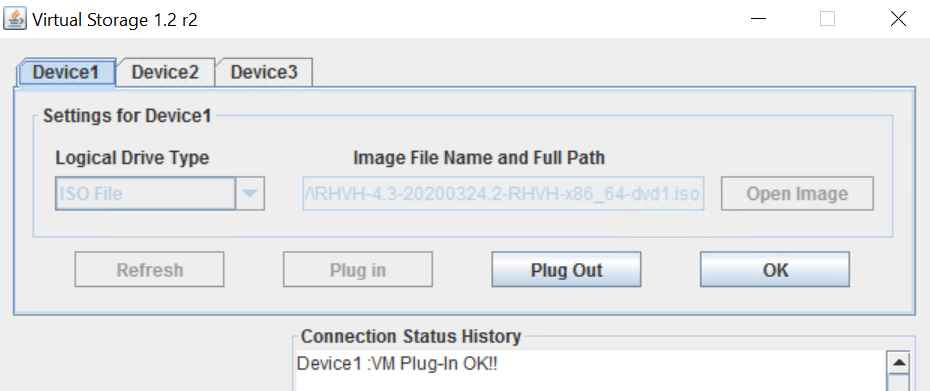
After the virtual console launches, attach the RHV-H 4.3.9 ISO by navigating to and clicking Virtual Media > Virtual Storage.

-
For Logical Drive Type, select ISO File from the drop down. Provide the full path and full name of the RHV-H 4. 3.9 ISO file or attach it by clicking the Open Image button. Then click Plug In.
-
Reboot the server so that it boots using RHV-H 4.3.9 ISO by navigating and clicking Power Control > Set Power Reset.

-
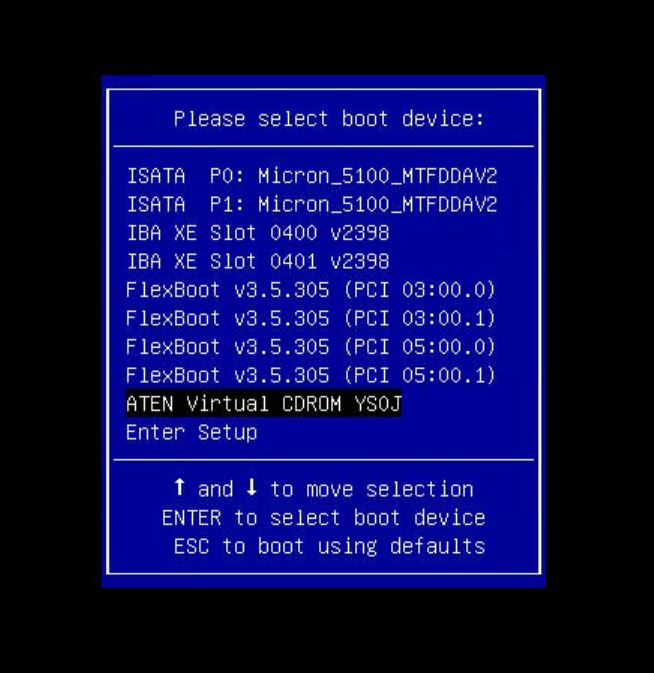
When the node reboots and the initial screen appears, press F11 to enter the boot menu. From the boot menu, navigate to and click ATEN Virtual CDROM YSOJ.
-
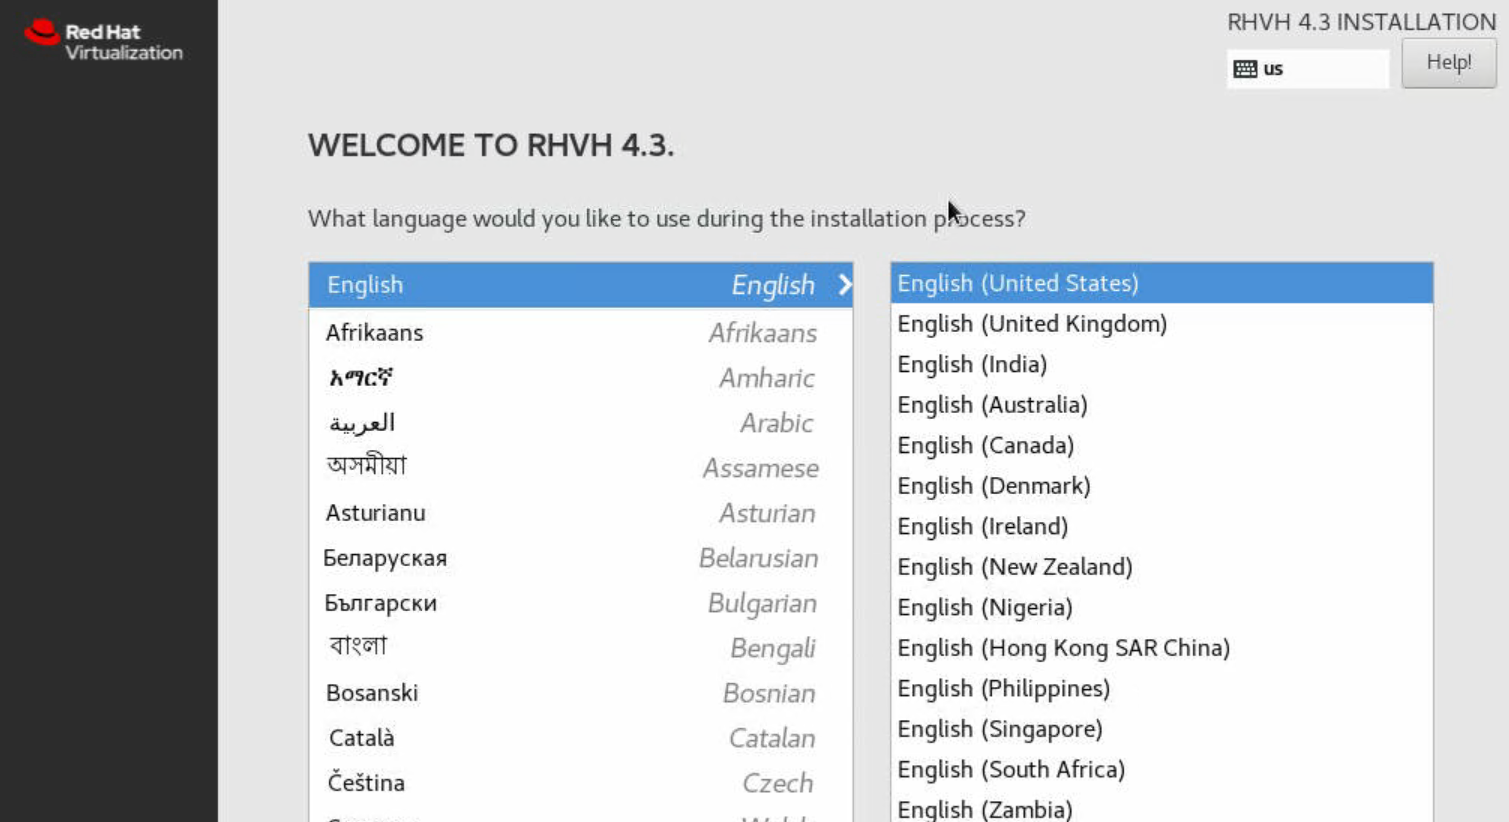
On the next screen, navigate to and click Install RHV 4.3. This loads the image, runs the pre-installation scripts, and starts Anaconda, the Red Hat Enterprise Linux system installer.

-
The installation welcome screen appears. Select the preferred language and click Next.
-
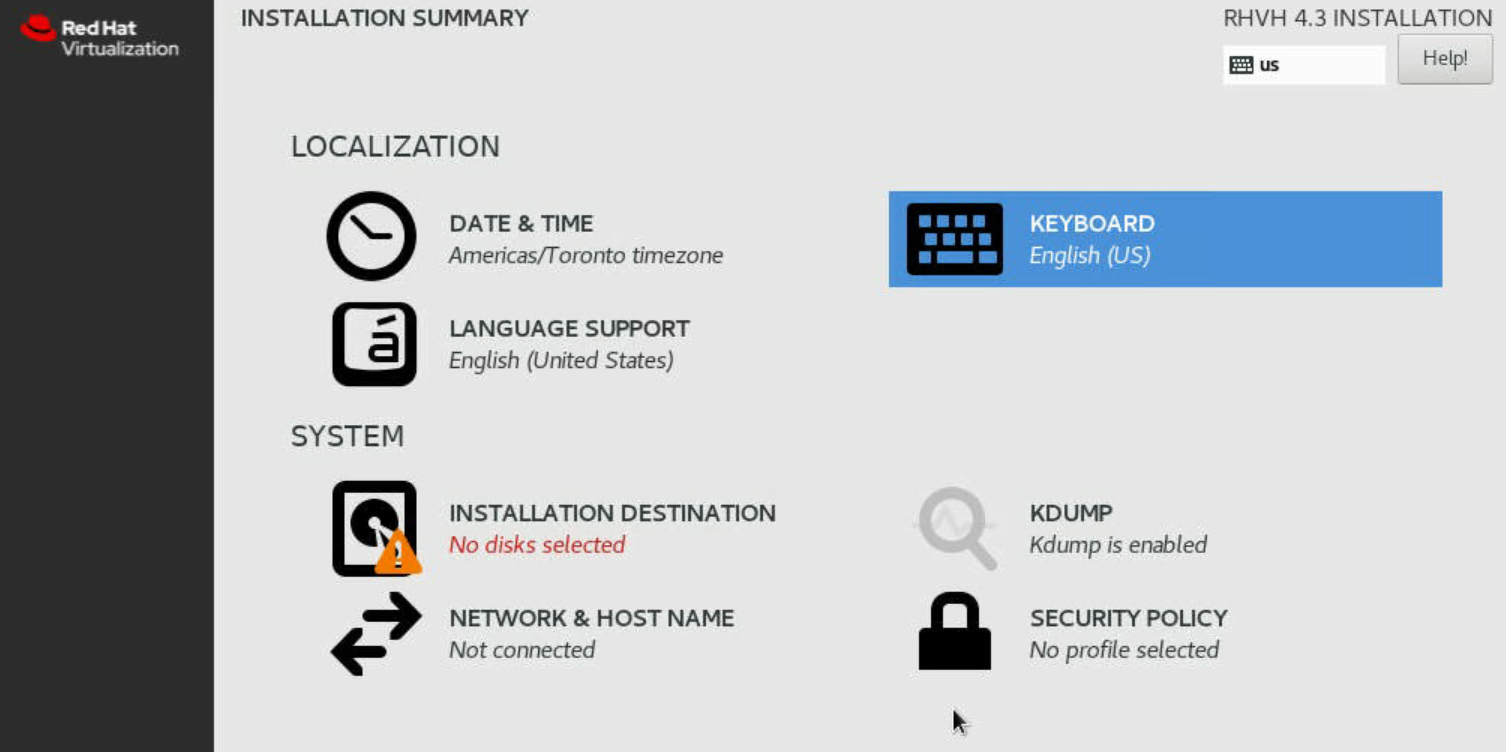
In the next screen, select your time zone under Date & Time. The default is UTC. However, NetApp recommends that you configure NTP servers for your environment on this screen. Then select the keyboard language and click Done.
-
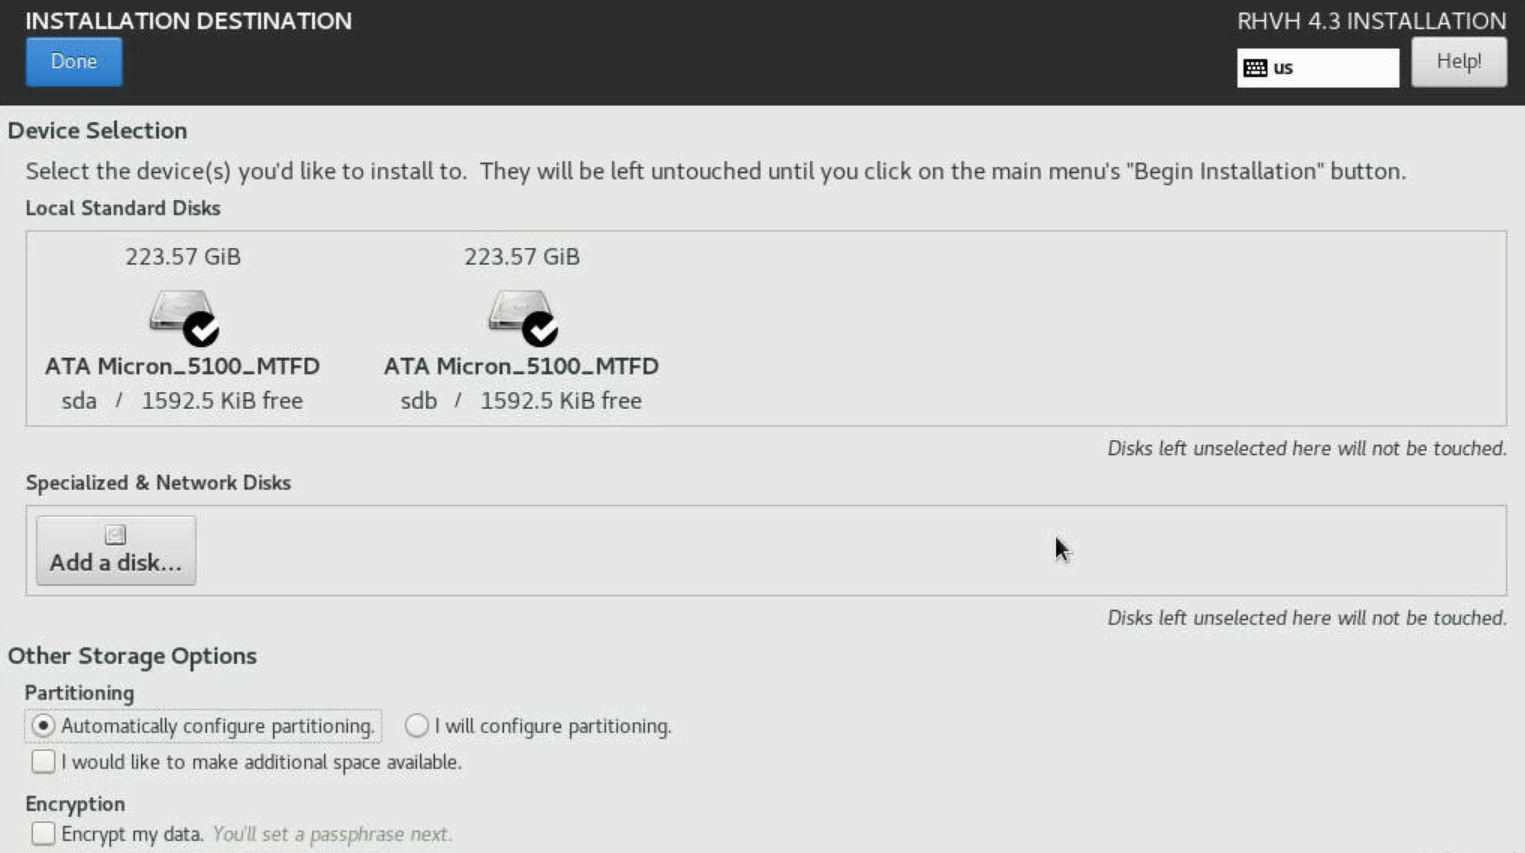
Next, click Installation Destination. In the Installation Destination screen, select the drives on which you want to install RHV-H. Verify that Automatically Configure Partitioning is selected in the Partitioning section. Optionally, you can enable encryption by checking the box next to Encrypt My Data. Click Done to confirm the settings.
-
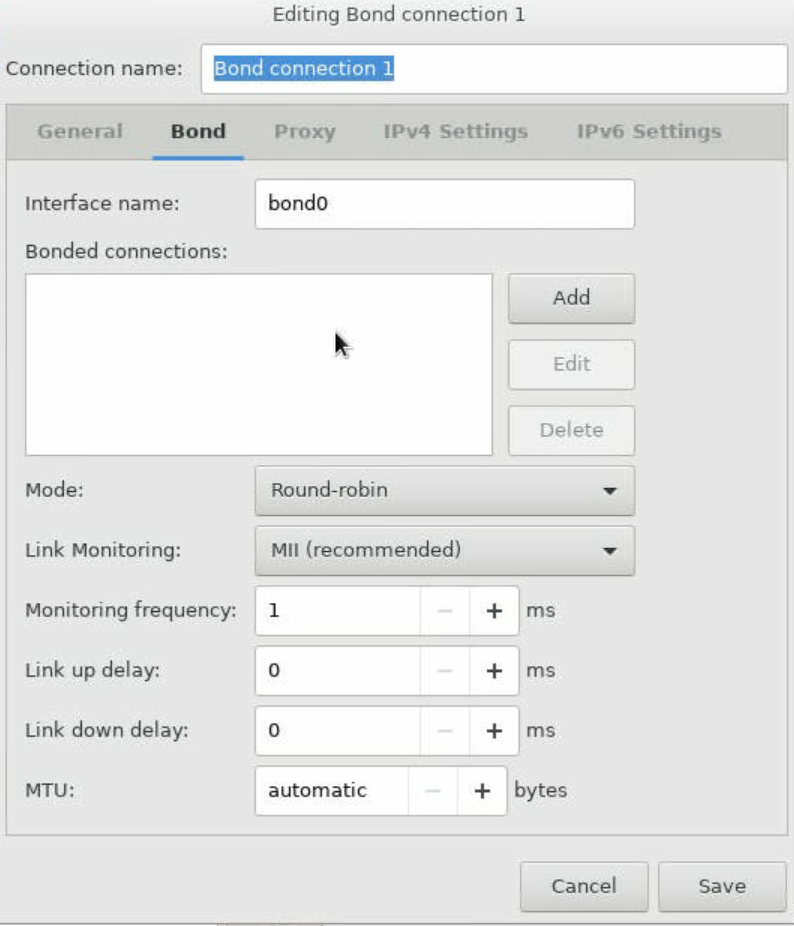
Click Network & Host Name. Provide the desired host name at the bottom of the screen. Then click the (+) button at the bottom. Select the Bond from the drop down and click Add.

-
Next, in the bond configuration screen, click Add to add the member interfaces to the bond interface.
-
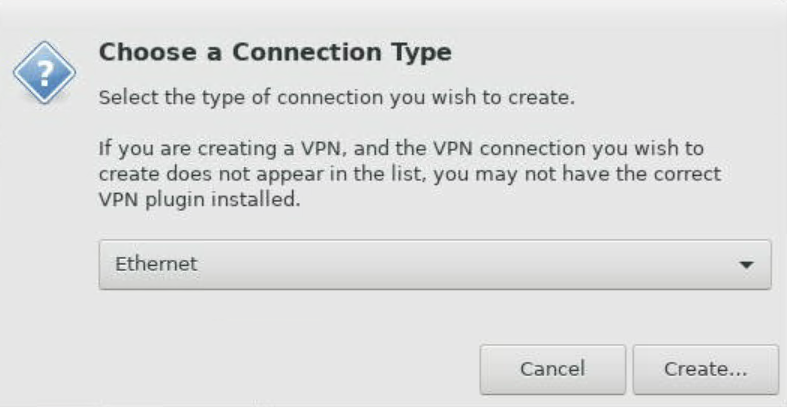
Select Ethernet from the drop down, indicating that the Ethernet interface is added as a member to the bond interface. Click Create.
-
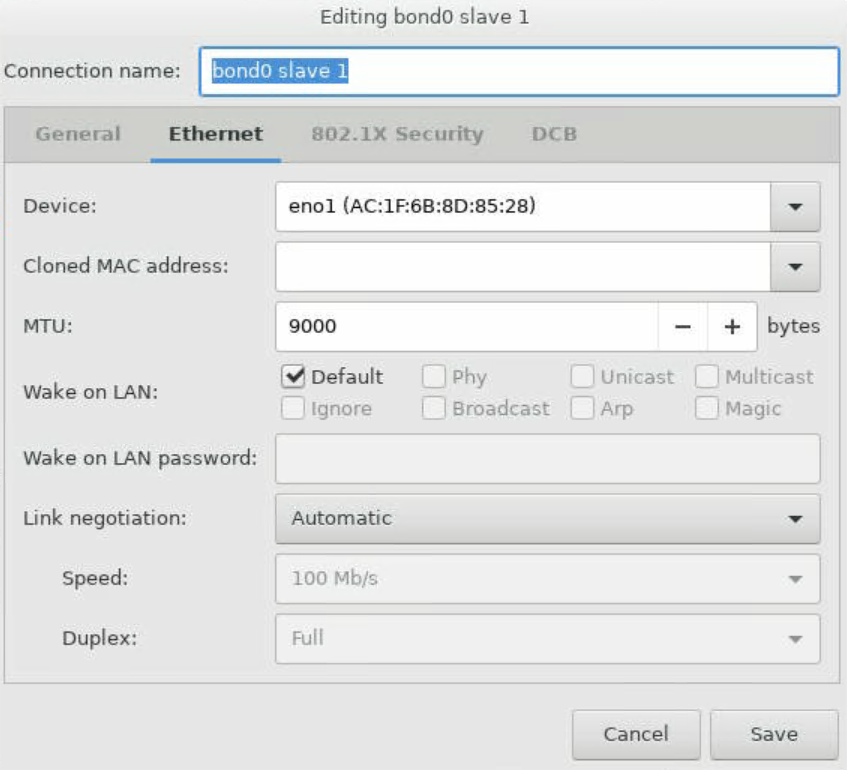
From the Device dropdown in the slave 1 configuration screen, select the Ethernet interface. Verify that the MTU is set to 9000. Click Save.
-
Repeat steps 12, 13, and 14 to add the other Ethernet port to the bond0 interface.
-
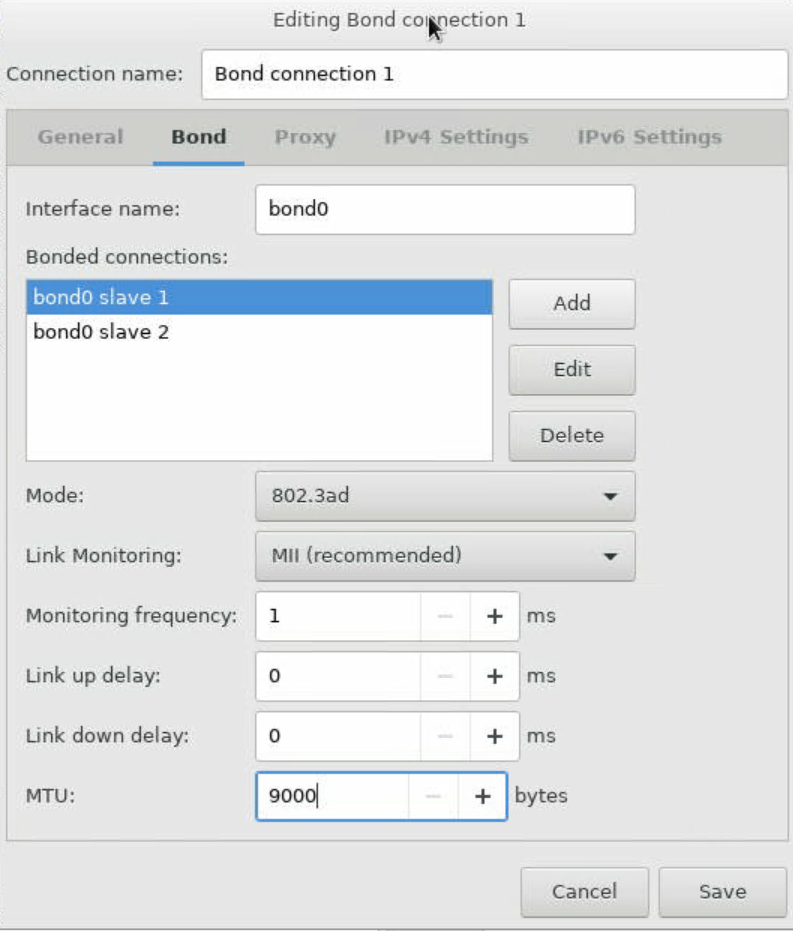
From the Mode dropdown in the bond configuration screen, select 802.3ad for LACP. Verify that the MTU is set to 9000. Then click Save.
-
Create the VLAN interface for the in-band management network. Click the (+) button again, select VLAN from the dropdown and click Create.

-
In the Editing VLAN connection screen, select bond0 in the Parent Interface dropdown, enter the VLAN ID of the in-band management network. Provide the name of the VLAN interface in
bond0.<vlan_id>format.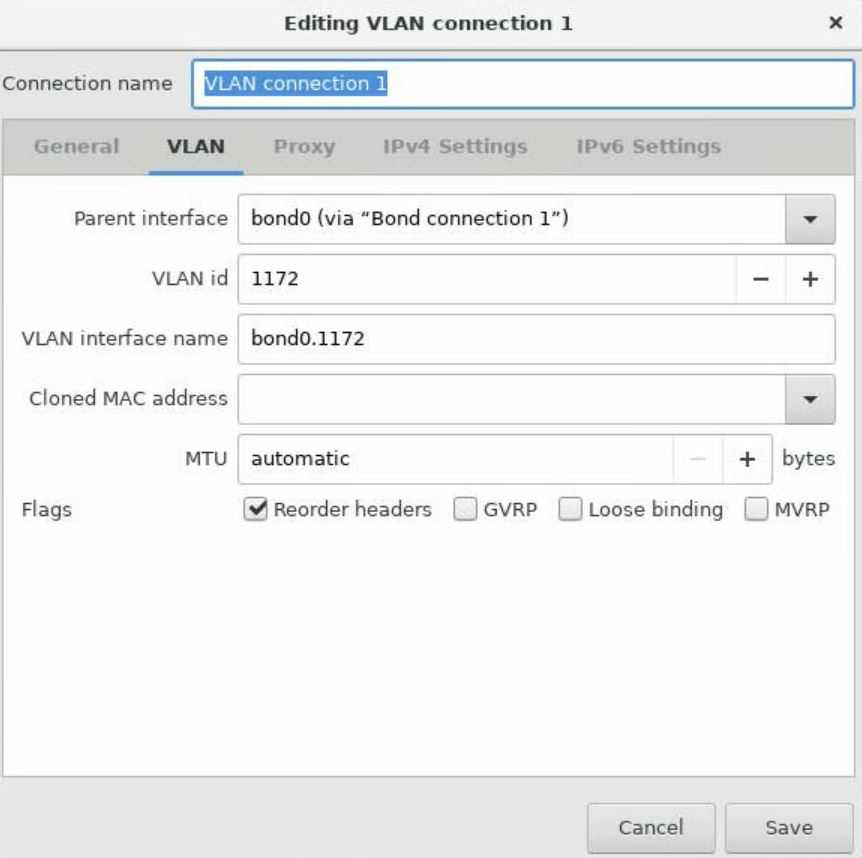
-
In the Editing VLAN connection screen, click the IPv4 Settings sub-tab. In the IPv4 Settings sub-tab, configure the network address, netmask, gateway, and DNS servers corresponding to the in-band management network. Click Save to confirm the settings.
-
Create the VLAN interface for the storage network. Click the (+) button again, select VLAN from the dropdown, and click Create. In the Editing VLAN Connection screen, select bond0 in the Parent Interface dropdown, enter the VLAN ID of the storage network, provide the name of the VLAN interface in the
bond0.<vlan_id>format. Adjust the MTU to 9000 to allow jumbo frame support. Click Save.
-
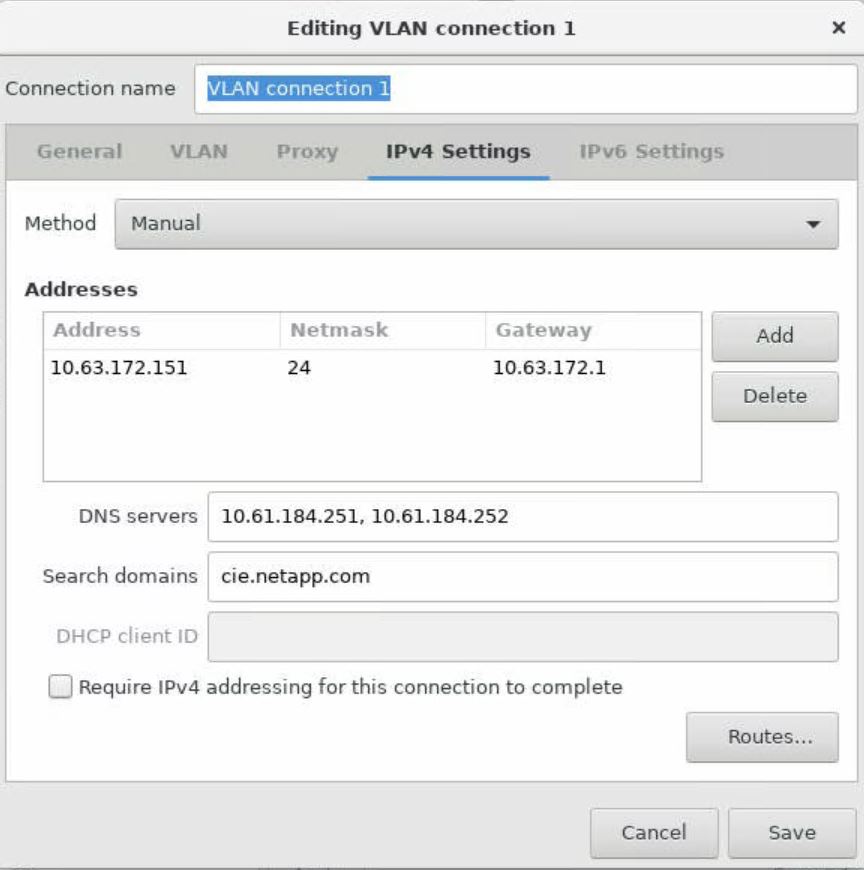
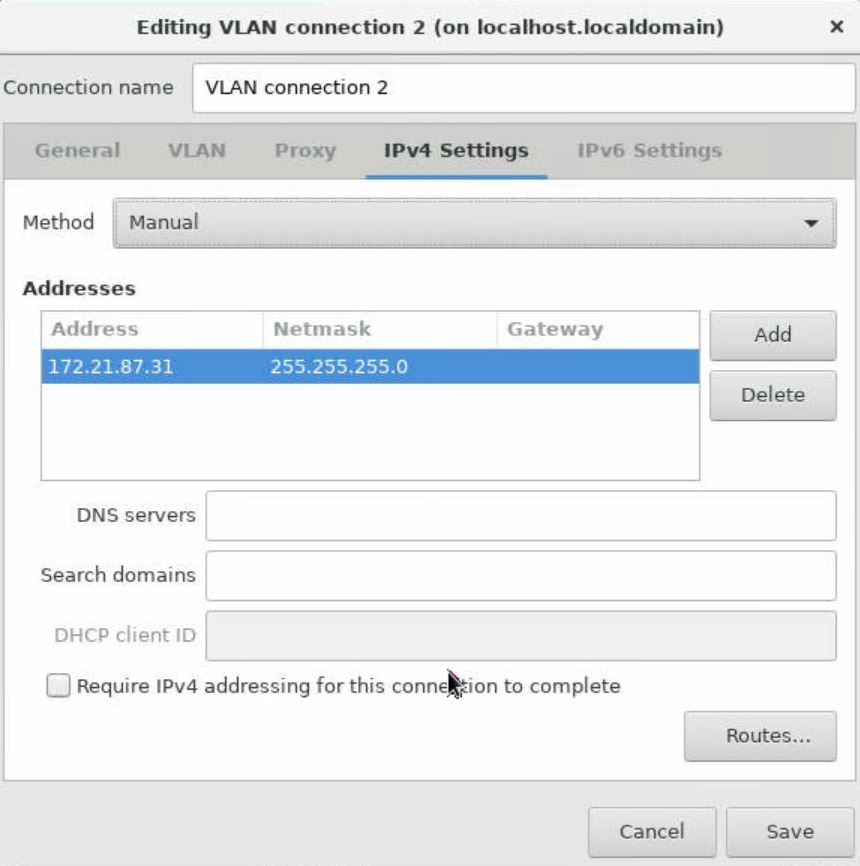
In the Editing VLAN Connection screen, click the IPv4 Settings sub-tab. In the IPv4 Settings sub-tab, configure the network address and the netmask corresponding to the storage network. Click Save to confirm the settings.
-
Confirm that the network interfaces are up and click Done.

-
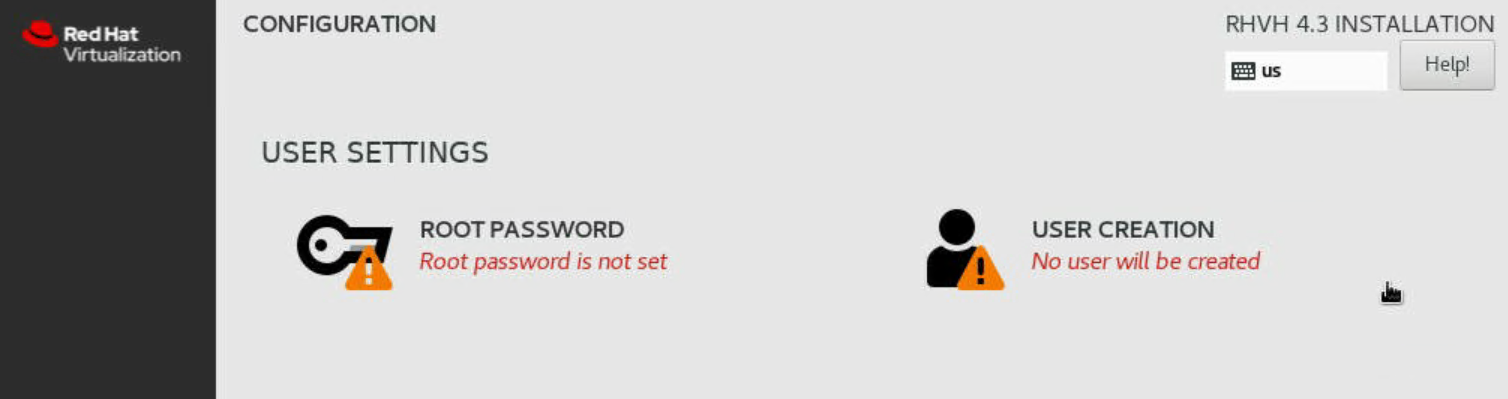
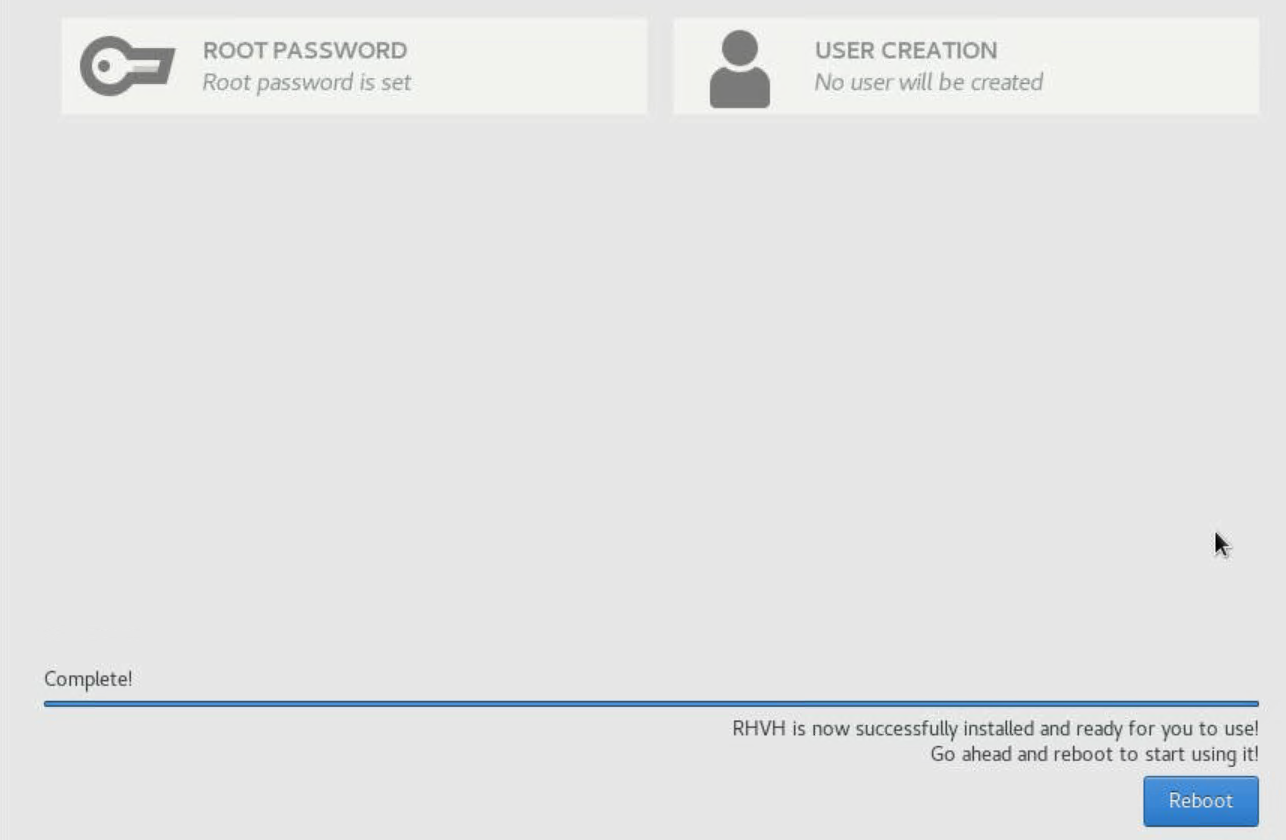
After the wizard navigates back to the configuration page, click Begin Installation. The next screen prompts you to configure the root password and optionally to create another user for logging into RHV-H.
-
After the installation completes, unmount the ISO file by navigating to Virtual media > Virtual Storage in the virtual console and click Plug Out. Then click Reboot on the Anaconda GUI to complete the installation process. The node then reboots.
After the node comes up, it displays the login screen.

-
Now that the installation is complete, you must then register RHV-H and enable the required repositories. Open a browser and log in to the Cockpit user interface at
https://<HostFQDN/IP>:9090using the root credentials provided during the installation.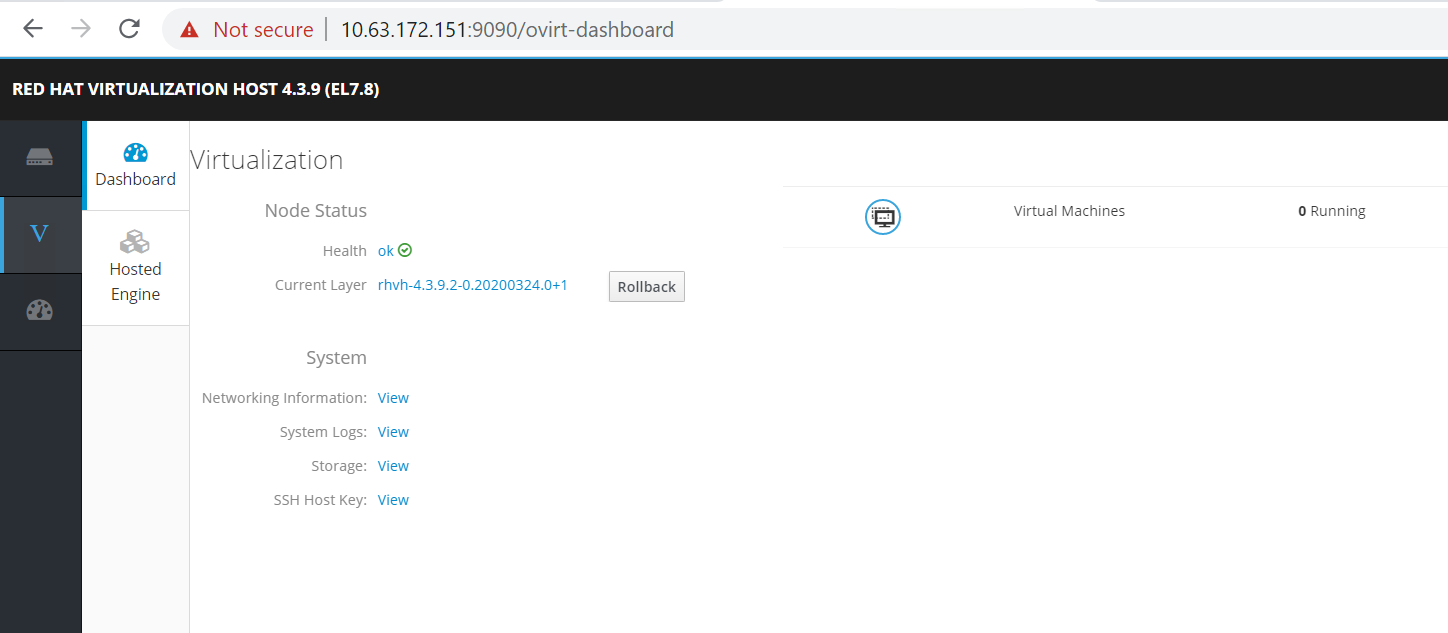
-
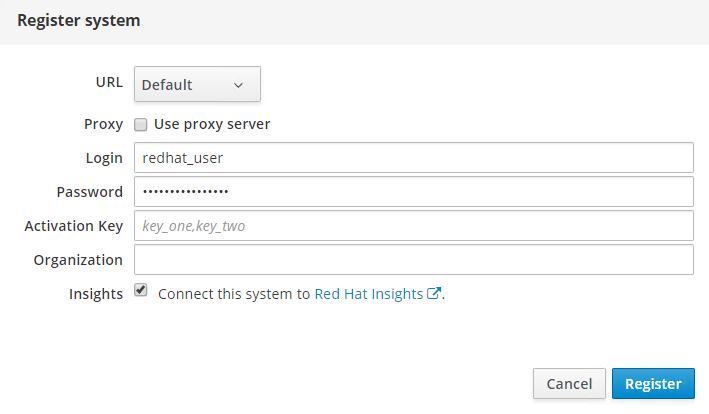
Navigate to localhost > Subscriptions and click Register. Enter your Red Hat Portal username and password, click the check box Connect this System to Red Hat Insights, and click Register. The system automatically subscribes to the Red Hat Virtualization Host entitlement.
Red Hat Insights provide continuous analysis of registered systems to proactively recognize threats to availability, security, performance, and stability across physical, virtual, and cloud environments.
-
Navigate to localhost > Terminal to display the CLI. Optionally you can use any SSH client to log in to the RHV- H CLI. Confirm that the required subscription is attached, and then enable the Red Hat Virtualization Host 7 repository to allow further updates and make sure that all other repositories are disabled.
# subscription-manager list +-------------------------------------------+ Installed Product Status +-------------------------------------------+ Product Name: Red Hat Virtualization Host Product ID: 328 Version: 4.3 Arch: x86_64 Status: Subscribed # subscription-manager repos --disable=* Repository 'rhel-7-server- rhvh-4-source-rpms' is disabled for this system. Repository 'rhvh-4-build-beta-for-rhel-8-x86_64-source-rpms' is disabled for this system. Repository 'rhel-7-server- rhvh-4-beta-debug-rpms' is disabled for this system. Repository 'rhvh-4-beta-for-rhel-8-x86_64-debug-rpms' is disabled for this system. Repository 'jb-eap-textonly-1-for-middleware-rpms' is disabled for this system. Repository 'rhvh-4-build-beta-for-rhel-8-x86_64-rpms' is disabled for this system. Repository 'rhvh-4-beta-for-rhel-8-x86_64-source-rpms' is disabled for this system. Repository 'rhel-7-server- rhvh-4-debug-rpms' is disabled for this system. Repository 'rhvh-4-build-beta-for-rhel-8-x86_64-debug-rpms' is disabled for this system. Repository 'rhel-7-server- rhvh-4-beta-source-rpms' is disabled for this system. Repository 'rhel-7-server- rhvh-4-rpms' is disabled for this system. Repository 'jb-coreservices-textonly-1-for-middleware-rpms' is disabled for this system. Repository 'rhvh-4-beta-for-rhel-8-x86_64-rpms' is disabled for this system. Repository 'rhel-7-server- rhvh-4-beta-rpms' is disabled for this system. # subscription-manager repos --enable=rhel-7-server- rhvh-4-rpms Repository 'rhel-7-server- rhvh-4-rpms' is enabled for this system. -
From the console, modify the iSCSI initiator ID to match the one you set in the Element access group previously by running the following command.
rhv-h01 # echo InitiatorName=iqn.1994-05.com.redhat:rhv-host-node- 01 > /etc/iscsi/initiatorname.iscsi
-
Enable and restart the iscsid service.
# systemctl enable iscsid Created symlink from /etc/systemd/system/multi-user.target.wants/iscsid.service to /usr/lib/systemd/system/iscsid.service # systemctl start iscsid # systemctl status iscsid ● iscsid.service - Open-iSCSI Loaded: loaded (/usr/lib/systemd/system/iscsid.service; enabled; vendor preset: disabled) Active: active (running) since Thu 2020-05-14 16:08:52 EDT; 3 days ago Docs: man:iscsid(8) man:iscsiuio(8) man:iscsiadm(8) Main PID: 5422 (iscsid) Status: "Syncing existing session(s)" CGroup: /system.slice/iscsid.service ├─5422 /sbin/iscsid -f └─5423 /sbin/iscsid -f -
Install and prepare the other RHV host by repeating the steps 1 to 29.