Deploy and Configure ONTAP Select in the VMware Virtual Infrastructure (Automated Deployment)
 Suggest changes


To deploy and configure an ONTAP Select instance within the VMware Virtual Infrastructure, complete the following steps:
-
From the Deployment Jump VM, login to the NetApp Support Site and download the ONTAP Select OVA for ESXi.
-
Create a directory OTS and obtain the Ansible roles for deploying ONTAP Select.
mkdir OTS
cd OTS
git clone https://github.com/NetApp/ansible.git
cd ansible
-
Install the prerequisite libraries.
pip install requests pip install pyvmomi Open a VI Editor and create a playbook ‘`ots_setup.yaml`’ with the below content to deploy the ONTAP Select OVA and initialize the ONTAP cluster. --- - name: Create ONTAP Select Deploy VM from OVA (ESXi) hosts: localhost gather_facts: false connection: 'local' vars_files: - ots_deploy_vars.yaml roles: - na_ots_deploy - name: Wait for 1 minute before starting cluster setup hosts: localhost gather_facts: false tasks: - pause: minutes: 1 - name: Create ONTAP Select cluster (ESXi) hosts: localhost gather_facts: false vars_files: - ots_cluster_vars.yaml roles: - na_ots_cluster -
Open a VI editor, create a variable file
ots_deploy_vars.yaml, and fill in hte following parameters:target_vcenter_or_esxi_host: "10.xxx.xx.xx"# vCenter IP host_login: "yourlogin@yourlab.local" # vCenter Username ovf_path: "/run/deploy/ovapath/ONTAPdeploy.ova"# Path to OVA on Deployment Jump VM datacenter_name: "your-Lab"# Datacenter name in vCenter esx_cluster_name: "your Cluster"# Cluster name in vCenter datastore_name: "your-select-dt"# Datastore name in vCenter mgt_network: "your-mgmt-network"# Management Network to be used by OVA deploy_name: "test-deploy-vm"# Name of the ONTAP Select VM deploy_ipAddress: "10.xxx.xx.xx"# Management IP Address of ONTAP Select VM deploy_gateway: "10.xxx.xx.1"# Default Gateway deploy_proxy_url: ""# Proxy URL (Optional and if used) deploy_netMask: "255.255.255.0"# Netmask deploy_product_company: "NetApp"# Name of Organization deploy_primaryDNS: "10.xxx.xx.xx"# Primary DNS IP deploy_secondaryDNS: ""# Secondary DNS (Optional) deploy_searchDomains: "your.search.domain.com"# Search Domain Name
Update the variables to match your environment.
-
Open a VI editor, create a variable file
ots_cluster_vars.yaml, and fill it out with the following parameters:node_count: 1#Number of nodes in the ONTAP Cluster monitor_job: truemonitor_deploy_job: true deploy_api_url: #Use the IP of the ONTAP Select VM deploy_login: "admin" vcenter_login: "administrator@vsphere.local" vcenter_name: "172.21.232.100" esxi_hosts: - host_name: 172.21.232.102 - host_name: 172.21.232.103 cluster_name: "hci-ai-ots"# Name of ONTAP Cluster cluster_ip: "172.21.232.118"# Cluster Management IP cluster_netmask: "255.255.255.0" cluster_gateway: "172.21.232.1" cluster_ontap_image: "9.7" cluster_ntp: - "10.61.186.231" cluster_dns_ips: - "10.61.186.231" cluster_dns_domains: - "sddc.netapp.com" mgt_network: "NetApp HCI VDS 01-Management_Network"# Name of VM Port Group for Mgmt Network data_network: "NetApp HCI VDS 01-NFS_Network"# Name of VM Port Group for NFS Network internal_network: ""# Not needed for Single Node Cluster instance_type: "small" cluster_nodes: - node_name: "{{ cluster_name }}-01" ipAddress: 172.21.232.119# Node Management IP storage_pool: NetApp-HCI-Datastore-02 # Name of Datastore in vCenter to use capacityTB: 1# Usable capacity will be ~700GB host_name: 172.21.232.102# IP Address of an ESXi host to deploy nodeUpdate the variables to match your environment.
-
Start ONTAP Select setup.
ansible-playbook ots_setup.yaml --extra-vars deploy_pwd=$'"P@ssw0rd"' --extra-vars vcenter_password=$'"P@ssw0rd"' --extra-vars ontap_pwd=$'"P@ssw0rd"' --extra-vars host_esx_password=$'"P@ssw0rd"' --extra-vars host_password=$'"P@ssw0rd"' --extra-vars deploy_password=$'"P@ssw0rd"'
-
Update the command with
deploy_pwd `(ONTAP Select VM instance), `vcenter_password(vCenter),ontap_pwd(ONTAP login password),host_esx_password(VMware ESXi),host_password(vCenter), anddeploy_password(ONTAP Select VM instance).
Configure the ONTAP Select Cluster – Manual Deployment
To configure the ONTAP Select cluster, complete the following steps:
-
Open a browser and log into the ONTAP cluster’s System Manager using its cluster management IP.
-
On the DASHBOARD page, click Prepare Storage under Capacity.
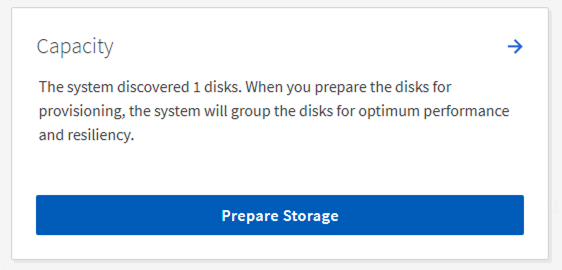
-
Select the radio button to continue without onboard key manager, and click Prepare Storage.
-
On the NETWORK page, click the
+sign in the Broadcast Domains window.
-
Enter the Name as
NFS, set the MTU to9000, and select the porte0b. Click Save.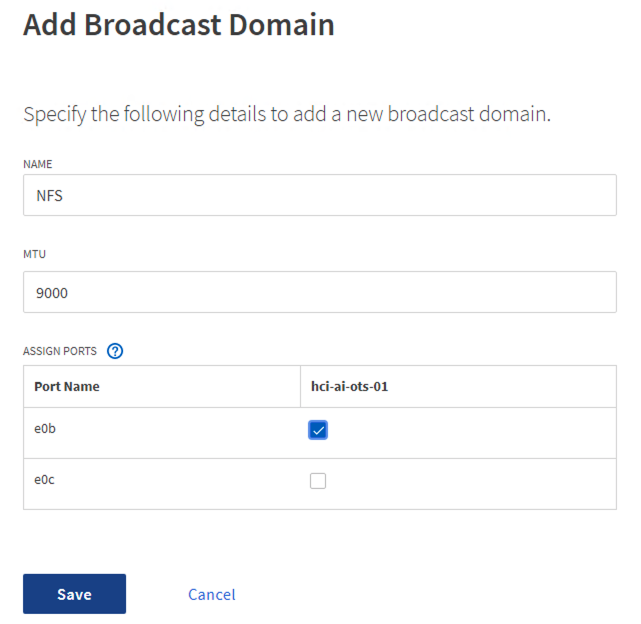
-
On the DASHBOARD page, click
Configure Protocolsunder Network.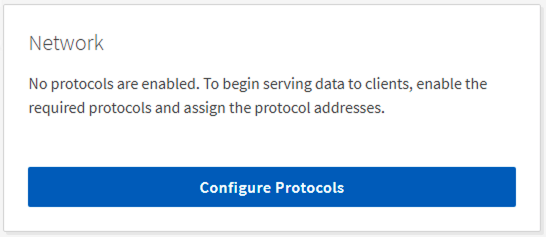
-
Enter a name for the SVM, select Enable NFS, provide an IP and subnet mask for the NFS LIF, set the Broadcast Domain to NFS, and click Save.
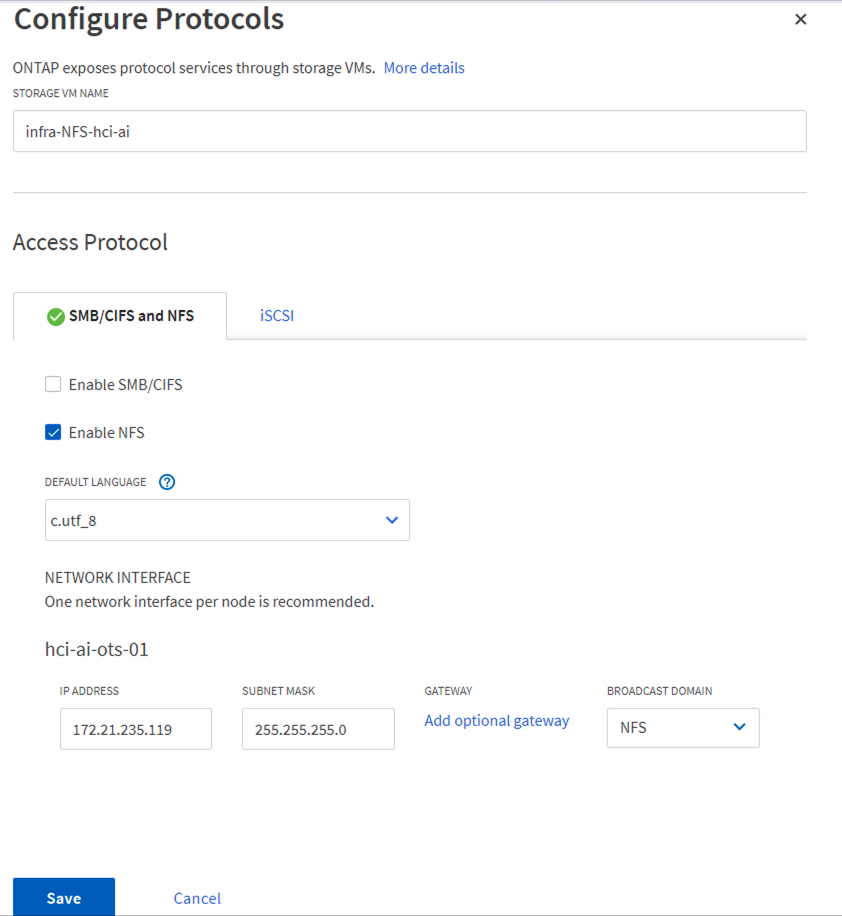
-
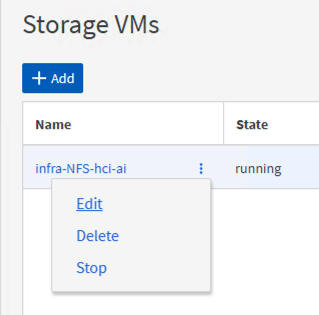
Click STORAGE in the left pane, and from the dropdown select Storage VMs
-
Edit the SVM.
-
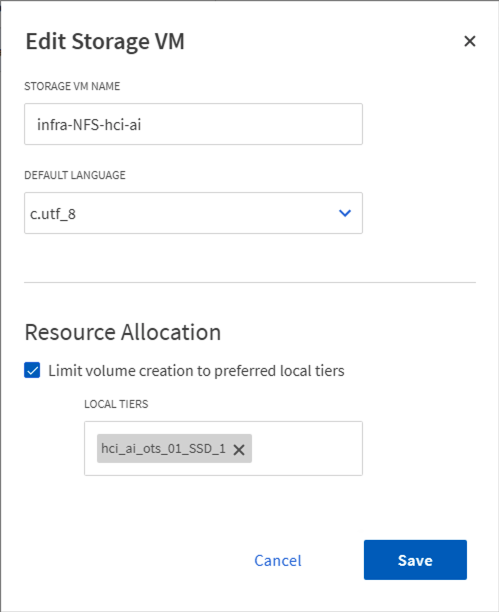
Select the checkbox under Resource Allocation, make sure that the local tier is listed, and click Save.
-
-
Click the SVM name, and on the right panel scroll down to Policies.
-
Click the arrow within the Export Policies tile, and click the default policy.
-
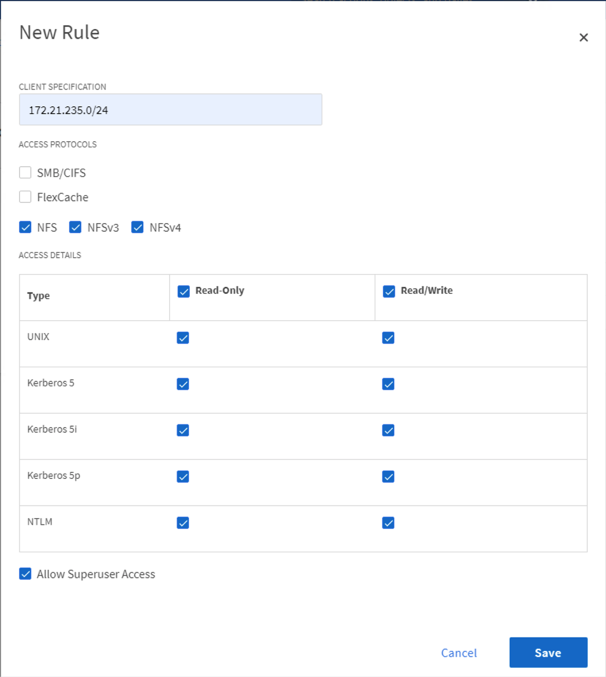
If there is a rule already defined, you can edit it; if no rule exists, then create a new one.
-
Select NFS Network Clients as the Client Specification.
-
Select the Read-Only and Read/Write checkboxes.
-
Select the checkbox to Allow Superuser Access.
-


 Private Cloud