

Deploy Workload Security Agents
 Suggest changes
Workload Security agents are essential for monitoring user activity and detecting potential security threats across your storage infrastructure. This guide provides step-by-step installation instructions, best practices for agent management (including pause/resume and pin/unpin capabilities), and post-deployment configuration requirements. Before you begin, ensure your agent server meets the system requirements.
Before You Begin
-
The sudo privilege is required for installation, running scripts, and uninstall.
-
While installing the agent, a local user cssys and a local group cssys are created on the machine. If permission settings do not allow creation of a local user, and instead require Active Directory, a user with the username cssys must be created in the Active Directory server.
-
You can read about Data Infrastructure Insights security here.
Best Practices
Keep the following in mind before configuring your Workload Security agent.
Pause and Resume |
Pause: Removes fpolicies from ONTAP. Typically used when customers perform extended maintenance activities which may take significant time, such as agent VM reboots or storage replacements. |
Pin and Unpin |
Unpin immediately fetches the latest version (if available) and upgrades the agent and collector. During this upgrade, fpolicies will disconnect and reconnect. |
Recommended Approach |
For large configurations, it is advisable to use Pin and Unpin rather than pausing collectors. There is no need to pause and resume while using pin and unpin. |
Steps to Install Agent
-
Log in as Administrator or Account Owner to your Workload Security environment.
-
Select Collectors > Agents > +Agent
The system displays the Add an Agent page:

-
Verify that the agent server meets the minimum system requirements.
-
To verify that the agent server is running a supported version of Linux, click Versions Supported (i).
-
If your network is using proxy server, please set the proxy server details by following the instructions in the Proxy section.

-
Click the Copy to Clipboard icon to copy the installation command.
-
Run the installation command in a terminal window.
-
The system displays the following message when the installation completes successfully:

-
You need to configure a User Directory Collector .
-
You need to configure one or more Data Collectors.
Network Configuration
Run the following commands on the local system to open ports that will be used by Workload Security. If there is a security concern regarding the port range, you can use a lesser port range, for example 35000:35100. Each SVM uses two ports.
-
sudo firewall-cmd --permanent --zone=public --add-port=35000-55000/tcp -
sudo firewall-cmd --reload
Follow the next steps according to your platform:
CentOS 7.x / RHEL 7.x:
-
sudo iptables-save | grep 35000
Sample output:
-A IN_public_allow -p tcp -m tcp --dport 35000:55000 -m conntrack -ctstate NEW,UNTRACKED -j ACCEPT
CentOS 8.x / RHEL 8.x:
-
sudo firewall-cmd --zone=public --list-ports | grep 35000(for CentOS 8)
Sample output:
35000-55000/tcp
"Pinning" an Agent at the current version
By default, Data Infrastructure Insights Workload Security updates agents automatically. Some customers may wish to pause automatic updating, which leaves an Agent at its current version until one of the following occurs:
-
The customer resumes automatic Agent updates.
-
30 days have passed. Note that the 30 days starts on the day of the most recent Agent update, not at the day the Agent is paused.
In each of these cases, the agent will be updated at the next Workload Security refresh.
To pause or resume automatic agent updates, use the cloudsecure_config.agents APIs:
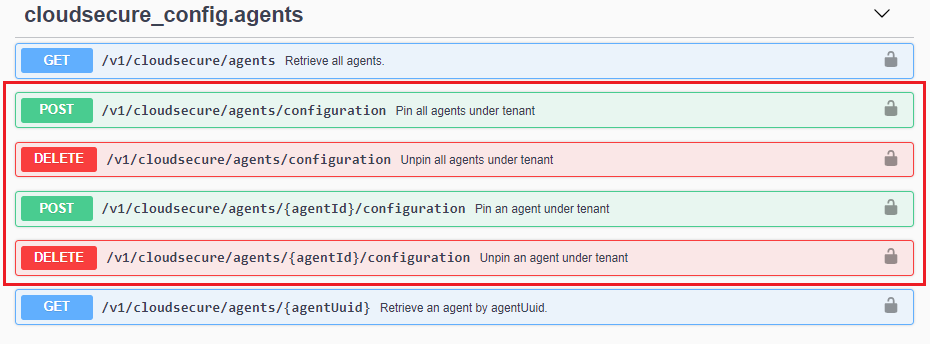
Note that it may take up to five minutes for the pause or resume action to take effect.
You can view your current Agent versions on the Workload Security > Collectors page, in the Agents tab.

Troubleshooting Agent Errors
Known problems and their resolutions are described in the following table.
| Problem: | Resolution: |
|---|---|
Agent installation fails to create the /opt/netapp/cloudsecure/agent/logs/agent.log folder and the install.log file provides no relevant information. |
This error occurs during bootstrapping of the agent. The error is not logged in log files because it occurs before logger is initialized. |
Agent installation fails with ‘This linux distribution is not supported. Exiting the installation’. |
This error appears when you attempt to install the Agent on an unsupported system. See Agent Requirements. |
Agent Installation failed with the error: |
Install unzip and then run the installation command again. If Yum is installed on the machine, try “yum install unzip” to install unzip software. |
Agent was installed and was running. However agent has stopped suddenly. |
SSH to the Agent machine. Check the status of the agent service via |
Unable to add more than 50 Data collectors to an Agent. |
Only 50 Data collectors can be added to an Agent. This can be a combination of all the collector types, for example, Active Directory, SVM and other collectors. |
UI shows Agent is in NOT_CONNECTED state. |
Steps to restart the Agent. |
Agent VM is behind Zscaler proxy and the agent installation is failing. Because of Zscaler proxy’s SSL inspection, the Workload Security certificates are presented as it is signed by Zscaler CA so the agent is not trusting the communication. |
Disable SSL inspection in the Zscaler proxy for the *.cloudinsights.netapp.com url. If Zscaler does SSL inspection and replaces the certificates, Workload Security will not work. |
While installing the agent, the installation hangs after unzipping. |
“chmod 755 -Rf” command is failing. |
If the Agent is still not able to connect to Saas, please open a case with NetApp Support. Provide the Data Infrastructure Insights serial number to open a case, and attach logs to the case as noted. |
To attach logs to the case: |
The cloudsecure-agent-symptom-collector.sh script fails with the following error. |
Zip tool is not installed.. |
Agent installation Fails with useradd: cannot create directory /home/cssys |
This error can occur if user's login directory cannot be created under /home, due to lack of permissions. |
Agent is not running after installation. |
This can be failing because cssys user may not have permission to install. |
Agent was initially connected via a proxy server and the proxy was set during Agent installation. Now the proxy server has changed. How can the Agent’s proxy configuration be changed? |
You can edit the agent.properties to add the proxy details. Follow these steps: |