

Workload Security: Simulating File Tampering
 Suggest changes
You can use the instructions on this page to simulate file tampering for testing or demonstrating Workload Security using the included file tampering Simulation script.
Things to note before you begin
-
The file tampering simulation script works on Linux only. The simulation script should also generate High Confidence Alerts in the event that the user has integrated ONTAP ARP with Workload Security.
-
Workload Security will detect events and alerts generated with NFS 4.1 only if ONTAP version is 9.15 or higher.
-
The script is provided with the Workload Security agent installation files. It is available on any machine that has a Workload Security agent installed.
-
You can run the script on the Workload Security agent machine itself; there is no need to prepare another Linux machine. However, if you prefer to run the script on another system, simply copy the script and run it there.
-
Users can opt for either the Python or shell script based on their preferences and system requirements.
-
The Python script has pre-requisite installations. If you don't want to use python, use the shell script.
Guidelines:
This script should be executed on an SVM containing a folder with a substantial number of files for encryption, ideally 100 or more, including files in sub-folders. Ensure that the files are not empty.
To generate the alert, temporarily pause the collector before test data creation. Once the sample files are generated, resume the collector and initiate the encryption process.
Steps:
Prepare the system:
First, mount the target volume to the machine. You can mount either an NFS or CIFS export.
To mount NFS export in Linux:
mount -t nfs -o vers=4.0 10.193.177.158:/svmvol1 /mntpt
mount -t nfs -o vers=4.0 Vserver data IP>:/nfsvol /destinationlinuxfolder
Do not mount NFS version 4.1; it is not supported by Fpolicy.
To mount CIFS in Linux:
mount -t cifs //10.193.77.91/sharedfolderincluster /root/destinationfolder/ -o username=raisa
Enable ONTAP Autonomous Ransomware Protection (Optional):
If your ONTAP cluster version is 9.11.1 or higher you may enable the ONTAP Ransomware Protection service by executing the following command on the ONTAP command console.
security anti-ransomware volume enable -volume [volume_name] -vserver [svm_name]
Next, set up a Data Collector:
-
Configure the Workload Security agent if not already done.
-
Configure an SVM data collector if not already done.
-
Make sure the mount protocol is selected while configuring the data collector.
Generate the sample files programmatically:
Before creating the files, you must first stop or pause the data collector processing.
Before running the simulation, you must first add files to be encrypted. You can either manually copy the files to be encrypted into the target folder, or use one of the included scripts to programmatically create the files. Whichever method you use, make sure at least 100 files are present to encrypt.
If you choose to programmatically create the files, you can use the Shell or Python:
Shell:
-
Log into the Agent box.
-
Mount an NFS or CIFS share from the SVM of the filer to the Agent machine. Cd to that folder.
-
Copy the script from Agent installation directory (%AGENT_INSTALL_DIR/ agent/install/ransomware_simulation/shell/create_dataset.sh) to the target mount location.
-
Execute the following command using the scripts within the mounted directory (e.g. /root/demo) to create the test dataset folder and files:
'./create_dataset.sh'
-
This will create 100 non empty files with various extensions inside the mount folder under a directory called "test_dataset".
Python:
Python script Prerequisite:
-
Install Python (if not already installed.)
-
Download Python 3.5.2 or above from https://www.python.org/.
-
To check Python installation, run
python --version. -
The Python script has been tested on versions as early as 3.5.2.
-
-
Install pip if not already installed:
-
Download the get-pip.py script from https://bootstrap.pypa.io/.
-
Install pip using
python get-pip.py. -
Verify pip installation with
pip --version.
-
-
PyCryptodome Library:
-
The script uses the PyCryptodome library.
-
Install PyCryptodome with
pip install pycryptodome. -
Confirm PyCryptodome installation by running
pip show pycryptodome.
-
Python create file script:
-
Log into the Agent box.
-
Mount an NFS or CIFS share from the SVM of the filer to the Agent machine. Cd to that folder.
-
Copy the script from Agent installation directory (%AGENT_INSTALL_DIR/agent/install/ransomware_simulation/python/create_dataset.py) to the target mount location.
-
Execute the following command using the scripts within the mounted directory (for e.g. /root/demo) to create the test dataset folder and files:
'python create_dataset.py'
-
This will create 100 non empty files with various extensions inside the mount folder under a directory called “test_dataset"
Resume the collector
If you paused the collector before following these steps, please be sure to resume the collector once the sample files are created.
Generate File Tampering Alert
To generate a file tampering alert, you can execute the included script which will simulate a file tampering alert in Workload Security.
Shell:
-
Copy the script from Agent installation directory (%AGENT_INSTALL_DIR/agent/install/ransomware_simulation/shell/simulate_attack.sh) to the target mount location.
-
Execute the following command using the scripts within the mounted directory (for e.g. /root/demo) to encrypt the test dataset:
'./simulate_attack.sh'
-
This will encrypt the sample files created under the "test_dataset" directory.
Python:
-
Copy the script from Agent installation directory (%AGENT_INSTALL_DIR/agent/install/ransomware_simulation/python/simulate_attack.py) to the target mount location.
-
Please note that python prerequisites are installed as per Python script Prerequisite section
-
Execute the following command using the scripts within the mounted directory (for e.g. /root/demo) to encrypt the test dataset:
'python simulate_attack.py'
-
This will encrypt the sample files created under the "test_dataset" directory.
Generate an Alert in Workload Security
Once the simulator script execution has finished, an alert will be seen on the Web UI within a few minutes.
Note: In the event that all of the following conditions are met, a High Confidence Alert will be generated.
-
Monitored SVM's ONTAP version higher than 9.11.1
-
ONTAP Autonomous Ransomware Protection configured
-
Workload Security Data collector is added in Cluster mode.
Workload Security detects file tampering patterns based on user behaviour while ONTAP ARP detects file tampering activity based on encryption activities in files.
If the conditions are met, Workload Security marks the alerts as High Confidence Alert.
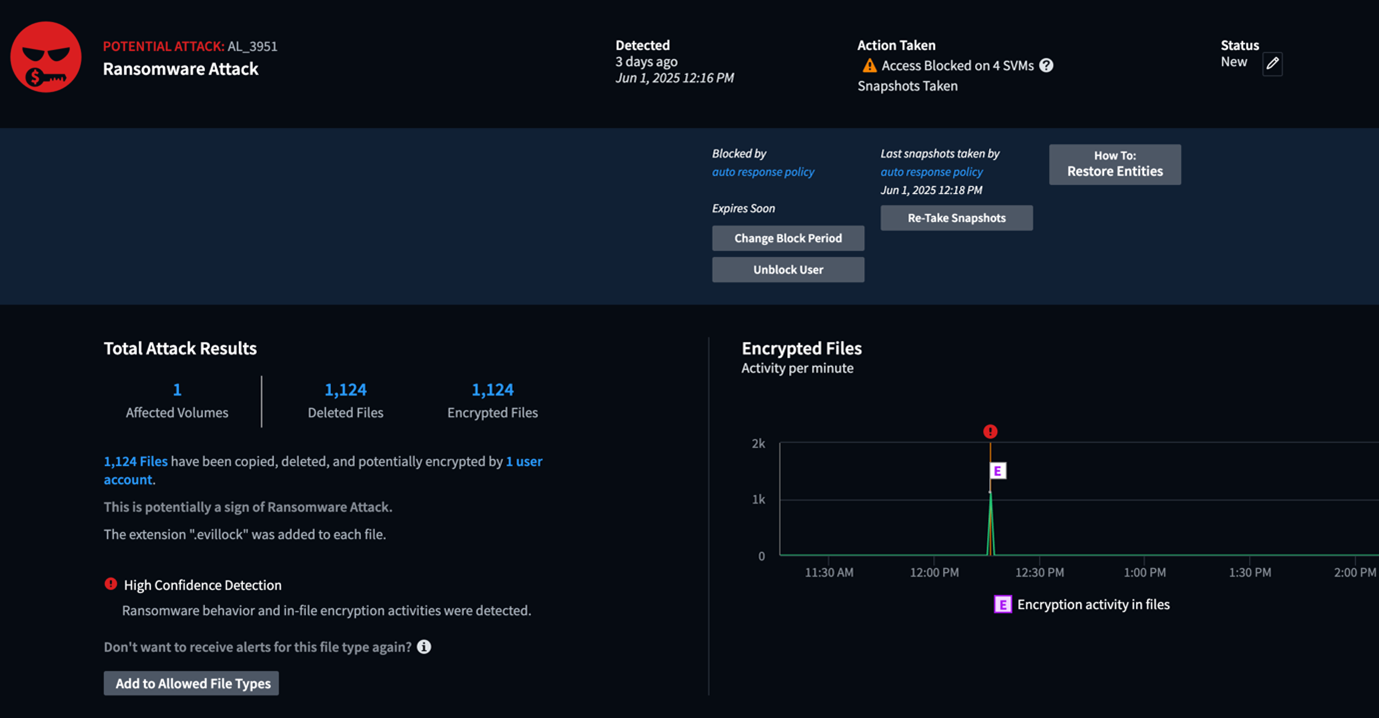
Example of High Confidence Alert on the Alerts list page:

Example of High Confidence Alert detail:
Triggering alert multiple times
Workload Security learns user behavior and will not generate alerts on repeated file tampering attacks within 24 hours for the same user.
To generate a new alert with a different user, please follow the same steps again (creating test data and then encrypting the test data).