

Configuring the ONTAP SVM Data Collector
 Suggest changes
The ONTAP SVM Data Collector enables Workload Security to monitor file and user access activities on NetApp ONTAP storage virtual machines (SVMs). This guide walks you through the configuration and management of the SVM data collector to provide comprehensive security monitoring of your ONTAP environment.
Before you begin
-
This data collector is supported with the following:
-
Data ONTAP 9.2 and later versions. For best performance, use a Data ONTAP version greater than 9.13.1.
-
SMB protocol version 3.1 and earlier.
-
NFS versions up to and including NFS 4.1 (Note that NFS 4.1 is supported with ONTAP 9.15 or later).
-
Flexgroup is supported from ONTAP 9.4 and later versions
-
FlexCache is supported for NFS with ONTAP 9.7 and later versions.
-
FlexCache is supported for SMB with ONTAP 9.14.1 and later versions.
-
ONTAP Select is supported
-
-
Only data type SVMs are supported. SVMs with infinite volumes are not supported.
-
SVM has several sub-types. Of these, only default, sync_source, and sync_destination are supported.
-
An Agent must be configured before you can configure data collectors.
-
Make sure that you have a properly configured User Directory Connector, otherwise events will show encoded user names and not the actual name of the user (as stored in Active Directory) in the “Activity Forensics” page.
-
ONTAP Persistent Store is supported from 9.14.1.
-
For optimal performance, you should configure the FPolicy server to be on the same subnet as the storage system.
-
For comprehensive best practices and recommendations regarding Workload Security FPolicy configuration, see the KB Article on FPolicy Best Practices.
-
You must add an SVM using one of the following two methods:
-
By Using Cluster IP, SVM name, and Cluster Management Username and Password. This is the recommended method.
-
SVM name must be exactly as is shown in ONTAP and is case-sensitive.
-
-
By Using SVM Vserver Management IP, Username, and Password
-
If you are not able or not willing to use the full Administrator Cluster/SVM Management Username and Password, you can create a custom user with lesser privileges as mentioned in the “A note about permissions” section below. This custom user can be created for either SVM or Cluster access.
-
You can also use an AD user with a role that has at least the permissions of csrole as mentioned in “A note about permissions” section below. Also refer to the ONTAP documentation.
-
-
-
Ensure the correct applications are set for the SVM by executing the following command:
clustershell:> security login show -vserver <vservername> -user-or-group-name <username>
Example output:

-
Ensure that the SVM has a CIFS server configured:
clustershell:>vserver cifs showThe system returns the Vserver name, CIFS server name and additional fields.
-
Set a password for the SVM vsadmin user. If using custom user or cluster admin user, skip this step.
clustershell:>security login password -username vsadmin -vserver svmname -
Unlock the SVM vsadmin user for external access. If using custom user or cluster admin user, skip this step.
clustershell:>security login unlock -username vsadmin -vserver svmname -
Ensure the firewall-policy of the data LIF is set to 'mgmt' (not 'data'). Skip this step if using a dedicated management lif to add the SVM.
clustershell:>network interface modify -lif <SVM_data_LIF_name> -firewall-policy mgmt -
When a firewall is enabled, you must have an exception defined to allow TCP traffic for the port using the Data ONTAP Data Collector.
See Agent requirements for configuration information. This applies to on-premise Agents and Agents installed in the Cloud.
-
When an Agent is installed in an AWS EC2 instance to monitor a Cloud ONTAP SVM, the Agent and Storage must be in the same VPC. If they are in separate VPCs, there must be a valid route between the VPC's.
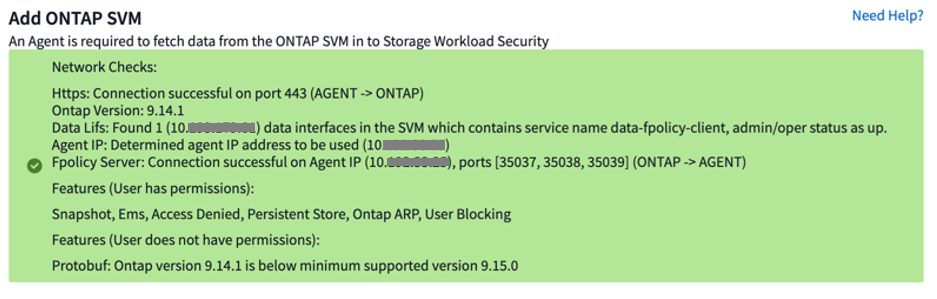
Test Connectivity for Data Collectors
The test connectivity feature (introduced March 2025) aims to help end users identify the specific causes of failures when setting up data collectors in Data Infrastructure Insights (DII) Workload Security. This allows the users to self-correct issues related to network communication or missing roles.
This feature will help users determine if all network-related checks are in place before setting up a data collector. Additionally, it will inform users about the features they can access based on the ONTAP version, roles, and permissions assigned to them in ONTAP.

|
Test connectivity is not supported for User Directory collectors |
Prerequisites for Connection Testing
-
Cluster level credentials are needed for this feature to work in full.
-
Feature access check is not supported in SVM mode.
-
If you are using cluster administration credentials, no new permissions are needed.
-
If you are using a custom user (e.g., csuser), provide the mandatory permissions and feature specific permissions for the features you want to use.

Be sure to review the Permissions section below as well.
Test the Connection
The user can go to the add/edit collector page, enter the cluster level details (in Cluster Mode) or SVM level details (in SVM Mode), and click on the Test Connection button. Workload Security will then process the request and display an appropriate success or failure message.
Things to note for ONTAP Multi Admin Verify (MAV)
Some features, such as the creation and deletion of snapshots or user blocking (SMB), may not work based on the MAV commands added in your version of ONTAP.
Follow the steps below to add exclusions to your MAV commands which allow Workload Security to create or delete snapshots and block users.
Commands to allow snapshot create and delete:
multi-admin-verify rule modify -operation "volume snapshot create" -query "-snapshot !*cloudsecure_*"
multi-admin-verify rule modify -operation "volume snapshot delete" -query "-snapshot !*cloudsecure_*"
Command to allow user blocking:
multi-admin-verify rule delete -operation set
Prerequisites for User Access Blocking
Keep the following in mind for User Access Blocking:
Cluster level credentials are needed for this feature to work.
If you are using cluster administration credentials, no new permissions are needed.
If you are using a custom user (for example, csuser) with permissions given to the user, then follow the steps in User Access Blocking to give permissions to Workload Security to block user.
A Note About Permissions
Permissions when adding via Cluster Management IP:
If you cannot use the Cluster management administrator user to allow Workload Security to access the ONTAP SVM data collector, you can create a new user named “csuser” with the roles as shown in the commands below. Use the username “csuser” and password for “csuser” when configuring the Workload Security data collector to use Cluster Management IP.
Note: You can create a single role to use for all feature permissions for a custom user. If there is an existing user then first delete the existing user and role using these commands:
security login delete -user-or-group-name csuser -application *
security login role delete -role csrole -cmddirname *
security login rest-role delete -role csrestrole -api *
security login rest-role delete -role arwrole -api *
To create the new user, log in to ONTAP with the Cluster management Administrator username/password, and execute the following commands on the ONTAP server:
security login role create -role csrole -cmddirname DEFAULT -access readonly
security login role create -role csrole -cmddirname "vserver fpolicy" -access all
security login role create -role csrole -cmddirname "volume snapshot" -access all -query "-snapshot cloudsecure_*"
security login role create -role csrole -cmddirname "event catalog" -access all
security login role create -role csrole -cmddirname "event filter" -access all
security login role create -role csrole -cmddirname "event notification destination" -access all
security login role create -role csrole -cmddirname "event notification" -access all
security login role create -role csrole -cmddirname "security certificate" -access all
security login role create -role csrole -cmddirname "cluster application-record" -access all
security login create -user-or-group-name csuser -application ontapi -authmethod password -role csrole
security login create -user-or-group-name csuser -application ssh -authmethod password -role csrole
security login create -user-or-group-name csuser -application http -authmethod password -role csrole
Permissions when adding via Vserver Management IP:
If you cannot use the Cluster management administrator user to allow Workload Security to access the ONTAP SVM data collector, you can create a new user named “csuser” with the roles as shown in the commands below. Use the username “csuser” and password for “csuser” when configuring the Workload Security data collector to use Vserver Management IP.
Note: You can create a single role to use for all feature permissions for a custom user. If there is an existing user then first delete the existing user and role using these commands:
security login delete -user-or-group-name csuser -application * -vserver <vservername>
security login role delete -role csrole -cmddirname * -vserver <vservername>
security login rest-role delete -role csrestrole -api * -vserver <vservername>
To create the new user, log in to ONTAP with the Cluster management Administrator username/password, and execute the following commands on the ONTAP server. For ease, copy these commands to a text editor and replace the <vservername> with your Vserver name before and executing these commands on ONTAP:
security login role create -vserver <vservername> -role csrole -cmddirname DEFAULT -access none
security login role create -vserver <vservername> -role csrole -cmddirname "network interface" -access readonly
security login role create -vserver <vservername> -role csrole -cmddirname version -access readonly
security login role create -vserver <vservername> -role csrole -cmddirname volume -access readonly
security login role create -vserver <vservername> -role csrole -cmddirname vserver -access readonly
security login role create -vserver <vservername> -role csrole -cmddirname "vserver fpolicy" -access all
security login role create -vserver <vservername> -role csrole -cmddirname "volume snapshot" -access all
security login create -user-or-group-name csuser -application ontapi -authmethod password -role csrole -vserver <vservername>
security login create -user-or-group-name csuser -application http -authmethod password -role csrole -vserver <vservername>
Protobuf Mode
Workload Security will configure the FPolicy engine in protobuf mode when this option is enabled in the collector's Advanced Configuration settings. Protobuf mode is supported in ONTAP version 9.15 and later.
More details on this feature can be found in the ONTAP documentation.
Specific permissions are required for protobuf (some or all of these may already exist):
Cluster mode:
security login role create -role csrole -cmddirname "vserver fpolicy" -access all
Vserver mode:
security login role create -vserver <vservername> -role csrole -cmddirname "vserver fpolicy" -access all
Permissions for ONTAP Autonomous Ransomware Protection and ONTAP Access Denied
If you are using cluster administration credentials, no new permissions are needed.
If you are using a custom user (for example, csuser) with permissions given to the user, then follow the steps below to give permissions to Workload Security to collect ARP related information from ONTAP.
For more information, read about Integration with ONTAP Access Denied
Configure the data collector
-
Log in as Administrator or Account Owner to your Data Infrastructure Insights environment.
-
Click Workload Security > Collectors > +Data Collectors
The system displays the available Data Collectors.
-
Hover over the NetApp SVM tile and click *+Monitor.
The system displays the ONTAP SVM configuration page. Enter the required data for each field.
Field |
Description |
Name |
Unique name for the Data Collector |
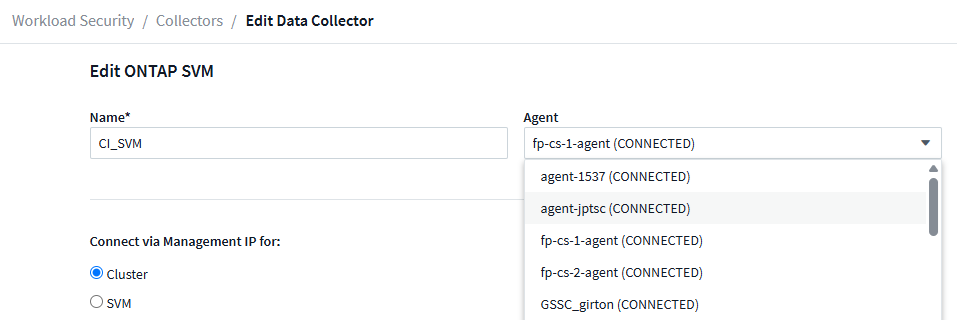
Agent |
Select a configured agent from the list. |
Connect via Management IP for: |
Select either Cluster IP or SVM Management IP |
Cluster / SVM Management IP Address |
The IP address for the cluster or the SVM, depending on your selection above. |
SVM Name |
The Name of the SVM (this field is required when connecting via Cluster IP) |
Username |
User name to access the SVM/Cluster |
Password |
Password for the above user name |
Filter Shares/Volumes |
Choose whether to include or exclude Shares / Volumes from event collection |
Enter complete share names to exclude/include |
Comma-separated list of shares to exclude or include (as appropriate) from event collection |
Enter complete volume names to exclude/include |
Comma-separated list of volumes to exclude or include (as appropriate) from event collection |
Monitor Folder Access |
When checked, enables events for folder access monitoring. Note that folder create/rename and delete will be monitored even without this option selected. Enabling this will increase the number of events monitored. |
Set ONTAP Send Buffer size |
Sets the ONTAP Fpolicy send buffer size. If an ONTAP version prior to 9.8p7 is used and performance issue is seen, then the ONTAP send buffer size can be altered to get improved ONTAP performance. Contact NetApp Support if you do not see this option and wish to explore it. |
-
In the Installed Data Collectors page, use the options menu on the right of each collector to edit the data collector. You can restart the data collector or edit data collector configuration attributes.
Recommended Configuration for MetroCluster
The following is recommended for MetroCluster:
-
Connect two data collectors, one to the source SVM and another to the destination SVM.
-
The data collectors should be connected by Cluster IP.
-
At any moment in time, the current 'running' SVM's data collector will show as Running. The current 'stopped' SVM's data collector will show as Stopped.
-
Whenever there is a switchover, the state of the data collector will change from Running to Stopped and vice versa.
-
It will take up to two minutes for the data collector to move from Stopped state to Running state.
Service Policy
If using service policy with ONTAP version 9.9.1 or newer, in order to connect to the Data Source Collector, the data-fpolicy-client service is required along with the data service data-nfs, and/or data-cifs.
Example:
Testcluster-1:*> net int service-policy create -policy only_data_fpolicy -allowed-addresses 0.0.0.0/0 -vserver aniket_svm
-services data-cifs,data-nfs,data,-core,data-fpolicy-client
(network interface service-policy create)
In versions of ONTAP prior to 9.9.1, data-fpolicy-client need not be set.
Play-Pause Data Collector
If the Data Collector is in Running state, you can Pause collection. Open the "three dots" menu for the collector and select PAUSE. While the collector is paused, no data is gathered from ONTAP, and no data is sent from the collector to ONTAP. This means no Fpolicy events will flow from ONTAP to the data collector, and from there to Data Infrastructure Insights.
Note that if any new volumes, etc. are created on ONTAP while the collector is Paused, Workload Security won't gather the data and those volumes, etc. will not be reflected in dashboards or tables.
|
|
A collector cannot be paused if it has restricted users. Restore the user access before pausing the collector. |
Keep the following in mind:
-
Snapshot purge won't happen as per the settings configured on a paused collector.
-
EMS events (like ONTAP ARP) won't be processed on a paused collector. This means if ONTAP identifies a file tampering attack, Data Infrastructure Insights Workload Security won't be able to acquire that event.
-
Health notifications emails will NOT be sent for a paused collector.
-
Manual or Automatic actions (such as Snapshot or User Blocking) will not be supported on a paused collector.
-
On agent or collector upgrades, agent VM restarts/reboots, or agent service restart, a paused collector will remain in Paused state.
-
If the data collector is in Error state, the collector cannot be changed to Paused state. The Pause button will be enabled only if the state of the collector is Running.
-
If the agent is disconnected, the collector cannot be changed to Paused state. The collector will go into Stopped state and the Pause button will be disabled.
Persistent Store
Persistent store is supported with ONTAP 9.14.1 and later. Note that volume name instructions vary from ONTAP 9.14 to 9.15.
Persistent Store can be enabled by selecting the checkbox in the collector edit/add page. After selecting the checkbox, a text field is displayed for accepting volume name. Volume name is a mandatory field for enabling Persistent Store.
-
For ONTAP 9.14.1, you must create the volume prior to enabling the feature, and provide the same name in the Volume Name field. The recommended volume size is 16GB.
-
For ONTAP 9.15.1, the volume will be created automatically with 16GB size by the collector, using the name provided in in the Volume Name field.
Specific permissions are required for Persistent Store (some or all of these may already exist):
Cluster mode:
security login role create -role csrole -cmddirname "vserver fpolicy" -access all
security login role create -role csrole -cmddirname "job show" -access readonly
Vserver mode:
security login role create -vserver <vservername> -role csrole -cmddirname "vserver fpolicy" -access all
security login role create -vserver <vservername> -role csrole -cmddirname "job show" -access readonly
Migrate Collectors
You can easily migrate a Workload Security collector from one agent to another, allowing for efficient load balancing of collectors across agents.
Prerequisites
-
Source agent must be in connected state.
-
Collector to be migrated must be in running state.
Note:
-
Migrate is supported for both Data and User Directory collectors.
-
Migration of a collector is not supported for manually managed tenants.
Migrate collector
To migrate a collector, follow these steps:
-
Go to the "Edit Collector" page.
-
Select a destination agent from the agent dropdown.
-
Click on the "Save Collector" button.
Workload Security will process the request. On successful migration, the user will be redirected to the collectors list page. In case of failure, an appropriate message will be displayed on the edit page.
Note: Any configuration changes previously made on the "Edit Collector" page will be remain applied when the collector is successfully migrated to the destination agent.
Troubleshooting
See the Troubleshooting the SVM Collector page for troubleshooting tips.