

FSx ONTAP Monitoring and Auto-Resizing using AWS Lambda Function
 Suggest changes
This page describes the automation around monitoring AWS FSx ONTAP and auto-resizing based on threshold.
Overview: Monitoring and Auto-Resizing FSx ONTAP via AWS Lambda function
FSx ONTAP is a first-party enterprise-grade cloud storage service available on AWS that provides highly reliable, scalable, high-performing and feature-rich file storage built on the popular NetApp ONTAP file system.
FSx ONTAP provides a seamless deployment and management experience. No storage expertise is required to get started. To simplify monitoring, an AWS lambda function (to automate resizing of total storage capacity, volume size or LUN size based on threshold) can be used. This document provides a step-by-step guide to creating an automated setup that monitors FSx ONTAP at regular intervals, notifies and resizes when a user-specified threshold is crossed and notifies the administrator of the resizing activity.
Features
The solution provides the following features:
-
Ability to monitor:
-
Usage of overall Storage Capacity of FSx ONTAP
-
Usage of each volume (thin provisioned / thick provisioned)
-
Usage of each LUN (thin provisioned / thick provisioned)
-
-
Ability to resize any of the above when a user-defined threshold is breached
-
Alerting mechanism to receive usage warnings and resizing notifications via email
-
Ability to delete snapshots older than the user-defined threshold
-
Ability to get a list of FlexClone volumes and snapshots associated
-
Ability to monitor the checks at a regular interval
-
Ability to use the solution with or without internet access
-
Ability to deploy manually or using AWS CloudFormation Template
-
Ability to monitor multiple FSx ONTAP filesystems in a single VPC
Pre-requisites
Before you begin, ensure that the following prerequisites are met:
-
FSx ONTAP is deployed
-
Private subnet with connectivity to FSx ONTAP
-
"fsxadmin" password has been set for FSx ONTAP
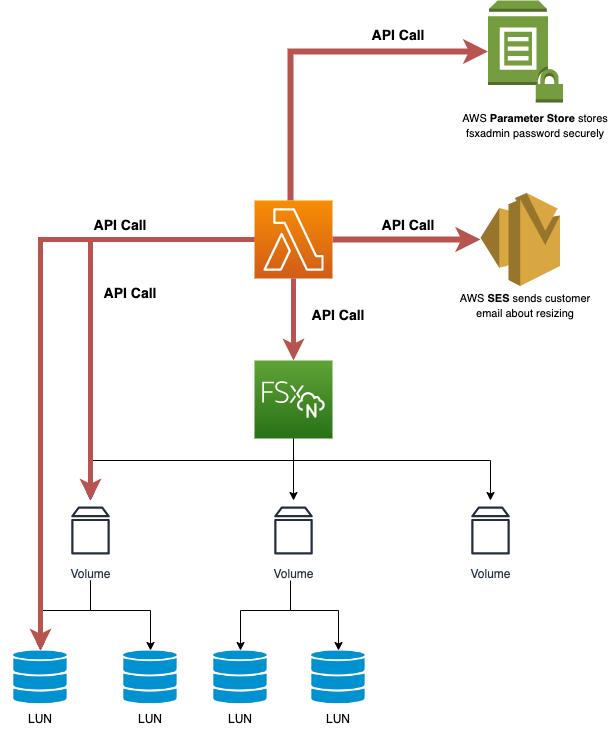
High-Level Architecture
-
AWS Lambda Function makes API calls to FSx ONTAP for retrieving and updating the size of Storage Capacity, Volumes and LUNs.
-
"fsxadmin" password stored as secure string in AWS SSM Parameter Store for an added layer of security.
-
AWS SES (Simple Email Service) is used to notify end-users when a resizing event occurs.
-
If deploying the solution in a VPC without internet access, VPC Endpoints for AWS SSM, FSx and SES are set up to allow Lambda to reach these services via AWS internal network.
Solution Deployment
Automated Deployment

|
Covers single FSx ONTAP filesystem. |
Follow the series of steps to complete the automated deployment of this solution:
Step 1: Clone the GitHub repository
Clone the GitHub repository on your local system:
git clone https://github.com/NetApp/fsxn-monitoring-auto-resizing.git
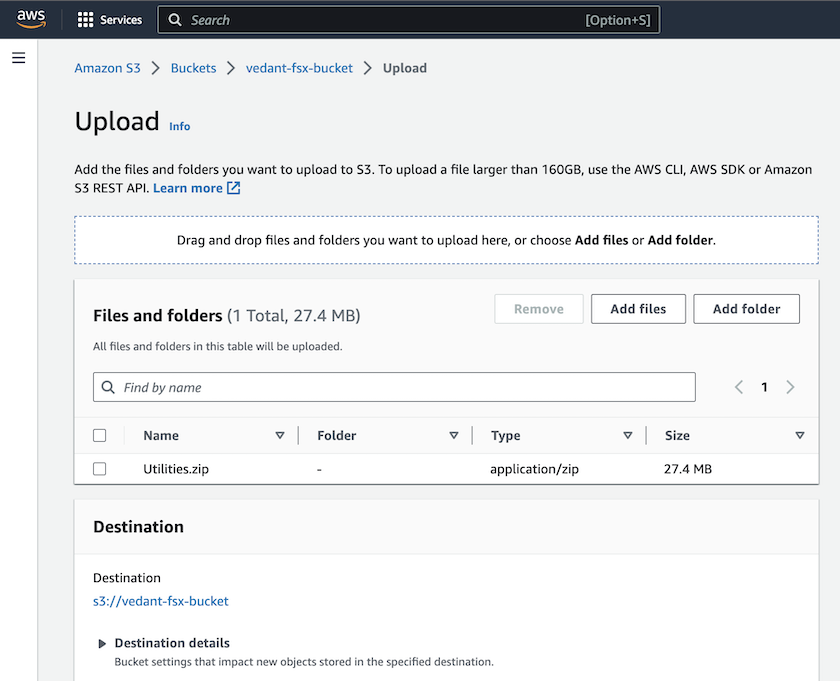
Step 2: Setup an AWS S3 bucket
-
Navigate to AWS Console > S3 and click on Create bucket. Create the bucket with the default settings.
-
Once inside the bucket, click on Upload > Add files and select Utilities.zip from the cloned GitHub repository on your system.
Step 3: AWS SES SMTP Setup (required if no internet access available)
Follow this step if you want to deploy the solution without internet access (Note: There will be added costs associated with VPC endpoints being set up.)
-
Navigate to AWS Console > AWS Simple Email Service (SES) > SMTP Settings and click on Create SMTP credentials
-
Enter an IAM User Name or leave it at the default value and click on Create User. Save the SMTP user name and SMTP password for further use.
Skip this step if SES SMTP setup is already in place. 
Step 4: AWS CloudFormation Deployment
-
Navigate to AWS Console > CloudFormation > Create stack > With New Resources (Standard).
Prepare template: Template is ready
Specify template: Upload a template file
Choose file: Browse to the cloned GitHub repo and select fsxn-monitoring-solution.yaml

Click on Next
-
Enter the stack details. Click on Next and check the checkbox for "I acknowledge that AWS CloudFormation might create IAM resources" and click on Submit.
If "Does VPC have internet access?" is set to False, "SMTP Username for AWS SES" and "SMTP Password for AWS SES" are required. Otherwise, they can be left empty. 


-
Once the CloudFormation deployment starts, the email ID mentioned in the "sender email ID" will get an email asking them to authorize the use of the email address with AWS SES. Click on the link to verify the email address.
-
Once the CloudFormation stack deployment is completed, if there are any warnings/notifications, an email will be sent to the recipient email ID with the notification details.


Manual Deployment
|
|
Supports monitoring multiple FSx ONTAP filesystems in a single VPC. |
Follow the series of steps to complete the manual deployment of this solution:
Step 1: Clone the GitHub repository
Clone the GitHub repository on your local system:
git clone https://github.com/NetApp/fsxn-monitoring-auto-resizing.git
Step 2: AWS SES SMTP Setup (required if no internet access available)
Follow this step if you want to deploy the solution without internet access (Note: There will be added costs associated with VPC endpoints being set up.)
-
Navigate to AWS Console > AWS Simple Email Service (SES) > SMTP Settings and click on Create SMTP credentials
-
Enter an IAM User Name or leave it at the default value and click on Create. Save the username and password for further use.
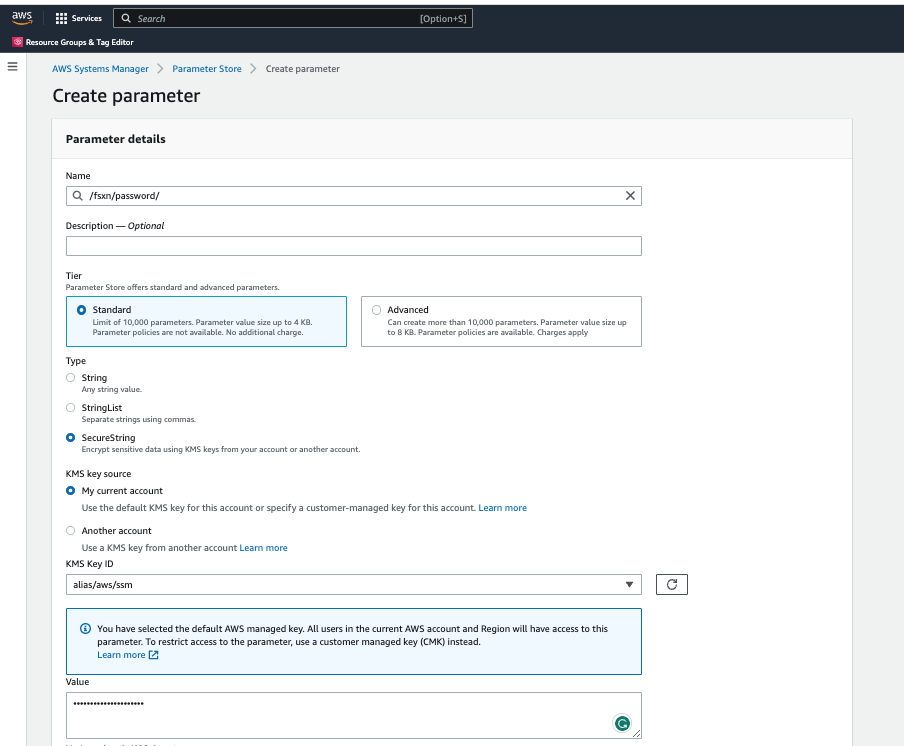
Step 3: Create SSM parameter for fsxadmin password
Navigate to AWS Console > Parameter Store and click on Create Parameter.
Name: <Any name/path for storing fsxadmin password>
Tier: Standard
Type: SecureString
KMS key source: My current account
  KMS Key ID: <Use the default one selected>
Value: <Enter the password for "fsxadmin" user configured on FSx ONTAP>
Click on Create parameter.
Repeat the above steps for all FSx ONTAP filesystems to be monitored.
Perform the same steps for storing smtp username and smtp password if deploying the solution without internet access. Otherwise, skip adding these 2 parameters.
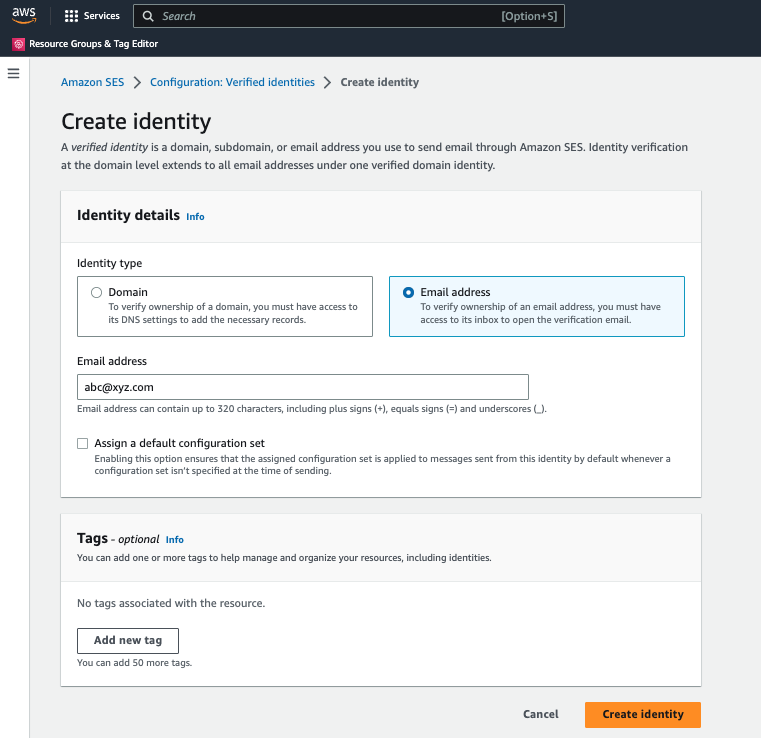
Step 4: Setup Email Service
Navigate to AWS Console > Simple Email Service (SES) and click on Create Identity.
Identity type: Email address
Email address: <Enter an email address to be used for sending resizing notifications>
Click on Create identity
The email ID mentioned in the "sender email ID" will get an email asking the owner to authorize the use of the email address with AWS SES. Click on the link to verify the email address.
Step 5: Setup VPC Endpoints (required if no internet access is available)
|
|
Required only if deployed without internet access. There will be additional costs associated with VPC endpoints. |
-
Navigate to AWS Console > VPC > Endpoints and click on Create Endpoint and enter the following details:
Name: <Any name for the vpc endpoint>
Service category: AWS Services
Services: com.amazonaws.<region>.fsx
vpc: <select the vpc where lambda will be deployed>
subnets: <select the subnets where lambda will be deployed>
Security groups: <select the security group>
Policy: <Either choose Full access or set your own custom policy>
Click on Create endpoint.


-
Follow the same process for creating SES and SSM VPC endpoints. All parameters remain the same as above except Services which will correspond to com.amazonaws.<region>.smtp and com.amazonaws.<region>.ssm respectively.
Step 6: Create and setup the AWS Lambda Function
-
Navigate to AWS Console > AWS Lambda > Functions and click on Create function in the same region as FSx ONTAP
-
Use the default Author from scratch and update the following fields:
Function name: <Any name of your choice>
Runtime: Python 3.9
Architecture: x86_64
Permissions: Select "Create a new role with basic Lambda permissions"
Advanced Settings:
  Enable VPC: Checked
    VPC: <Choose either the same VPC as FSx ONTAP or a VPC that can access both FSx ONTAP and the internet via a private subnet>
    Subnets: <Choose 2 private subnets that have NAT gateway attached pointing to public subnets with internet gateway and subnets that have internet access>
    Security Group: <Choose a Security Group>
Click on Create function.


-
Navigate to the newly created Lambda function > Scroll down to the Layers section and click on Add a layer.

-
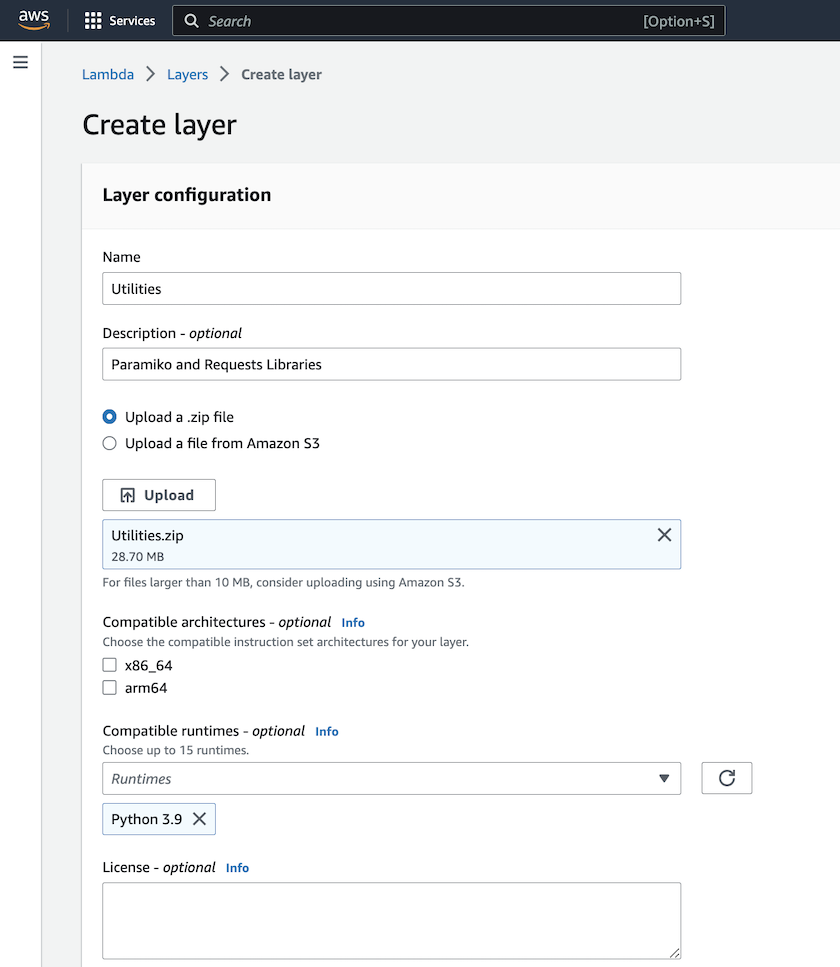
Click on create a new layer under Layer source
-
Create a Layer and upload Utilities.zip file. Select Python 3.9 as the compatible runtime and click on Create.
-
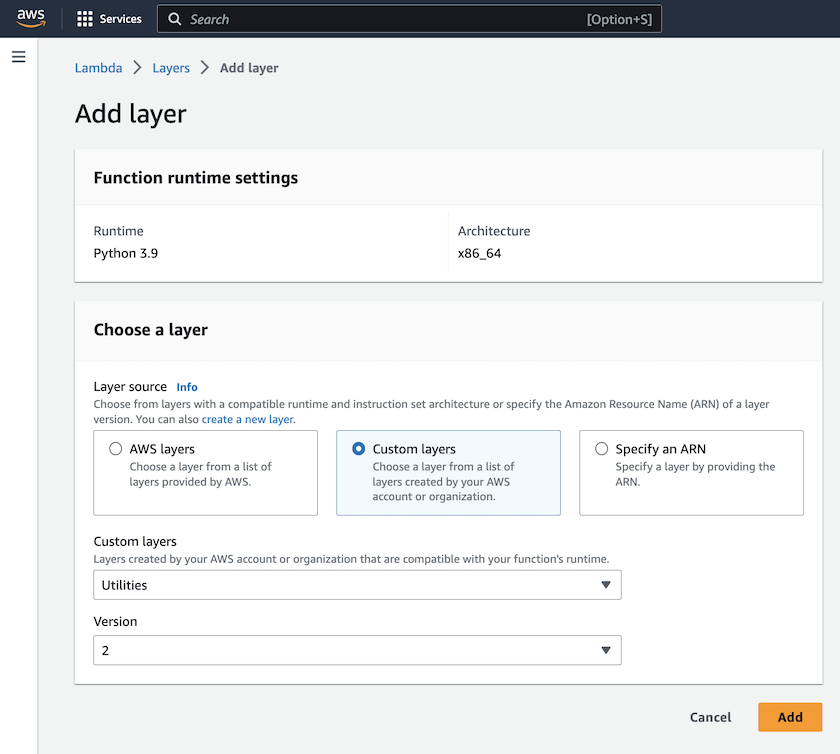
Navigate back to AWS Lambda function > Add Layer > Custom Layers and add the utilities layer.

-
Navigate to the Configuration tab of the Lambda function and click on Edit under General Configuration. Change the Timeout to 5 mins and click Save.
-
Navigate to Permissions tab of the Lambda function and click on the role assigned. In the permissions tab of the role, click on Add permissions > Create Inline policy.
-
Click on the JSON tab and paste the contents of the file policy.json from the GitHub repo.
-
Replace every occurrence of ${AWS::AccountId} with your account ID and click on Review Policy
-
Provide a Name for the policy and click on Create policy
-
-
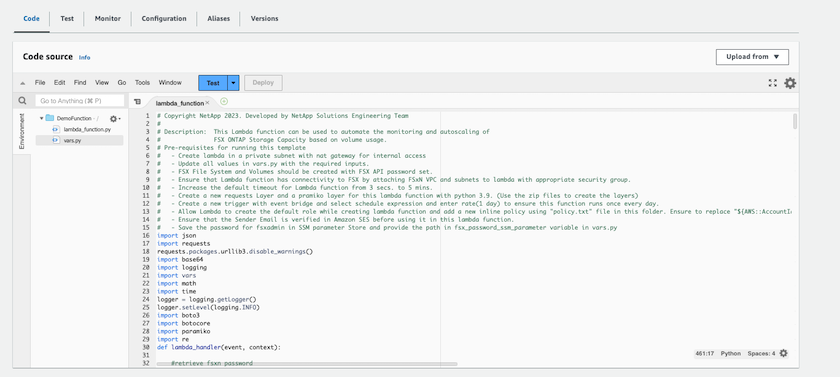
Copy the contents of fsxn_monitoring_resizing_lambda.py from the git repo to lambda_function.py in the AWS Lambda function Code Source section.
-
Create a new file in the same level as lambda_function.py and name it vars.py and copy the contents of vars.py from the git repo to the lambda function vars.py file. Update the variable values in vars.py. Reference variable definitions below and click on Deploy:
Name
Type
Description
fsxList
List
(Required) List of all FSx ONTAP filesystems to be monitored.
Include all the file systems in the list for monitoring and auto-resizing.fsxMgmtIp
String
(Required) Enter the "Management endpoint - IP address" from the FSx ONTAP console on AWS.
fsxId
String
(Required) Enter the "File system ID" from the FSx ONTAP console on AWS.
username
String
(Required) Enter the FSx ONTAP "ONTAP administrator username" from FSx ONTAP console on AWS.
resize_threshold
Integer
(Required) Enter the threshold percentage from 0-100. This threshold will be used to measure Storage Capacity, Volume and LUN usage and when the % use of any increases above this threshold, resize activity will occur.
fsx_password_ssm_parameter
String
(Required) Enter the path name used in AWS Parameter Store for storing "fsxadmin" password.
warn_notification
Bool
(Required) Set this variable to True to receive a notification when Storage Capacity/Volume/LUN usage exceeds 75% but is less than the threshold.
enable_snapshot_deletion
Bool
(Required) Set this variable to True to enable volume level snapshot deletion for snapshots older than the value specified in "snapshot_age_threshold_in_days".
snapshot_age_threshold_in_days
Integer
(Required) Enter the number of days of volume level snapshots you want to retain. Any snapshots older than the value provided will be deleted and the same will be notified via email.
internet_access
Bool
(Required) Set this variable to True if internet access is available from the subnet where this lambda is deployed. Otherwise set it to False.
smtp_region
String
(Optional) If "internet_access" variable is set to False, enter the region in which lambda is deployed. E.g. us-east-1 (in this format)
smtp_username_ssm_parameter
String
(Optional) If "internet_access" variable is set to False, enter the path name used in AWS Parameter Store for storing the SMTP username.
smtp_password_ssm_parameter
String
(Optional) If "internet_access" variable is set to False, enter the path name used in AWS Parameter Store for storing the SMTP password.
sender_email
String
(Required) Enter the email ID registered on SES that will be used by the lambda function to send notification alerts related to monitoring and resizing.
recipient_email
String
(Required) Enter the email ID on which you want to receive the alert notifications.
-
Click on Test, create a test event with an empty JSON object and run the test by clicking Invoke to check if the script is running properly.
-
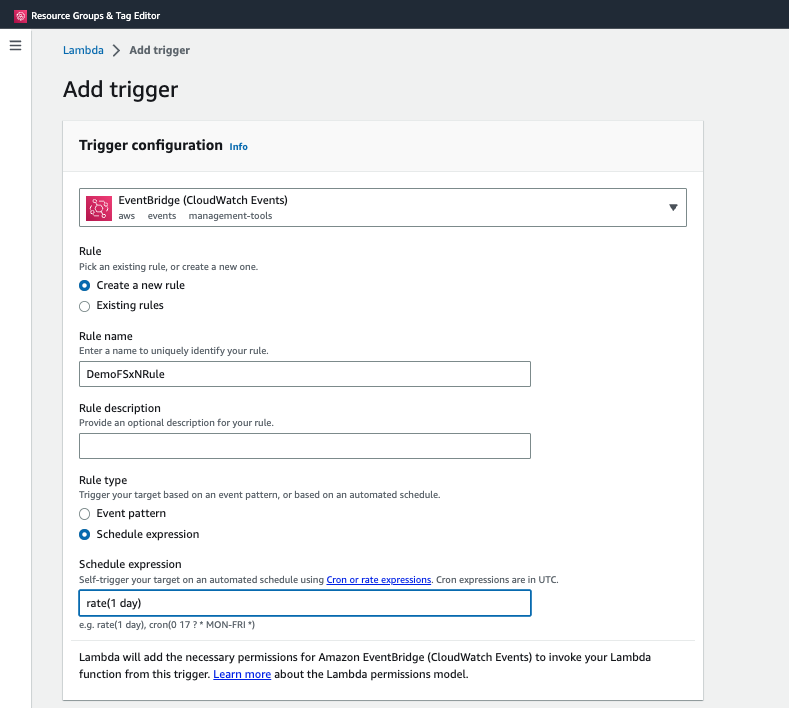
Once tested successfully, navigate to Configuration > Triggers > Add Trigger.
Select a Source: EventBridge
Rule: Create a new rule
Rule name: <Enter any name>
Rule type: Schedule expression
Schedule expression: <Use "rate(1 day)" if you want the function to run daily or add your own cron expression>
Click on Add.
Conclusion
With the provided solution, it is easy to set up a monitoring solution that regularly monitors FSx ONTAP Storage, resizes it based on a user-specified threshold and provides an alerting mechanism. This makes the process of using and monitoring FSx ONTAP seamless freeing up administrators to focus on business-critical activities while storage grows automatically when required.