

Preparing storage systems for SnapVault replication
 Suggest changes
Before you can use SnapManager's integrated SnapVault technology to archive Snapshot copies to disk, you need to configure a data-protection relationship between the source and destination volumes, then initialize the relationship. On initialization, SnapVault makes a Snapshot copy of the source volume, then transfers the copy and all the data blocks it references to the destination volume.
-
You must create the source and destination volumes in peered clusters with peered Storage Virtual Machines (SVMs). For more information, see the Clustered Data ONTAP Cluster Peering Express Guide.
-
You must be a cluster administrator.
You can use the Data ONTAP command-line interface (CLI) or OnCommand System Manager to create SnapVault relationships. The following procedure assumes you are using the CLI. For information about how to create SnapVault relationship by using OnCommand System Manager, see the Clustered Data ONTAP Volume Backup Using SnapVault Express Guide.
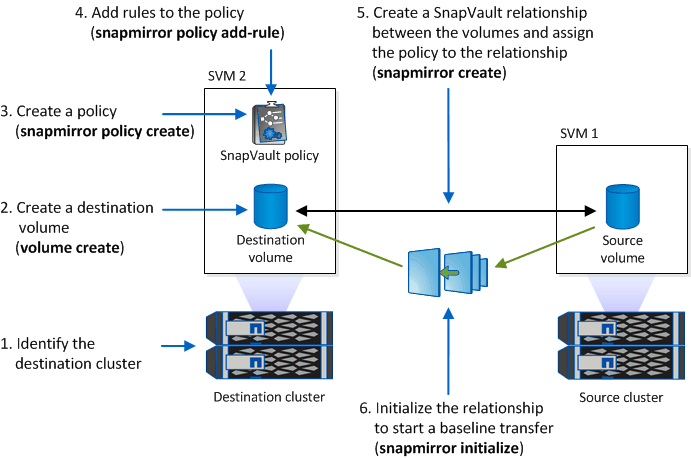
The following illustration shows the procedure for initializing a SnapVault relationship:
-
Identify the destination cluster.
-
On the destination cluster, use the volume create command with the -typeDP option to create a SnapVault destination volume that is the same or greater in size than the source volume.

The language setting of the destination volume must match the language setting of the source volume. The following command creates a 2-GB destination volume named dstvolB in SVM2 on the aggregate node01_aggr:
cluster2::> volume create -vserver SVM2 -volume dstvolB -aggregate node01_aggr -type DP
-size 2GB
-
On the destination SVM, use the snapmirror policy create command to create a SnapVault policy.
The following command creates the SVM-wide policy SVM1-vault:
SVM2::> snapmirror policy create -vserver SVM2 -policy SVM1-vault

Do not define a cron schedule or Snapshot copy policy for the SnapVault relationship. SnapManager does that for you when you create a backup schedule. -
Use the snapmirror policy add-rule command to add a rule to the policy that defines the following Snapshot copy labels and the retention policy for each label:
-
Daily
-
Weekly
-
Monthly
-
Hourly
-
Unlimited Important: The labels are case-sensitive.
These are fixed labels that SnapManager uses. You select one of these options when you archive a backup. You must execute this command once for each of the rules you are adding.
+ The following command adds a rule to the SVM1-vault policy that defines the “daily” label and specifies that thirty Snapshot copies matching the label should be kept in the vault:
+
SVM2::> snapmirror policy add-rule -vserver SVM2 -policy SVM1-vault
-snapmirror-label Daily -keep 30
-
-
Use the snapmirror create command with the -type XDP parameter and the -policy parameter to create a SnapVault relationship and assign a vault policy.
The XDP type defines the relationship as a SnapVault relationship.
The following command creates a SnapVault relationship between the source volume srcvolA on SVM1 and the destination volume dstvolB on SVM2. It assigns the policy named SVM1-vault:
SVM2::> snapmirror create -source-path SVM1:srcvolA -destination-path SVM2:dstvolB
-type XDP -policy SVM1-vault
-
Use the snapmirror initialize command to initialize the relationship.
The initialization process performs a baseline transfer to the destination volume. SnapMirror makes a Snapshot copy of the source volume, then transfers the copy and all the data blocks it references to the destination volume.
The following command initializes the relationship between the source volume srcvolA on SVM1 and the destination volume dstvolB on SVM2:
SVM2::> snapmirror initialize -destination-path SVM2:dstvolB
Related information