

Replace the power supply - E5700 (24-drive)
 Suggest changes
You can replace a power supply in an E5700 array with a 24-drive shelf, which include the following shelf types:
-
E5724 controller shelf
-
DE224C drive shelf
Each 24-drive controller shelf or drive shelf includes two power supplies with integrated fans. These are referred to as power-fan canisters in SANtricity System Manager. If a power-fan canister fails, you must replace it as soon as possible to ensure that the shelf has a redundant power source and adequate cooling.
You can replace a power supply while your storage array is powered on and performing host I/O operations, as long as the second power supply in the shelf has an Optimal status and the OK to remove field in the Details area of the Recovery Guru in SANtricity System Manager displays Yes.
-
Review the details in the Recovery Guru to confirm that there is an issue with the power supply. Select Recheck from the Recovery Guru to ensure no other items must be addressed first.
-
Check that the amber Attention LED on the power supply is on, indicating that the power supply or its integrated fan has a fault. Contact technical support for assistance if both power supplies in the shelf have their amber Attention LEDs on.
-
Make sure you have the following:
-
A replacement power supply that is supported for your controller shelf or drive shelf model.
-
An ESD wristband, or you have taken other antistatic precautions.
-
A management station with a browser that can access SANtricity System Manager for the controller. (To open the System Manager interface, point the browser to the controller's domain name or IP address.)
-
Step 1: Prepare to replace power supply
Prepare to replace a power supply in a 24-drive controller shelf or drive shelf.
-
Collect support data for your storage array using SANtricity System Manager.
If a problem occurs during this procedure, you can use the saved file to troubleshoot the issue. The system will save inventory, status, and performance data about your storage array in a single file.
-
Select .
-
Select Collect Support Data.
-
Click Collect.
The file is saved in the Downloads folder for your browser with the name, support-data.7z.
-
-
From SANtricity System Manager, determine which power supply has failed. You can find this information in the Details area of the Recovery Guru, or you can review the information displayed for the shelf.
-
Select Hardware.
-
Look at the power
 and fan
  icons to the right of the Shelf drop-down lists to determine which shelf has the failed power supply.
If a component has failed, either or both icons are red.
-
When you find the shelf with a red icon, select Show back of shelf.
-
Select either power supply.
-
On the Power Supplies and Fans tabs, look at the statuses of the power-fan canisters, the power supplies, and the fans to determine which power supply must be replaced.
A component with a Failed status must be replaced.

If the second power supply canister in the shelf does not have Optimal status, do not attempt to hot-swap the failed power supply. Instead, contact technical support for assistance.
-
-
From the back of the storage array, look at the Attention LEDs to locate the power supply you need to remove.
You must replace the power supply that has its Attention LED on.

-
If the Power LED
 is solid green, the power supply is functioning correctly. If it is Off, the power supply failed, the AC switch is turned off, the AC power cord is not properly installed, or the AC power cord input voltage is not within margin (there is a problem at the source end of the AC power cord).
If the Attention LED
 is solid amber, the power supply or its integrated fan has a fault.
-
Step 2: Remove failed power supply
Remove a failed power supply so you can replace it with a new one.
-
Unpack the new power supply, and set it on a level surface near the drive shelf.
Save all packing materials for use when returning the failed power supply.
-
Turn off the power supply and disconnect the power cables:
-
Turn off the power switch on the power supply.
-
Open the power cord retainer, and then unplug the power cord from the power supply.
-
Unplug the power cord from the power source.
-
-
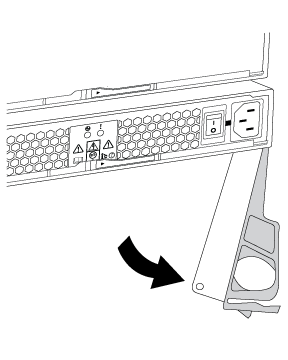
Squeeze the latch on the power supply cam handle, and then open the cam handle to fully release the power supply from the mid plane.
-
Use the cam handle to slide the power supply out of the system.
When removing a power supply, always use two hands to support its weight. As you remove the power supply, a flap swings into place to block the empty bay, helping to maintain air flow and cooling.
Step 3: Install new power supply
Install a new power supply to replace the failed one.
-
Make sure that the on/off switch of the new power supply is in the Off position.
-
Using both hands, support and align the edges of the power supply with the opening in the system chassis, and then gently push the power supply into the chassis using the cam handle.
The power supplies are keyed and can only be installed one way.
Do not use excessive force when sliding the power supply into the system; you can damage the connector. -
Close the cam handle so that the latch clicks into the locked position and the power supply is fully seated.
-
Reconnect the power supply cabling:
-
Reconnect the power cord to the power supply and the power source.
-
Secure the power cord to the power supply using the power cord retainer.
-
-
Turn on the power to the new power-fan canister.
Step 4: Complete power supply replacement
Confirm that the new power supply is working correctly, gather support data, and resume normal operations.
-
On the new power supply, check that the green Power LED is on and the amber Attention LED is OFF.
-
From the Recovery Guru in SANtricity System Manager, select Recheck to ensure the problem has been resolved.
-
If a failed power supply is still being reported, repeat the steps in Step 2: Remove failed power supply and in Step 3: Install new power supply. If the problem persists, contact technical support.
-
Remove the antistatic protection.
-
Collect support data for your storage array using SANtricity System Manager.
-
Select .
-
Select Collect Support Data.
-
Click Collect.
The file is saved in the Downloads folder for your browser with the name, support-data.7z.
-
-
Return the failed part to NetApp, as described in the RMA instructions shipped with the kit.
Your power supply replacement is complete. You can resume normal operations.