

Installing Snap Creator Agent on Windows
 Suggest changes
You can install Snap Creator Agent on Windows hosts by using the Windows installer.
-
JRE 1.8 Update 72 or later must be installed.
-
You must have administrator-level privileges.
-
The default port (9090) or another network port must be available.
-
Snap Creator must be downloaded.
-
Launch the Snap Creator installer by double-clicking the Snap_Creator_Frameworkrelease-Windowsversion.exe file icon (for example, Snap_Creator_Framework4.1.0-Windows64.exe).
-
On the Welcome page, click Next to start the installation.
-
Review and accept the terms of the license agreement.
-
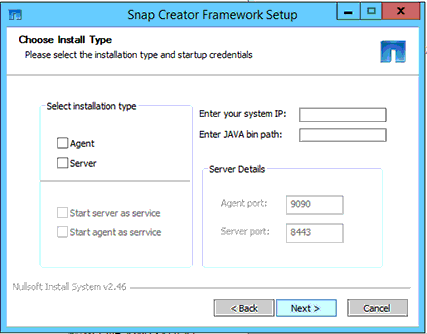
On the Choose Install Type page, configure the following settings to suit various installation types:
-
Select installation type
Select Agent.
-
Start agent as service
Select this option to install and start the snapcreatoragentservice immediately after the installation process is complete.
If this option is not selected, the Agent port field is disabled.

If you do not select this option, the service is not installed, and you must manually start Snap Creator Agent by running a batch script from a command prompt. -
Enter your system IP
Select this option to provide the IP address of the system on which Snap Creator Server or Snap Creator Agent is installed. This option is used for generating the SSL certificate during the Snap Creator installation process.
-
Enter JAVA bin path
Select this option to provide the Java bin path to locate the keytool utility. The keytool utility is used to generate an SSL certificate during the Snap Creator installation process.
-
Agent port
Accept the default port (9090) or specify a port number.
-
-
Click Next.
-
On the Choose Install Location page, either enter a Snap Creator installation path or accept the default path (C:\Program Files\NetApp\Snap_Creator_Framework), and then click Next.
If you plan to use the IBM Domino plug-in, you must select a location other than the Domino data folder. -
On the Choose Start Menu Folder page, either customize the folder in which Snap Creator should appear in the Windows Start Menu or accept the default folder option, and then click Install.
-
After the installation finishes, click Next.
During the Snap Creator Agent service installation, a command prompt is displayed if a service was selected as part of the installation options. This process attempts to start existing services; therefore, it is common to see failure messages listed as part of this step, which you should ignore.
-
Click Finish to close the Windows installer.
-
If you did not select the Start agent as service option during the installation process, you must manually start Snap Creator Agent.
Related information