

 Installation
Configuring the Snap Creator Framework and SAP HANA database backup
 Suggest changes
You must configure the Snap Creator Framework and the SAP HANA database backup.
-
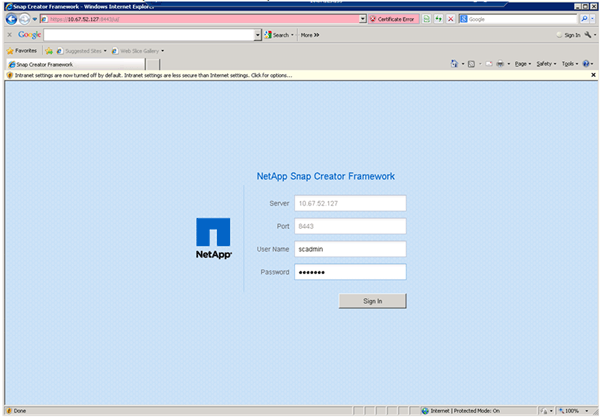
Connect to the Snap Creator graphical user interface (GUI): https://host:8443/ui/.
-
Log in using the user name and password that were configured during the installation. Click Sign in.
-
Enter a profile name and click OK.
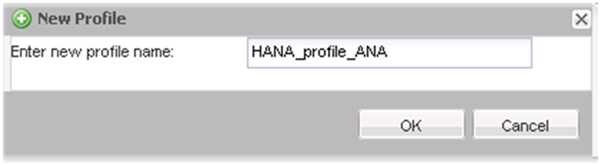
For example, “ANA” is the SID of the database.
-
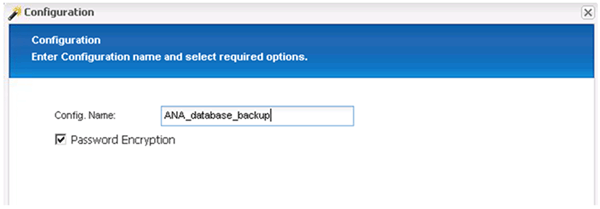
Enter the configuration name, and click Next.
-
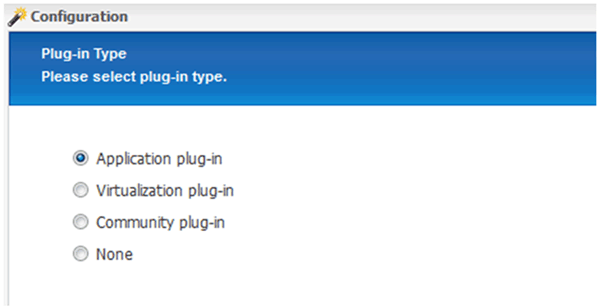
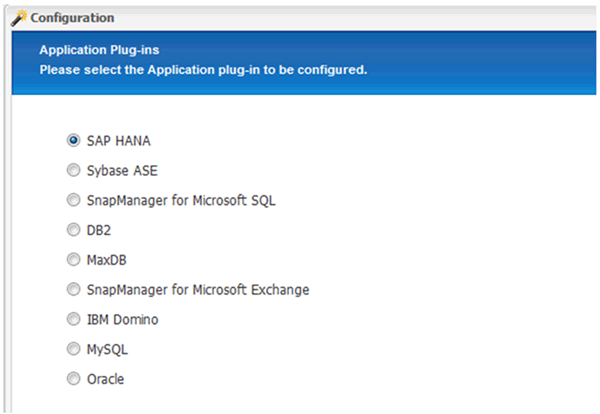
Select Application plug-in as the plug-in type, and click Next.
-
Select SAP HANA as the application plug-in, and click Next.
-
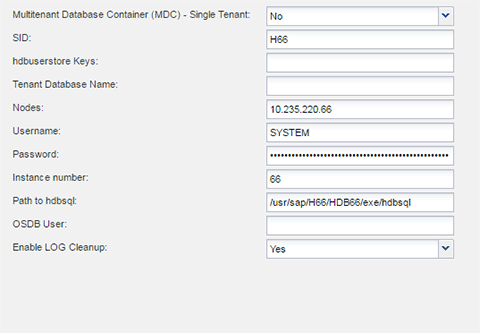
Enter the following configuration details:
-
Select Yes from the drop-down menu to use the configuration with a multitenant database. For a single container database select No.
-
If Multitenant Database Container is set to No, you must provide the database SID.
-
If Multitenant Database Container is set to Yes, you must add the hdbuserstore keys for each SAP HANA node.
-
Add the name of the tenant database.
-
Add the HANA nodes on which the hdbsql statement must be executed.
-
Enter the HANA node instance number.
-
Provide the path to the hdbsql executable file.
-
Add the OSDB user.
-
Select Yes from the drop-down list to Enable LOG Cleanup.
NOTE:
-
Parameter
HANA_SIDis available only if the value for parameterHANA_MULTITENANT_DATABASEis set toN -
For multitenant database containers (MDC) with a “Single Tenant” resource type, the SAP HANA Snapshot copies work with UserStore Key based authentication. If the
HANA_MULTITENANT_DATABASEparameter is set toY, then theHANA_USERSTORE_KEYSparameter must be set to the appropriate value. -
Similar to non-multitenant database containers, the file-based backup and integrity check feature is supported
-
-
Click Next.
-
-
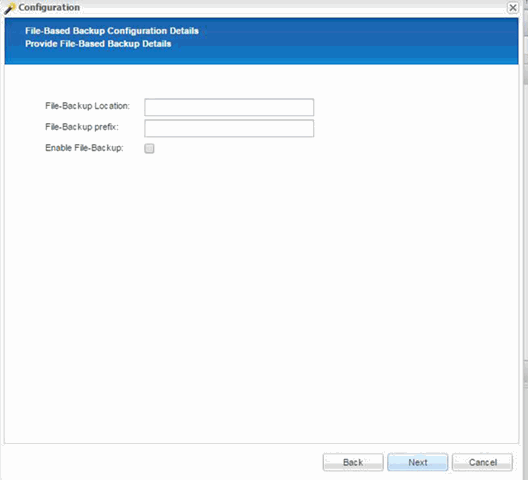
Enable the File-Based Backup operation:
-
Set the File-Backup Location.
-
Specify the file-backup prefix.
-
Select the Enable File-Backup checkbox.
-
Click Next.
-
-
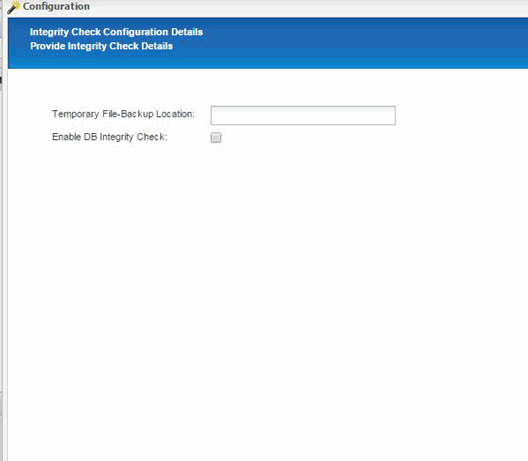
Enable the Database Integrity Check operation:
-
Set the temporary File-Backup location.
-
Select the Enable DB Integrity Check checkbox.
-
Click Next.
-
-
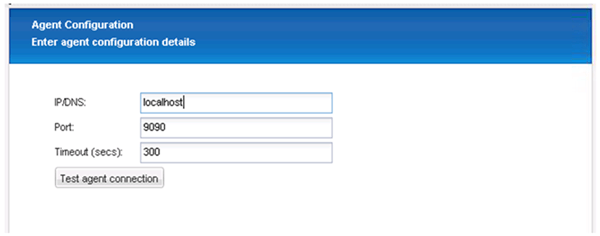
Enter the details for the agent configuration parameter, and click Next.
-
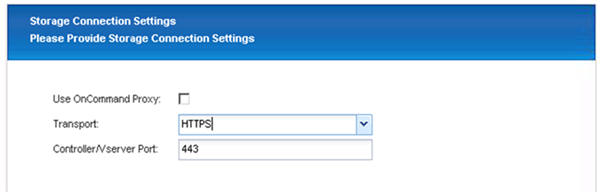
Enter the storage connection settings, and click Next.
-
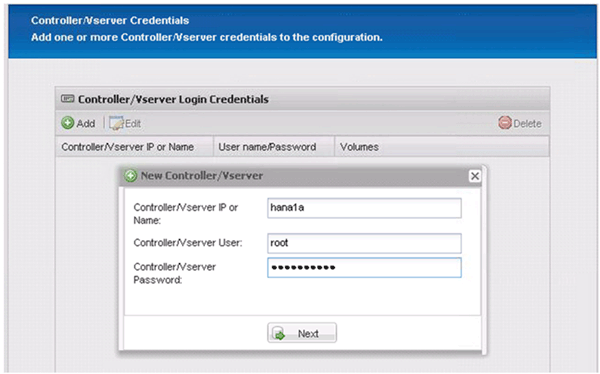
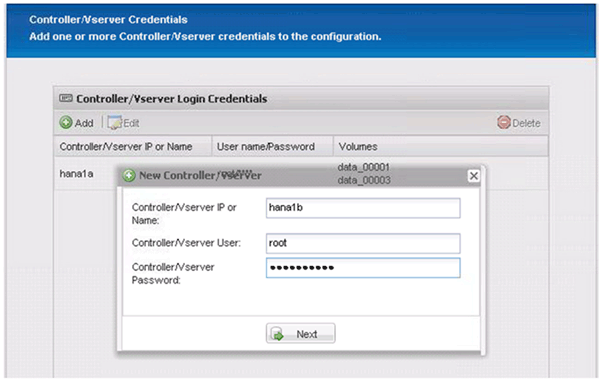
Enter the storage login credentials, and click Next.
-
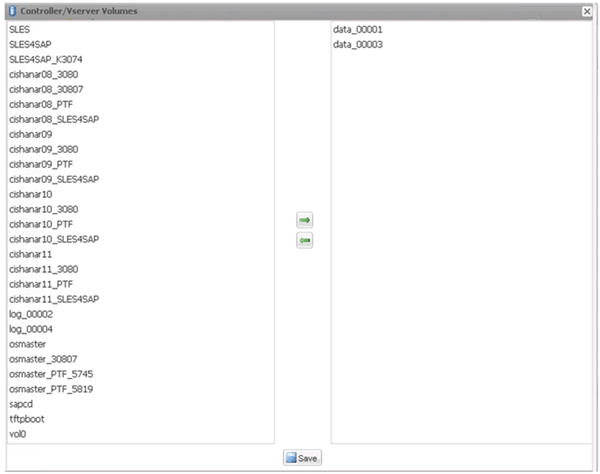
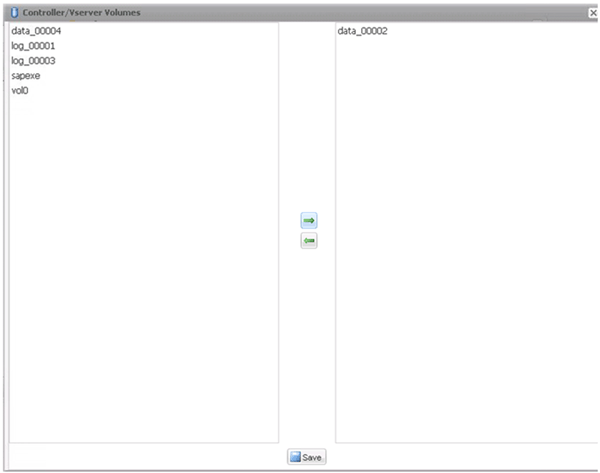
Select the data volumes that are stored on this storage controller, and click Save.
-
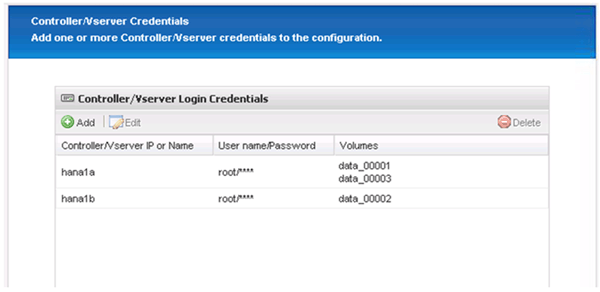
Click Add to add another storage controller.

-
Enter the storage login credentials, and click Next.
-
Select the data volumes that are stored on the second storage controller that you created, and click Save.
-
The Controller/Vserver Credentials window displays the storage controllers and volumes that you added. Click Next.
-
Enter the Snapshot policy and retention configuration.
The retention of three daily and eight hourly Snapshot copies is just an example and could be configured differently depending on the customer requirements.

Select Timestamp as the naming convention. The use of the naming convention Recent is not supported with the SAP HANA plug-in, because the timestamp of the Snapshot copy is also used for the SAP HANA backup catalog entries. 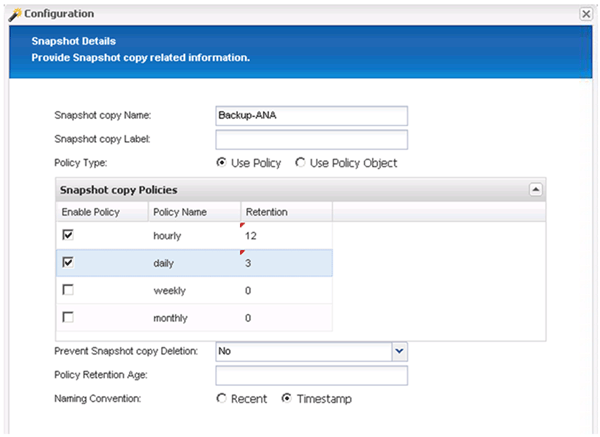
-
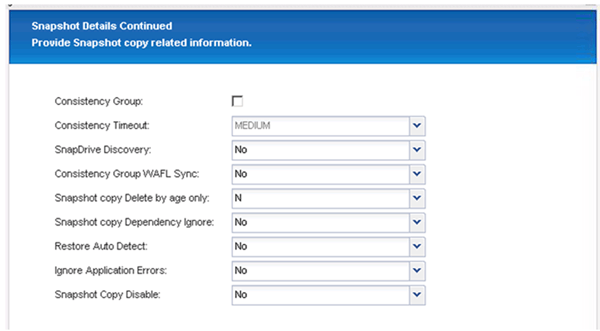
No changes required. Click Next.
-
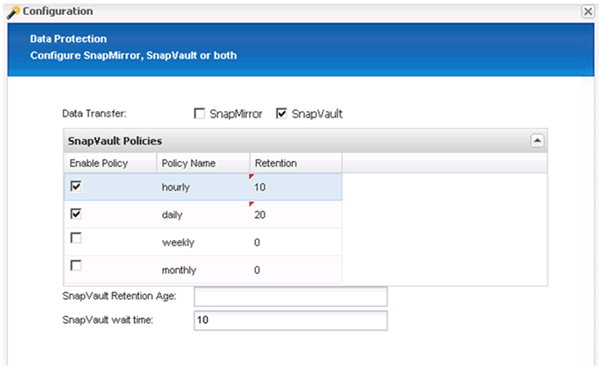
Select SnapVault, and configure the SnapVault retention policies and the SnapVault wait time.
-
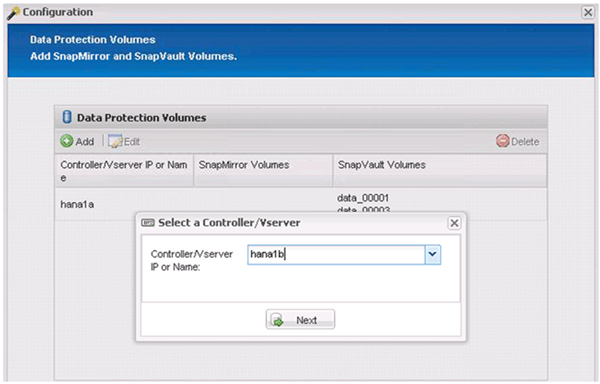
Click Add.
-
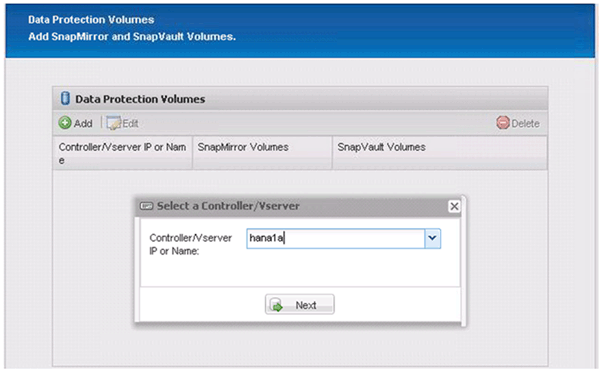
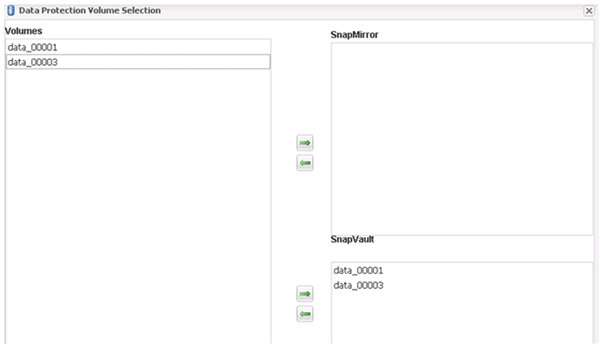
Select a source storage controller from the list, and click Next.
-
Select all the volumes that are stored on the source storage controller, and click Save.
-
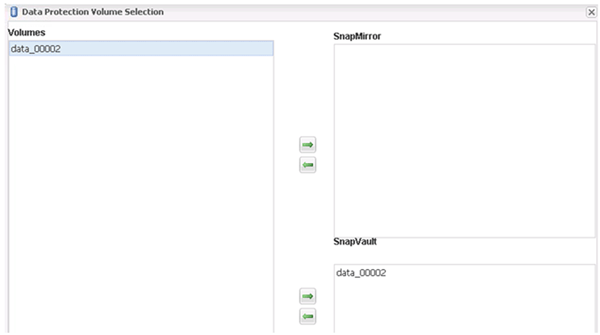
Click Add, and select the second source storage controller from the list, and then click Next.
-
Select all the volumes that are stored on the second source storage controller, and click Save.
-
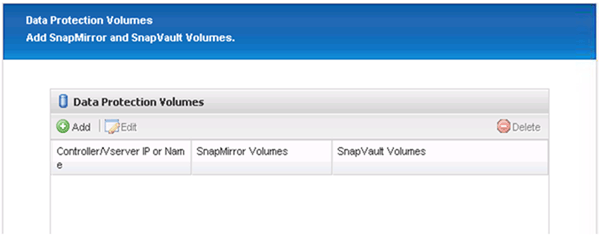
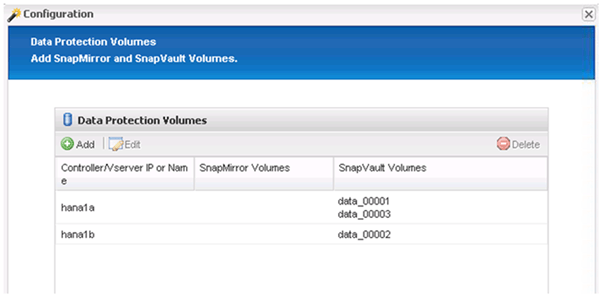
The Data Protection Volumes window displays all the volumes that should be protected in the configuration that you created. Click Next.
-
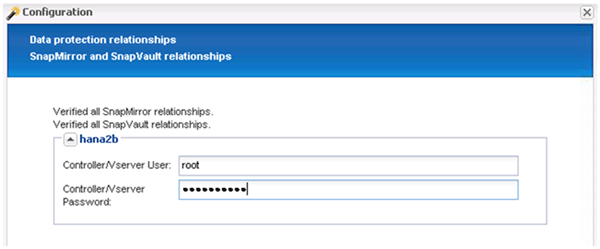
Enter the credentials for the target storage controllers, and click Next. In this example, the “root” user credentials are used to access the storage system. Typically, a dedicated backup user is configured on the storage system and is then used with Snap Creator.
-
Click Next.
-
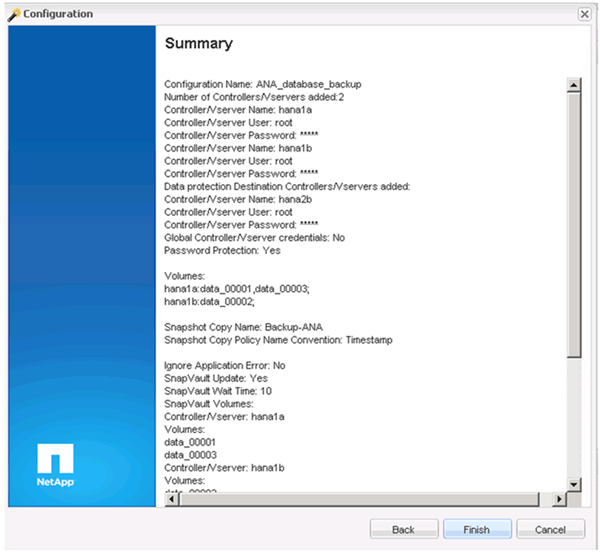
Click Finish to complete the configuration.
-
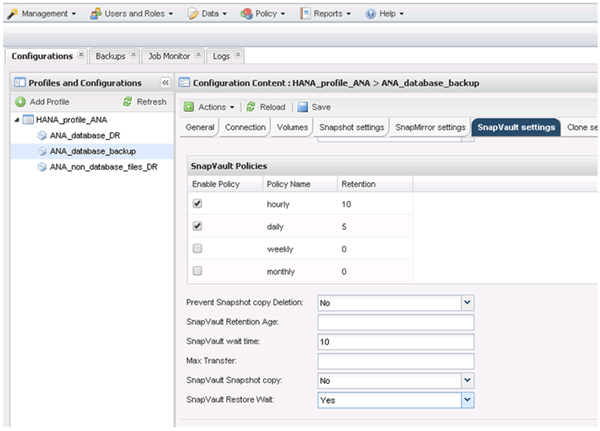
Click the SnapVault settings tab.
-
Select Yes from the drop-down list of the SnapVault Restore Wait option, and click Save.
It is recommended that you use a dedicated network for replication traffic. If you decide to do so, you should include this interface in the Snap Creator configuration file as a secondary interface.
You can also configure dedicated management interfaces so that Snap Creator can access the source or the target storage system by using a network interface that is not bound to the storage controller's host name.
mgmtsrv01:/opt/NetApp/Snap_Creator_Framework_411/scServer4.1.1c/engine/configs/HANA_profile_ANA
# vi ANA_database_backup.conf

#####################################################################
########################
#     Connection Options                                            #
#####################################################################
########################
PORT=443
SECONDARY_INTERFACES=hana1a:hana1a-rep/hana2b;hana1b:hana1b-rep/hana2b
MANAGEMENT_INTERFACES=hana2b:hana2b-mgmt