Add NFS access to an existing SVM
 Suggest changes


Adding NFS access to an existing SVM involves creating a data LIF, optionally configuring NIS, provisioning a volume, exporting the volume, and configuring the export policy.
-
You must know which of the following networking components the SVM will use:
-
The node and the specific port on that node where the data logical interface (LIF) will be created
-
The subnet from which the data LIF's IP address will be provisioned, or optionally the specific IP address you want to assign to the data LIF
-
-
Any external firewalls must be appropriately configured to allow access to network services.
-
The NFS protocol must be allowed on the SVM.
For more information, see the Network management documentation.
-
Navigate to the area where you can configure the protocols of the SVM:
-
Select the SVM that you want to configure.
-
In the Details pane, next to Protocols, click NFS.

-
-
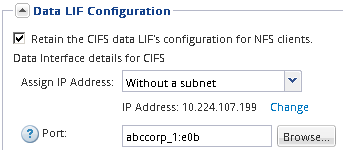
In the Configure NFS protocol dialog box, create a data LIF.
-
Assign an IP address to the LIF automatically from a subnet you specify or manually enter the address.
-
Click Browse and select a node and port that will be associated with the LIF.

-
-
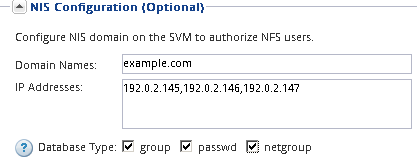
If your site uses NIS for name services or name mapping, specify the domain and IP addresses of the NIS servers and select the database types for which you want to add the NIS name service source.

If NIS services are not available, do not attempt to configure it. Improperly configured NIS services can cause datastore access issues.
-
Create and export a volume for NFS access:
-
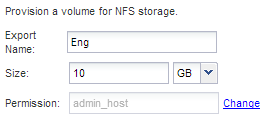
For Export Name, type a name that will be both the export name and the beginning of the volume name.
-
Specify a size for the volume that will contain the files.

You do not have to specify the aggregate for the volume because it is automatically located on the aggregate with the most available space.
-
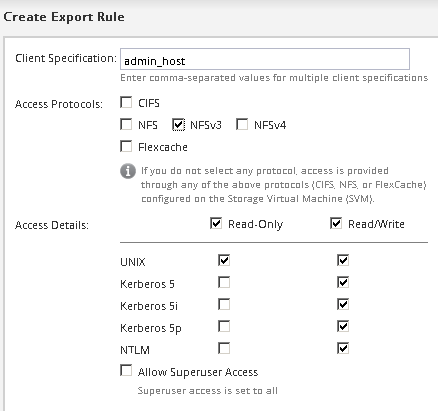
In the Permission field, click Change, and specify an export rule that gives NFSv3 access to a UNIX administration host, including Superuser access.

You can create a 10 GB volume named Eng, export it as Eng, and add a rule that gives the “admin_host” client full access to the export, including Superuser access.
-
-
Click Submit & Close, and then click OK.


