Create intercluster interfaces on all nodes (ONTAP 9.2 or earlier)
 Suggest changes


Using the ONTAP System Manager classic interface with ONTAP 9.2 or an earlier ONTAP 9 release, you can create intercluster LIFs that will be used for peering.
Clusters communicate with each other through logical interfaces (LIFs) that are dedicated to intercluster communication. You must create an intercluster LIF within each IPspace that will be used for peering. The LIFs must be created on each node in each cluster for which you want to create a peer relationship.
You must have identified the subnet and ports, and optionally the IP addresses, that you plan to use for the intercluster LIFs.
You must perform this procedure on both clusters for which you want to create a peer relationship. For example, if you have a four-node cluster that you want to peer with cluster X over IPspace A, and peer with cluster Y over IPspace Y, then you need a total of eight intercluster LIFs; Four on IPspace A (one per node), and four on IPspace Y (one per node).
-
Create an intercluster LIF on one node of the source cluster:
-
Navigate to the Network Interfaces window.
-
Click Create.
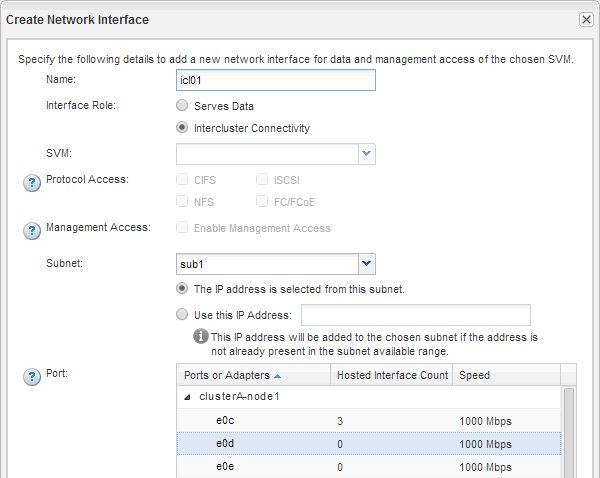
The Create Network Interface dialog box is displayed.
-
Enter a name for the intercluster LIF.
You can use “icl01” for the intercluster LIF on the first node, and “icl02” for the intercluster LIF on the second node.
-
Select Intercluster Connectivity as the interface role.
-
Select the IPspace.
-
In the Add Details dialog box, select Using a subnet from the Assign IP Address drop-down list, and then select the subnet that you want to use for intercluster communication.
By default, the IP address is automatically selected from the subnet after you click Create. If you do not want to use the IP address that is automatically selected, you must manually specify the IP address that the node uses for intercluster communication.
-
If you want to manually specify the IP address that the node uses for intercluster communication, select Use this IP Address, and type the IP address.
You must ensure that the IP address that you want to use either is already available in the subnet or can be added to the subnet later.
-
In the Ports area, click the node that you are configuring, and select the port that you want to use for this node.
-
If you decided not to share ports for intercluster communication with data communication, confirm that the selected port displays “0” in the Hosted Interface Count column.

-
Click Create.
-
-
Repeat Step 1 for each node in the cluster.
Each node in the cluster has an intercluster LIF.
-
Make a note of the IP addresses of the intercluster LIFs so that you can use them later when you create peer relationships with other clusters:
-
In the Network Interfaces window, in the Role column, click
 , clear the All check box, and then select Intercluster.
The Network Interfaces window displays only intercluster LIFs.
-
Note down the IP addresses that are listed in the IP Addresses/WWPN column, or leave the Network Interfaces window open so that you can retrieve the IP addresses later.
You can click the column display icon (
 ) to hide the columns that you do not want to view.
-
All of the nodes in each cluster have intercluster LIFs that can all communicate with each other.


