

Configuring Cross-Origin Resource Sharing (CORS)
 Suggest changes
You can configure Cross-Origin Resource Sharing (CORS) for an S3 bucket if you want that bucket and objects in that bucket to be accessible to web applications in other domains.
-
You must be signed in to the Tenant Manager using a supported browser.
-
You must belong to a user group that has the Manage All Buckets or the Root Access permission. These permissions override the permissions settings in group or bucket policies.
Cross-Origin Resource Sharing (CORS) is a security mechanism that allows client web applications in one domain to access resources in a different domain. For example, suppose you use an S3 bucket named Images to store graphics. By configuring CORS for the Images bucket, you can allow the images in that bucket to be displayed on the website http://www.example.com.
-
Use a text editor to create the XML required to enable CORS.
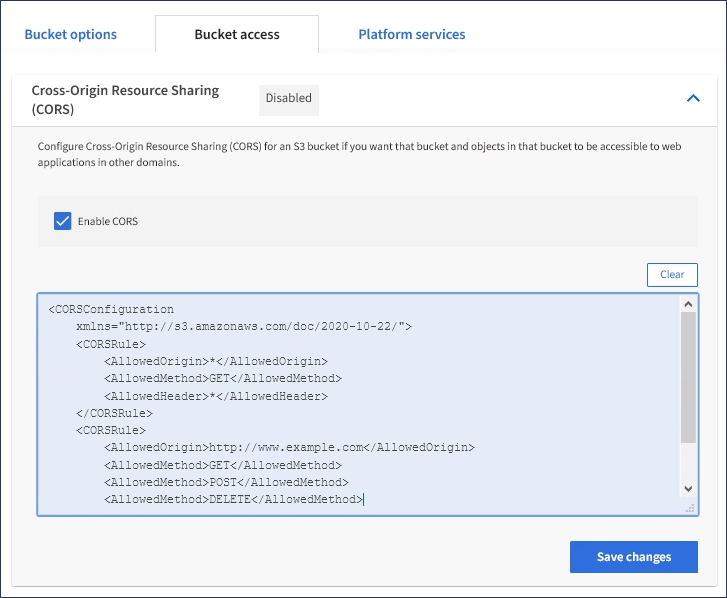
This example shows the XML used to enable CORS for an S3 bucket. This XML allows any domain to send GET requests to the bucket, but it only allows the
http://www.example.comdomain to send POST and DELETE requests. All request headers are allowed.<CORSConfiguration xmlns="http://s3.amazonaws.com/doc/2020-10-22/"> <CORSRule> <AllowedOrigin>*</AllowedOrigin> <AllowedMethod>GET</AllowedMethod> <AllowedHeader>*</AllowedHeader> </CORSRule> <CORSRule> <AllowedOrigin>http://www.example.com</AllowedOrigin> <AllowedMethod>GET</AllowedMethod> <AllowedMethod>POST</AllowedMethod> <AllowedMethod>DELETE</AllowedMethod> <AllowedHeader>*</AllowedHeader> </CORSRule> </CORSConfiguration>For more information about the CORS configuration XML, see Amazon Web Services (AWS) Documentation: Amazon Simple Storage Service Developer Guide.
-
In the Tenant Manager, select STORAGE (S3) > Buckets.
-
Select the bucket name from the list.
The bucket details page appears.
-
Select Bucket access > Cross-Origin Resource Sharing (CORS).
-
Select the Enable CORS check box.
-
Paste the CORS configuration XML into the text box, and select Save changes.
-
To modify the CORS setting for the bucket, update the CORS configuration XML in the text box or select Clear to start over. Then select Save changes.
-
To disable CORS for the bucket, unselect the Enable CORS check box, and then select Save changes.