Cabling a FibreBridge 7600N or 7500N bridge with disk shelves using IOM12 modules
 Suggest changes
After configuring the bridge, you can start cabling the system.
For disk shelves, insert a SAS cable connector with the pull tab oriented down (on the underside of the connector).
-
Daisy-chain the disk shelves in each stack:
-
Beginning with the logical first shelf in the stack, connect IOM A port 3 to the next shelf's IOM A port 1. Repeat the process until each IOM A in the stack is connected.
-
Repeat the previous substep for IOM B.
-
Repeat the previous substeps for each stack.
The Installation and Service Guide for your disk shelf model provides detailed information about daisy-chaining disk shelves.
-
-
Power up the disk shelves, then set the shelf IDs.
-
You must power-cycle each disk shelf.
-
Shelf IDs must be unique for each SAS disk shelf within each MetroCluster DR group (including both sites).
-
-
Cable disk shelves to the FibreBridge bridges.
-
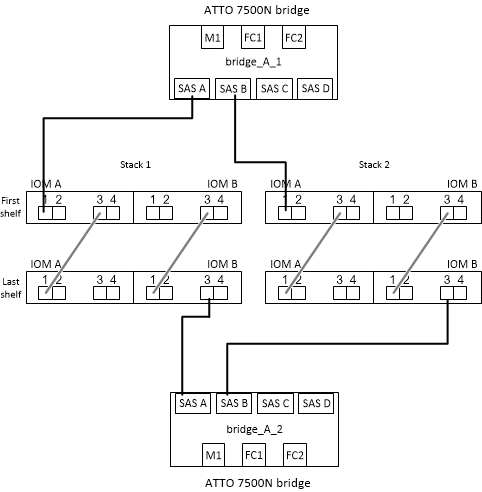
For the first stack of disk shelves, cable IOM A of the first shelf to SAS port A on FibreBridge A. Cable IOM B of the last shelf to SAS port A on FibreBridge B.
-
For additional shelf stacks, repeat the previous step using the next available SAS port on the FibreBridge bridges, using port B for the second stack, port C for the third stack, and port D for the fourth stack.
-
During cabling, attach the stacks based on IOM12 modules to the same bridge as long as they are connected to separate SAS ports.

Each stack can use different models of IOM, but all disk shelves within a stack must use the same model.
The following illustration shows disk shelves connected to a pair of FibreBridge 7600N or 7500N bridges:
-