

Set up and netboot the new MetroCluster IP controllers
 Suggest changes
Set up the new controllers before you netboot the controllers to confirm the new nodes are running the same version of ONTAP as the original nodes.
Set up the new controllers
You must rack and cable the new controllers.
-
Plan out the positioning of the new controller modules and storage shelves as needed.
The rack space depends on the platform model of the controller modules, the switch types, and the number of storage shelves in your configuration.
-
Properly ground yourself.
-
If your upgrade requires replacement of the controller modules, for example, upgrading from an AFF A800 to an AFF A90 system or from an AFF C800 to an AFF C80 system, you must remove the controller module from the chassis when you replace the controller module. For all other upgrades, skip to Step 4.
On the front of the chassis, use your thumbs to firmly push each drive in until you feel a positive stop. This confirms that the drives are firmly seated against the chassis midplane.

-
Install the controller modules.
The installation steps you follow depend on whether your upgrade requires replacement of the controller modules, or if IOM modules are required to convert the old controllers to an external shelf.
If you are upgrading… Follow the steps for … -
An AFF A150 to an AFF A20 system
-
An AFF A220 to an AFF A20 system
Controller to external shelf conversion
-
An AFF A800 to an AFF A90 system
-
An AFF C800 to an AFF C80 system
-
An AFF A250 to an AFF A30 system
-
An AFF C250 to an AFF C30 system
-
An AFF A70 to an AFF A90 system
Controller module replacement
Any other controller upgrade combinations
All other upgrades
Controller to external shelf conversionIf your original MetroCluster IP controllers are AFF A150 or AFF A220 models, you can convert the AFF A150 or AFF A220 HA pair to a DS224C drive shelf and then attach it to the new nodes.
For example, when upgrading from an AFF A150 or AFF A220 system to an AFF A20 system, you can convert the AFF A150 or AFF A220 HA pair to a DS224C shelf by swapping the AFF A150 or AFF A220 controller modules with IOM12 modules.
Steps-
Replace the controller modules in the node you are converting with IOM12 shelf modules.
-
Set the drive shelf ID.
Each drive shelf, including the chassis, requires a unique ID.
-
Reset other drive shelf IDs as needed.
-
Power off the shelves.
-
Cable the converted drive shelf to a SAS port on the new system, and, if you are using out-of-band ACP cabling, to the ACP port on the new node.
-
Turn on the power to the converted drive shelf and any other drive shelves attached to the new nodes.
-
Turn on the power to the new nodes, and then interrupt the boot process on each node by pressing Ctrl-C to access the boot environment prompt.
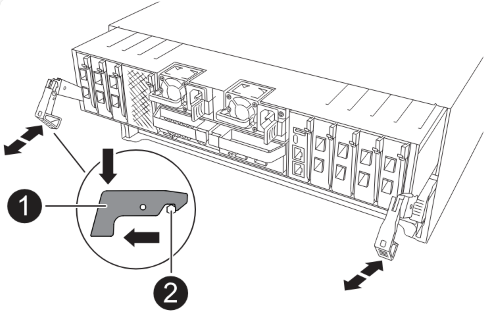
Controller module replacementInstalling the new controllers separately is not applicable for upgrades of integrated systems with disks and controllers in the same chassis, for example, from an AFF A800 system to an AFF A90 system. You must swap the new controller modules and I/O cards after powering off the old controllers, as shown in the image below.
The following example image is for representation only, the controller modules and I/O cards can vary between systems.
 All other upgrades
Install the controller modules in the rack or cabinet.
-
-
Cable the controllers' power, serial console, and management connections as described in Cable the MetroCluster IP switches
Do not connect any other cables that were disconnected from old controllers at this time.
-
Power up the new nodes and press Ctrl-C when prompted to display the
LOADERprompt.
Netboot the new controllers
After you install the new nodes, you need to netboot to ensure the new nodes are running the same version of ONTAP as the original nodes. The term netboot means you are booting from an ONTAP image stored on a remote server. When preparing for netboot, you must put a copy of the ONTAP 9 boot image onto a web server that the system can access.
This task is performed on each of the new controller modules.
-
Access the NetApp Support Site to download the files used for performing the netboot of the system.
-
Download the appropriate ONTAP software from the software download section of the NetApp Support Site and store the
ontap-version_image.tgzfile on a web-accessible directory. -
Go to the web-accessible directory and verify that the files you need are available.
Your directory listing should contain a netboot folder with a kernel file:
ontap-version_image.tgzYou do not need to extract the
ontap-version_image.tgzfile. -
At the
LOADERprompt, configure the netboot connection for a management LIF:-
If IP addressing is DHCP, configure the automatic connection:
ifconfig e0M -auto -
If IP addressing is static, configure the manual connection:
ifconfig e0M -addr=ip_addr -mask=netmask-gw=gateway
-
-
Perform the netboot.
netboot http://web_server_ip/path_to_web-accessible_directory/ontap-version_image.tgz -
From the boot menu, select option (7) Install new software first to download and install the new software image to the boot device.
Disregard the following message: "This procedure is not supported for Non-Disruptive Upgrade on an HA pair". It applies to nondisruptive upgrades of software, not to upgrades of controllers.
-
If you are prompted to continue the procedure, enter
y, and when prompted for the package, enter the URL of the image file:http://web_server_ip/path_to_web-accessible_directory/ontap-version_image.tgzEnter username/password if applicable, or press Enter to continue.
-
Enter
nto skip the backup recovery when you see a prompt similar to the following:Do you want to restore the backup configuration now? {y|n} n -
Reboot by entering
ywhen you see a prompt similar to the following:The node must be rebooted to start using the newly installed software. Do you want to reboot now? {y|n} y
You must reboot the node in order to use the newly installed software.
Clear the configuration on a controller module
Before using a new controller module in the MetroCluster configuration, you must clear the existing configuration.
-
If necessary, halt the node to display the
LOADERprompt:halt -
At the
LOADERprompt, set the environmental variables to default values:set-defaults -
Save the environment:
saveenv -
At the
LOADERprompt, launch the boot menu:boot_ontap menu -
At the boot menu prompt, clear the configuration:
wipeconfigRespond
yesto the confirmation prompt.The node reboots and the boot menu is displayed again.
-
At the boot menu, select option 5 to boot the system into Maintenance mode.
Respond
yesto the confirmation prompt.