

Perform expansion
 Suggest changes
When you perform the expansion, the new grid nodes are added to your existing StorageGRID deployment.
-
You are signed in to the Grid Manager using a supported web browser.
-
You have the provisioning passphrase.
-
You have deployed all of the grid nodes that are being added in this expansion.
-
You have the Maintenance or Root access permission.
-
If you are adding Storage Nodes, you have confirmed that all data-repair operations performed as part of a recovery are complete. See Check data repair jobs.
-
If you are adding Storage Nodes and you want to assign a custom storage grade to those nodes, you have already created the custom storage grade. You also have either the Root access permission or both the Maintenance and ILM permissions.
-
If you are adding a new site, you have reviewed and updated ILM rules. You must ensure that object copies aren't stored to the new site until after the expansion is complete. For example, if a rule uses the default storage pool (All Storage Nodes), you must create a new storage pool that contains only the existing Storage Nodes and update ILM rules and the ILM policy to use that new storage pool. Otherwise, objects will be copied to the new site as soon as the first node at that site becomes active.
Performing the expansion includes these main user tasks:
-
Configure the expansion.
-
Start the expansion.
-
Download a new Recovery Package file.
-
Monitor the expansion steps and stages until all new nodes are installed and configured and all services have started.

Some expansion steps and stages might take a significant amount of time to run on a large grid. For example, streaming Cassandra to a new Storage Node might take only a few minutes if the Cassandra database is empty. However, if the Cassandra database includes a large amount of object metadata, this stage might take several hours or longer. Don't reboot any Storage Nodes during the either the "Expanding the Cassandra cluster" or "Starting Cassandra and streaming data" stages.
-
Select MAINTENANCE > Tasks > Expansion.
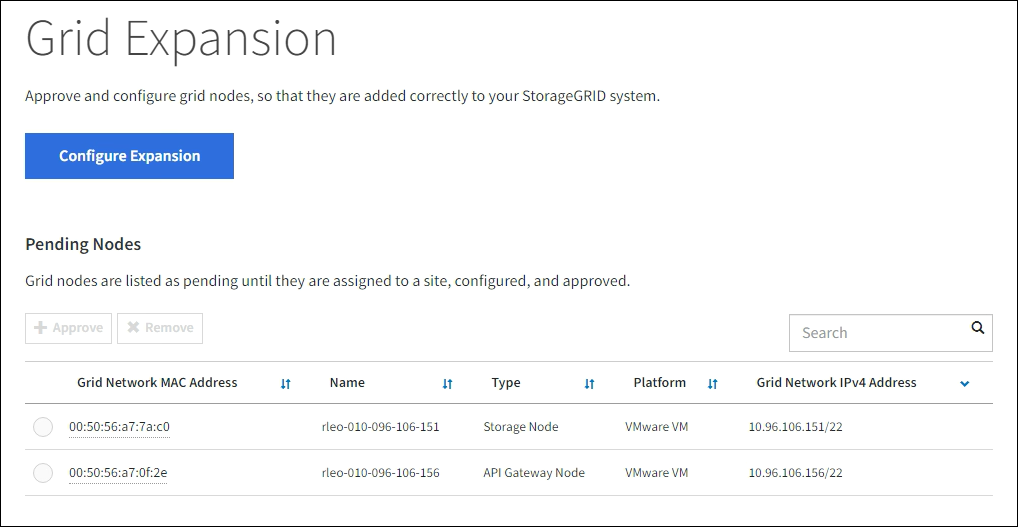
The Grid Expansion page appears. The Pending Nodes section lists the nodes that are ready to be added.
-
Select Configure Expansion.
The Site Selection dialog box appears.
-
Select the type of expansion you are starting:
-
If you are adding a new site, select New, and enter the name of the new site.
-
If you are adding one or more nodes to an existing site, select Existing.
-
-
Select Save.
-
Review the Pending Nodes list, and confirm that it shows all of the grid nodes you deployed.
As required, you can position your cursor over a node's Grid Network MAC Address to see details about that node.


If a node is missing, confirm that it was deployed successfully. -
From the list of pending nodes, approve the nodes you want to add in this expansion.
-
Select the radio button next to the first pending grid node you want to approve.
-
Select Approve.
The grid node configuration form appears.
-
As required, modify the general settings:
Field Description Site
The name of the site the grid node will be associated with. If you are adding multiple nodes, be sure to select the correct site for each node. If you are adding a new site, all nodes are added to the new site.
Name
The system name for the node. System names are required for internal StorageGRID operations and can't be changed.
NTP Role
The Network Time Protocol (NTP) role of the grid node:
-
Select Automatic (default) to automatically assign the NTP role to the node. The Primary role will be assigned to Admin Nodes, Storage Nodes with ADC services, Gateway Nodes, and any grid nodes that have non-static IP addresses. The Client role will be assigned to all other grid nodes.
-
Select Primary to manually assign the Primary NTP role to the node. At least two nodes at each site should have the Primary role to provide redundant system access to external timing sources.
-
Select Client to manually assign the Client NTP role to the node.
ADC Service (Storage Nodes only)
Whether this Storage Node will run the Administrative Domain Controller (ADC) service. The ADC service keeps track of the location and availability of grid services. At least three Storage Nodes at each site must include the ADC service. You can't add the ADC service to a node after it is deployed.
-
Select Yes if the Storage Node you are replacing includes the ADC service. Because you can't decommission a Storage Node if too few ADC services would remain, this ensures that a new ADC service is available before the old service is removed.
-
Select Automatic to let the system determine whether this node requires the ADC service.
Learn about the ADC quorum.
Storage Grade (Storage Nodes only)
Use the Default storage grade, or select the custom storage grade you want to assign to this new node.
Storage grades are used by ILM storage pools, so your selection can affect which objects will be placed on the Storage Node.
-
-
As required, modify the settings for the Grid Network, Admin Network, and Client Network.
-
IPv4 Address (CIDR): The CIDR network address for the network interface. For example: 172.16.10.100/24
If you discover that nodes have duplicate IP addresses on the Grid Network while you are approving nodes, you must cancel the expansion, redeploy the virtual machines or appliances with a non-duplicate IP, and restart the expansion. -
Gateway: The default gateway of the grid node. For example: 172.16.10.1
-
Subnets (CIDR): One or more subnetworks for the Admin Network.
-
-
Select Save.
The approved grid node moves to the Approved Nodes list.
-
To modify the properties of an approved grid node, select its radio button, and select Edit.
-
To move an approved grid node back to the Pending Nodes list, select its radio button, and select Reset.
-
To permanently remove an approved grid node, power the node off. Then, select its radio button, and select Remove.
-
-
Repeat these steps for each pending grid node you want to approve.
If possible, you should approve all pending grid notes and perform a single expansion. More time will be required if you perform multiple small expansions.
-
-
When you have approved all grid nodes, enter the Provisioning Passphrase, and select Expand.
After a few minutes, this page updates to display the status of the expansion procedure. When tasks that affect individual grid nodes are in progress, the Grid Node Status section lists the current status for each grid node.
During the “Installing grid nodes” step for a new appliance, the StorageGRID Appliance Installer shows installation moving from Stage 3 to Stage 4, Finalize Installation. When Stage 4 completes, the controller is rebooted. 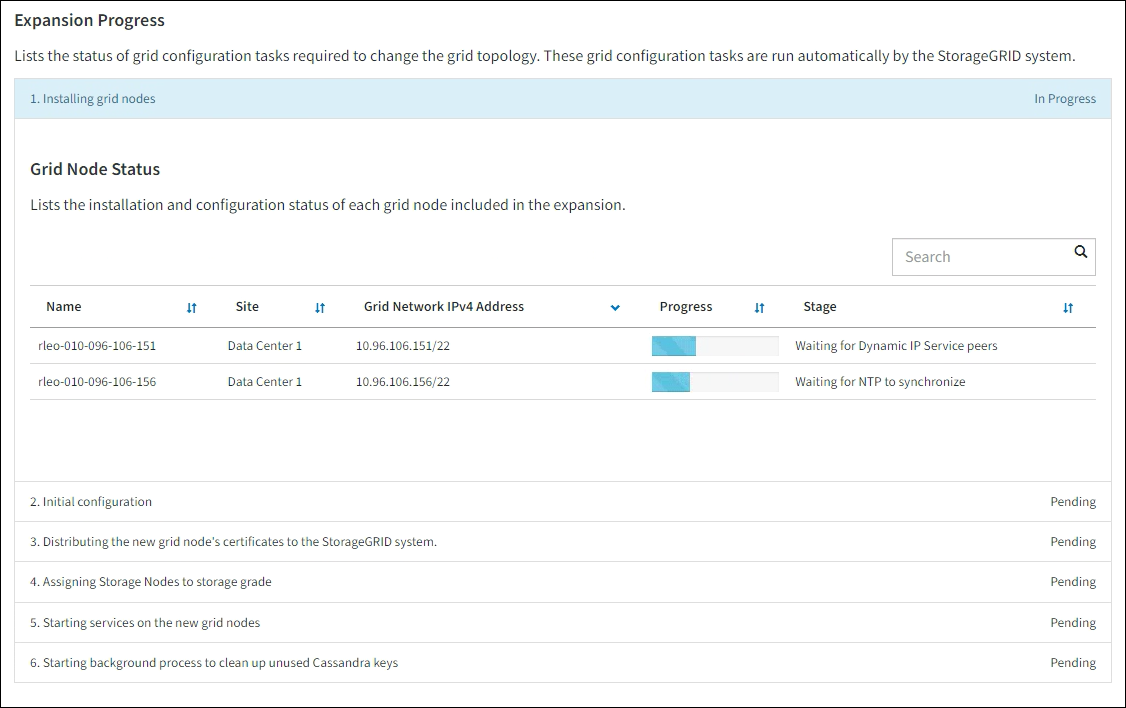
A site expansion includes an additional task to configure Cassandra for the new site. -
As soon as the Download Recovery Package link appears, download the Recovery Package file.
You must download an updated copy of the Recovery Package file as soon as possible after making grid topology changes to the StorageGRID system. The Recovery Package file allows you to restore the system if a failure occurs.
-
Select the download link.
-
Enter the provisioning passphrase, and select Start Download.
-
When the download completes, open the
.zipfile and confirm that you can access the contents, including thePasswords.txtfile. -
Copy the downloaded Recovery Package file (
.zip) to two safe, secure, and separate locations.
The Recovery Package file must be secured because it contains encryption keys and passwords that can be used to obtain data from the StorageGRID system.
-
-
If you are adding Storage Nodes to an existing site or adding a site, monitor the Cassandra stages, which occur when services are started on the new grid nodes.
Don't reboot any Storage Nodes during either the "Expanding the Cassandra cluster" or "Starting Cassandra and streaming data" stages. These stages might take many hours to complete for each new Storage Node, especially if existing Storage Nodes contain a large amount of object metadata. Adding Storage NodesIf you are adding Storage Nodes to an existing site, review the percentage shown in the “Starting Cassandra and streaming data” status message.
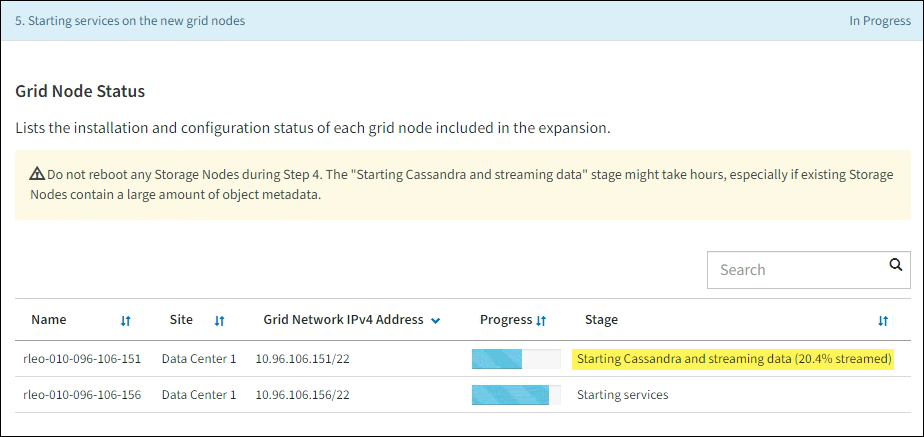
This percentage estimates how complete the Cassandra streaming operation is, based on the total amount of Cassandra data available and the amount that has already been written to the new node.
Adding siteIf you are adding a new site, use
nodetool statusto monitor the progress of Cassandra streaming and to see how much metadata has been copied to the new site during the "Expanding the Cassandra cluster" stage. The total Data Load on the new site should be within about 20% of the total of a current site. -
Continue monitoring the expansion until all tasks are complete and the Configure Expansion button reappears.
Depending on which types of grid nodes you added, perform additional integration and configuration steps. See Configuration steps after expansion.