

Configure load balancer endpoints
 Suggest changes
Load balancer endpoints determine the ports and network protocols S3 and Swift clients can use when connecting to the StorageGRID load balancer on Gateway and Admin Nodes.

|
Support for Swift client applications has been deprecated and will be removed in a future release. |
-
You are signed in to the Grid Manager using a supported web browser.
-
You have the Root access permission.
-
You have reviewed the considerations for load balancing.
-
If you previously remapped a port you intend to use for the load balancer endpoint, you have removed the port remap.
-
You have created any high availability (HA) groups you plan to use. HA groups are recommended, but not required. See Manage high availability groups.
-
If the load balancer endpoint will be used by S3 tenants for S3 Select, it must not use the IP addresses or FQDNs of any bare-metal nodes. Only SG100 or SG1000 appliances and VMware-based software nodes are allowed for the load balancer endpoints used for S3 Select.
-
You have configured any VLAN interfaces you plan to use. See Configure VLAN interfaces.
-
If you are creating an HTTPS endpoint (recommended), you have the information for the server certificate.
Changes to an endpoint certificate can take up to 15 minutes to be applied to all nodes. -
To upload a certificate, you need the server certificate, the certificate private key, and optionally, a CA bundle.
-
To generate a certificate, you need all of the domain names and IP addresses that S3 or Swift clients will use to access the endpoint. You must also know the subject (Distinguished Name).
-
If you want to use the StorageGRID S3 and Swift API certificate (which can also be used for connections directly to Storage Nodes), you have already replaced the default certificate with a custom certificate signed by an external certificate authority. See Configure S3 and Swift API certificates.
-
Create a load balancer endpoint
Each load balancer endpoint specifies a port, a client type (S3 or Swift), and a network protocol (HTTP or HTTPS).
Access the wizard
-
Select CONFIGURATION > Network > Load balancer endpoints.
-
Select Create.
Enter endpoint details
-
Enter details for the endpoint.
Field Description Name
A descriptive name for the endpoint, which will appear in the table on the Load balancer endpoints page.
Port
The StorageGRID port you want to use for load balancing. This field defaults to 10433 for the first endpoint you create, but you can enter any unused external port between 1 and 65535.
If you enter 80 or 443, the endpoint is configured only on Gateway Nodes. These ports are reserved on Admin Nodes.
Client type
The type of client application that will use this endpoint, either S3 or Swift.
Network protocol
The network protocol that clients will use when connecting to this endpoint.
-
Select HTTPS for secure, TLS encrypted communication (recommended). You must attach a security certificate before you can save the endpoint.
-
Select HTTP for less secure, unencrypted communication. Use HTTP only for a non-production grid.
-
-
Select Continue.
Select a binding mode
-
Select a binding mode for the endpoint to control how the endpoint is accessed—using any IP address or using specific IP addresses and network interfaces.
Option Description Global (default)
Clients can access the endpoint using the IP address of any Gateway Node or Admin Node, the virtual IP (VIP) address of any HA group on any network, or a corresponding FQDN.
Use the Global setting (default) unless you need to restrict the accessibility of this endpoint.
Virtual IPs of HA groups
Clients must use a virtual IP address (or corresponding FQDN) of an HA group to access this endpoint.
Endpoints with this binding mode can all use the same port number, as long as the HA groups you select for the endpoints don't overlap.
Node interfaces
Clients must use the IP addresses (or corresponding FQDNs) of selected node interfaces to access this endpoint.
Node type
Based on the type of node you select, clients must use either the IP address (or corresponding FQDN) of any Admin Node or the IP address (or corresponding FQDN) of any Gateway Node to access this endpoint.
If more than one endpoint uses the same port, StorageGRID uses this priority order to decide which endpoint to use: Virtual IPs of HA groups > Node interfaces > Node type > Global. -
If you selected Virtual IPs of HA groups, select one or more HA groups.
-
If you selected Node interfaces, select one or more node interfaces for each Admin Node or Gateway Node that you want to associate with this endpoint.
-
If you selected Node type, select either Admin Nodes, which includes both the primary Admin Node and any non-primary Admin Nodes, or Gateway Nodes.
Control tenant access
-
For the Tenant access step, select one of the following:
Field Description Allow all tenants (default)
All tenant accounts can use this endpoint to access their buckets.
You must select this option if you have not yet created any tenant accounts. After you add tenant accounts, you can edit the load balancer endpoint to allow or block specific accounts.
Allow selected tenants
Only the selected tenant accounts can use this endpoint to access their buckets.
Block selected tenants
The selected tenant accounts can't use this endpoint to access their buckets. All other tenants can use this endpoint.
-
If you are creating an HTTP endpoint, you don't need to attach a certificate. Select Create to add the new load balancer endpoint. Then, go to After you finish. Otherwise, select Continue to attach the certificate.
Attach certificate
-
If you are creating an HTTPS endpoint, select the type of security certificate you want to attach to the endpoint.
The certificate secures the connections between S3 and Swift clients and the Load Balancer service on Admin Node or Gateway Nodes.
-
Upload certificate. Select this option if you have custom certificates to upload.
-
Generate certificate. Select this option if you have the values needed to generate a custom certificate.
-
Use StorageGRID S3 and Swift certificate. Select this option if you want to use the global S3 and Swift API certificate, which can also be used for connections directly to Storage Nodes.
You can't select this option unless you have replaced the default S3 and Swift API certificate, which is signed by the grid CA, with a custom certificate signed by an external certificate authority. See Configure S3 and Swift API certificates.
-
-
If you aren't using the StorageGRID S3 and Swift certificate, upload or generate the certificate.
Upload certificate-
Select Upload certificate.
-
Upload the required server certificate files:
-
Server certificate: The custom server certificate file in PEM encoding.
-
Certificate private key: The custom server certificate private key file (
.key).
EC private keys must be 224 bits or larger. RSA private keys must be 2048 bits or larger. -
CA bundle: A single optional file containing the certificates from each intermediate issuing certificate authority (CA). The file should contain each of the PEM-encoded CA certificate files, concatenated in certificate chain order.
-
-
Expand Certificate details to see the metadata for each certificate you uploaded. If you uploaded an optional CA bundle, each certificate displays on its own tab.
-
Select Download certificate to save the certificate file or select Download CA bundle to save the certificate bundle.
Specify the certificate file name and download location. Save the file with the extension
.pem.For example:
storagegrid_certificate.pem -
Select Copy certificate PEM or Copy CA bundle PEM to copy the certificate contents for pasting elsewhere.
-
-
Select Create.
The load balancer endpoint is created. The custom certificate is used for all subsequent new connections between S3 and Swift clients and the endpoint.
Generate certificate-
Select Generate certificate.
-
Specify the certificate information:
Field Description Domain name
One or more fully qualified domain names to include in the certificate. Use an * as a wildcard to represent multiple domain names.
IP
One or more IP addresses to include in the certificate.
Subject (optional)
X.509 subject or distinguished name (DN) of the certificate owner.
If no value is entered in this field, the generated certificate uses the first domain name or IP address as the subject common name (CN).
Days valid
Number of days after creation that the certificate expires.
Add key usage extensions
If selected (default and recommended), key usage and extended key usage extensions are added to the generated certificate.
These extensions define the purpose of the key contained in the certificate.
Note: Leave this checkbox selected unless you experience connection problems with older clients when certificates include these extensions.
-
Select Generate.
-
Select Certificate details to see the metadata for the generated certificate.
-
Select Download certificate to save the certificate file.
Specify the certificate file name and download location. Save the file with the extension
.pem.For example:
storagegrid_certificate.pem -
Select Copy certificate PEM to copy the certificate contents for pasting elsewhere.
-
-
Select Create.
The load balancer endpoint is created. The custom certificate is used for all subsequent new connections between S3 and Swift clients and this endpoint.
-
After you finish
-
If you use a DNS, ensure that the DNS includes a record to associate the StorageGRID fully qualified domain name (FQDN) to each IP address that clients will use to make connections.
The IP address you enter in the DNS record depends on whether you are using an HA group of load-balancing nodes:
-
If you have configured an HA group, clients will connect to the virtual IP addresses of that HA group.
-
If you aren't using an HA group, clients will connect to the StorageGRID Load Balancer service using the IP address of a Gateway Node or Admin Node.
You must also ensure that the DNS record references all required endpoint domain names, including any wildcard names.
-
-
Provide S3 and Swift clients with the information needed to connect to the endpoint:
-
Port number
-
Fully qualified domain name or IP address
-
Any required certificate details
-
View and edit load balancer endpoints
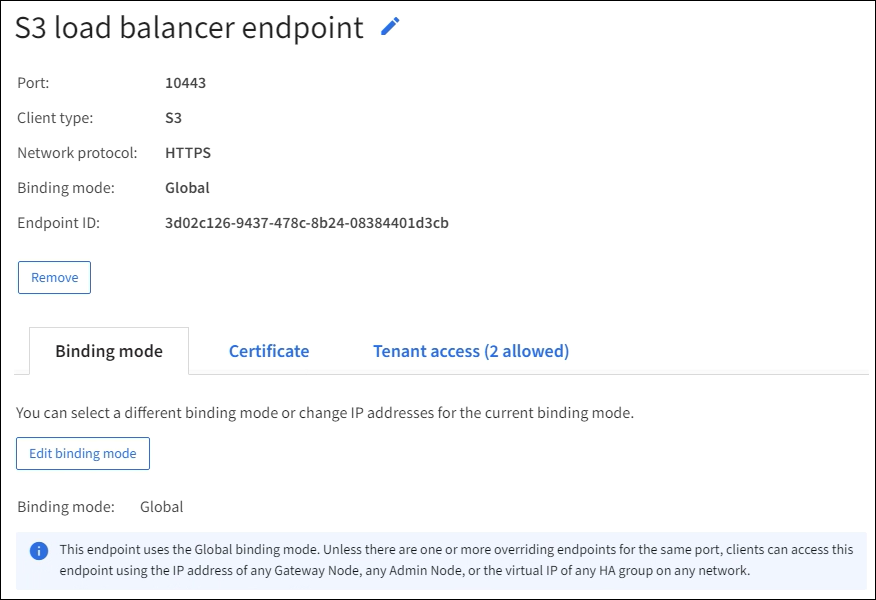
You can view details for existing load balancer endpoints, including the certificate metadata for a secured endpoint. You can also change an endpoint's name or binding mode and update any associated certificates.
You can't change the service type (S3 or Swift), the port, or the protocol (HTTP or HTTPS).
-
To view basic information for all load balancer endpoints, review the table on the Load balancer endpoints page.

-
To view all details about a specific endpoint, including certificate metadata, select the endpoint's name in the table.
-
To edit an endpoint, use the Actions menu on the Load balancer endpoints page or the details page for a specific endpoint.

After editing an endpoint, you might need to wait up to 15 minutes for your changes to be applied to all nodes. Task Actions menu Details page Edit endpoint name
-
Select the checkbox for the endpoint.
-
Select Actions > Edit endpoint name.
-
Enter the new name.
-
Select Save.
-
Select the endpoint name to display the details.
-
Select the edit icon
 .
. -
Enter the new name.
-
Select Save.
Edit endpoint binding mode
-
Select the checkbox for the endpoint.
-
Select Actions > Edit endpoint binding mode.
-
Update the binding mode as required.
-
Select Save changes.
-
Select the endpoint name to display the details.
-
Select Edit binding mode.
-
Update the binding mode as required.
-
Select Save changes.
Edit endpoint certificate
-
Select the checkbox for the endpoint.
-
Select Actions > Edit endpoint certificate.
-
Upload or generate a new custom certificate or begin using the global S3 and Swift certificate, as required.
-
Select Save changes.
-
Select the endpoint name to display the details.
-
Select the Certificate tab.
-
Select Edit certificate.
-
Upload or generate a new custom certificate or begin using the global S3 and Swift certificate, as required.
-
Select Save changes.
Edit tenant access
-
Select the checkbox for the endpoint.
-
Select Actions > Edit tenant access.
-
Choose a different access option, select or remove tenants from the list, or do both.
-
Select Save changes.
-
Select the endpoint name to display the details.
-
Select the Tenant access tab.
-
Select Edit tenant access.
-
Choose a different access option, select or remove tenants from the list, or do both.
-
Select Save changes.
-
Remove load balancer endpoints
You can remove one or more endpoints using the Actions menu, or you can remove a single endpoint from the details page.

|
To prevent client disruptions, update any affected S3 or Swift client applications before you remove a load balancer endpoint. Update each client to connect using a port assigned to another load balancer endpoint. Be sure to update any required certificate information as well. |
-
To remove one or more endpoints:
-
From the Load balancer page, select the checkbox for each endpoint you want to remove.
-
Select Actions > Remove.
-
Select OK.
-
-
To remove one endpoint from the details page:
-
From the Load balancer page. select the endpoint name.
-
Select Remove on the details page.
-
Select OK.
-