

Replace SGF6112 appliance
 Suggest changes
You might need to replace the appliance if it is not functioning optimally or if it has failed.
-
You have a replacement appliance with the same part number as the appliance you are replacing.
-
You have labels to identify each cable that is connected to the appliance.
-
You have physically located the appliance.
The StorageGRID node will not be accessible while you replace the appliance. If the appliance is functioning sufficiently, you can perform a controlled shutdown at the start of this procedure.

|
If you are replacing the appliance before installing StorageGRID software, you might not be able to access the StorageGRID Appliance Installer immediately after completing this procedure. While you can access the StorageGRID Appliance Installer from other hosts on the same subnet as the appliance, you can't access it from hosts on other subnets. This condition should resolve itself within 15 minutes (when any ARP cache entries for the original appliance time out), or you can clear the condition immediately by purging any old ARP cache entries manually from the local router or gateway. |
-
Display the current configurations of the appliance and record them.
-
Log in to the appliance to be replaced:
-
Enter the following command:
ssh admin@grid_node_IP -
Enter the password listed in the
Passwords.txtfile. -
Enter the following command to switch to root:
su - -
Enter the password listed in the
Passwords.txtfile.When you are logged in as root, the prompt changes from
$to#.
-
-
Enter:
run-host-command ipmitool lan printto display the current BMC configurations for the appliance.
-
-
Shut down the appliance:
-
If any of the network interfaces on this StorageGRID appliance are configured for DHCP, you may need to update the permanent DHCP lease assignments on the DHCP servers to reference the MAC addresses of the replacement appliance, to ensure the appliance is assigned the expected IP addresses. See Update MAC address references.
-
Remove and replace the appliance:
-
Label the cables and then disconnect the cables and any network transceivers.

To prevent degraded performance, don't twist, fold, pinch, or step on the cables. -
Remove the failed appliance from the cabinet or rack.
-
Note the position of the replaceable components (two power supplies, eight cooling fans, three NICs, and twelve SSDs) in the failed appliance.
The twelve drives are in the following positions in the chassis (front of chassis with bezel removed shown):
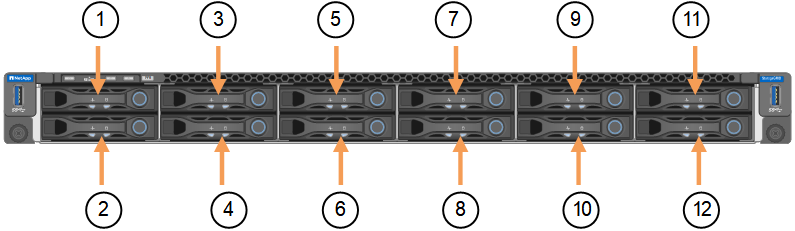
Drive 1
HDD00
2
HDD01
3
HDD02
4
HDD03
5
HDD04
6
HDD05
7
HDD06
8
HDD07
9
HDD08
10
HDD09
11
HDD10
12
HDD11
-
Transfer the replaceable components to the replacement appliance.
Follow the maintenance instructions provided for reinstalling the replaceable components.
If you wish to retain the data on the drives, be sure to insert the SSD drives into the same drive slots they occupied in the failed appliance. If you don't, the Appliance Installer will display a warning message and you will have to put the drives into the correct slots and reboot the appliance before the appliance can rejoin the grid. -
Install the replacement appliance into the cabinet or rack.
-
Replace the cables and any optical transceivers.
-
Power on the appliance and wait for it to rejoin the grid. If the appliance does not rejoin the grid, follow the guidance on the StorageGRID Appliance Installer home page to address any issues.

To prevent data loss if the Appliance Installer indicates that physical hardware changes are required, such as moving disk drives to different slots, power down the appliance before making hardware changes.
-
-
If the appliance where you replaced the appliance used a key management server (KMS) to encrypt data, additional configuration might be required before the node can join the grid. If the node does not automatically join the grid, make sure that these configuration settings have transferred to the new appliance and manually configure any settings that don't have the expected configuration:
-
Log in to the replaced appliance:
-
Enter the following command:
ssh admin@grid_node_IP -
Enter the password listed in the
Passwords.txtfile. -
Enter the following command to switch to root:
su - -
Enter the password listed in the
Passwords.txtfile.
-
-
Restore BMC network connectivity for the replaced appliance. There are two options:
-
Use static IP, netmask, and gateway
-
Use DHCP to obtain an IP, netmask, and gateway
-
To restore the BMC configuration to use a static IP, netmask, and gateway, enter the following commands:
run-host-command ipmitool lan set 1 ipsrc staticrun-host-command ipmitool lan set 1 ipaddr Appliance_IPrun-host-command ipmitool lan set 1 netmask Netmask_IPrun-host-command ipmitool lan set 1 defgw ipaddr Default_gateway -
To restore the BMC configuration to use DHCP to obtain an IP, netmask, and gateway, enter the following command:
run-host-command ipmitool lan set 1 ipsrc dhcp
-
-
-
After restoring BMC network connectivity, connect to the BMC interface to audit and restore any additional custom BMC configuration you might have applied. For example, you should confirm the settings for SNMP trap destinations and email notifications. See Configure BMC interface.
-
Confirm that the appliance node appears in the Grid Manager and that no alerts appear.
After replacing the part, return the failed part to NetApp, as described in the RMA instructions shipped with the kit. See the Part Return & Replacements page for further information.