

Configure AutoSupport
 Suggest changes
You can enable the AutoSupport feature and the individual AutoSupport options when you first install StorageGRID, or you can enable them later.
-
You are signed in to the Grid Manager using a supported web browser.
-
You have the Root access or Other grid configuration permission.
-
If you will use the HTTPS or HTTP protocol for sending AutoSupport messages, you have provided outbound internet access to the primary Admin Node, either directly or using a proxy server (inbound connections not required).
-
If you will use the HTTPS or HTTP protocol and you want to use a proxy server, you have configured an Admin proxy server.
-
If you will use SMTP as the protocol for AutoSupport messages, you have configured an SMTP mail server. The same mail server configuration is used for alarm email notifications (legacy system).
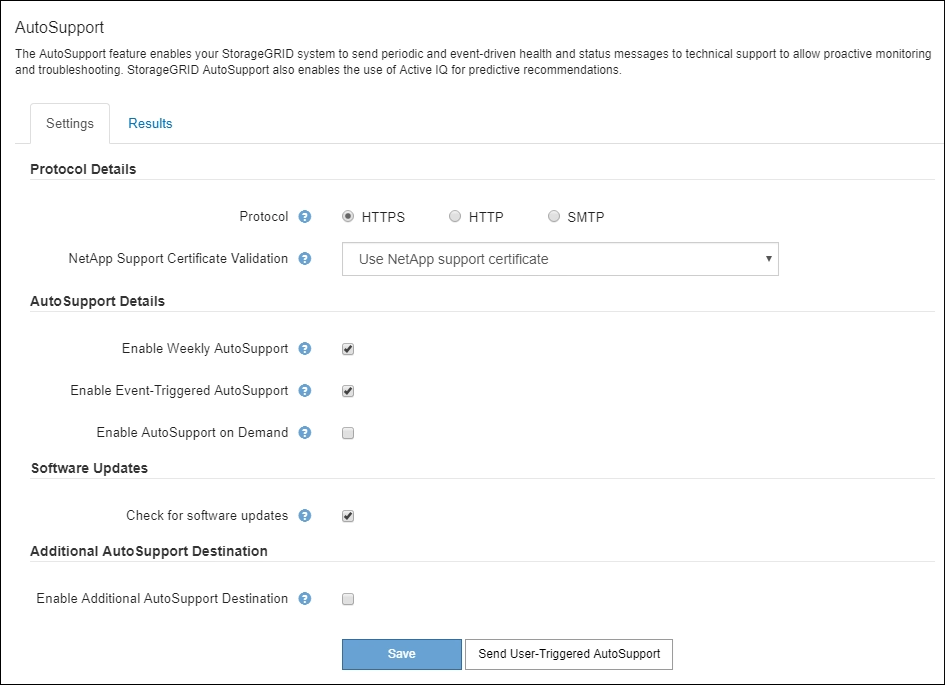
Specify the protocol for AutoSupport messages
You can use any of the following protocols for sending AutoSupport messages:
-
HTTPS: This is the default and recommended setting for new installations. The HTTPS protocol uses port 443. If you want to enable the AutoSupport on Demand feature, you must use the HTTPS protocol.
-
HTTP: This protocol is not secure, unless it is used in a trusted environment where the proxy server converts to HTTPS when sending data over the internet. The HTTP protocol uses port 80.
-
SMTP: Use this option if you want AutoSupport messages to be emailed. If you use SMTP as the protocol for AutoSupport messages, you must configure an SMTP mail server on the Legacy Email Setup page (SUPPORT > Alarms (legacy) > Legacy email setup).

SMTP was the only protocol available for AutoSupport messages before the StorageGRID 11.2 release. If you installed an earlier version of StorageGRID initially, SMTP might be the selected protocol.
The protocol you set is used for sending all types of AutoSupport messages.
-
Select SUPPORT > Tools > AutoSupport.
The AutoSupport page appears, and the Settings tab is selected.
-
Select the protocol you want to use to send AutoSupport messages.
-
If you selected HTTPS, select whether to use a TLS certificate to secure the connection to the NetApp Support server.
-
Use NetApp support certificate (default): Certificate validation ensures that the transmission of AutoSupport messages is secure. The NetApp support certificate is already installed with the StorageGRID software.
-
Do not verify certificate: Select this option only when you have a good reason not to use certificate validation, such as when there is a temporary problem with a certificate.
-
-
Select Save.
All weekly, user-triggered, and event-triggered messages are sent using the selected protocol.
Disable weekly AutoSupport messages
By default, the StorageGRID system is configured to send an AutoSupport message to NetApp Support once a week.
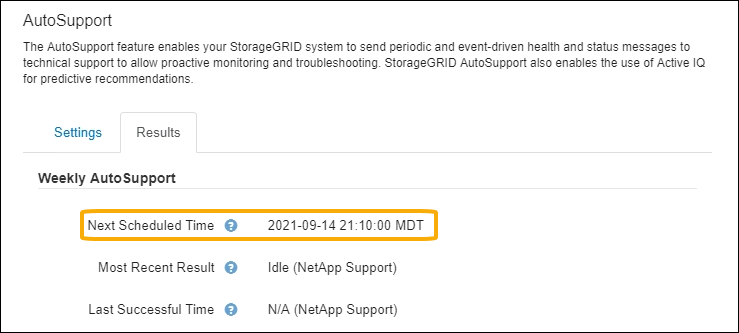
To determine when the weekly AutoSupport message will be sent, go to the AutoSupport > Results tab. In Weekly AutoSupport section, look at the value for Next Scheduled Time.
You can disable the automatic sending of weekly AutoSupport messages at any time.
-
Select SUPPORT > Tools > AutoSupport.
-
Unselect the Enable Weekly AutoSupport check box.
-
Select Save.
Disable event-triggered AutoSupport messages
By default, the StorageGRID system is configured to send an AutoSupport message to NetApp Support when an important alert or other significant system event occurs.
You can disable event-triggered AutoSupport messages at any time.
|
|
Event-triggered AutoSupport messages are also suppressed when you suppress email notifications system wide. (Select CONFIGURATION > System > Display options. Then, select Notification Suppress All.) |
-
Select SUPPORT > Tools > AutoSupport.
-
Unselect the Enable Event-Triggered AutoSupport check box.
-
Select Save.
Enable AutoSupport on Demand
AutoSupport on Demand can assist in solving issues that technical support is actively working on.
By default, AutoSupport on Demand is disabled. Enabling this feature allows technical support to request that your StorageGRID system send AutoSupport messages automatically. Technical support can also set the polling time interval for AutoSupport on Demand queries.
Technical support cannot enable or disable AutoSupport on Demand.
-
Select SUPPORT > Tools > AutoSupport.
-
Select the HTTPS for the protocol.
-
Select the Enable Weekly AutoSupport check box.
-
Select the Enable AutoSupport on Demand check box.
-
Select Save.
AutoSupport on Demand is enabled, and technical support can send AutoSupport on Demand requests to StorageGRID.
Disable checks for software updates
By default, StorageGRID contacts NetApp to determine if software updates are available for your system. If a StorageGRID hotfix or new version is available, the new version is shown on the StorageGRID Upgrade page.
As required, you can optionally disable the check for software updates. For example, if your system does not have WAN access, you should disable the check to avoid download errors.
-
Select SUPPORT > Tools > AutoSupport.
-
Unselect the Check for software updates check box.
-
Select Save.
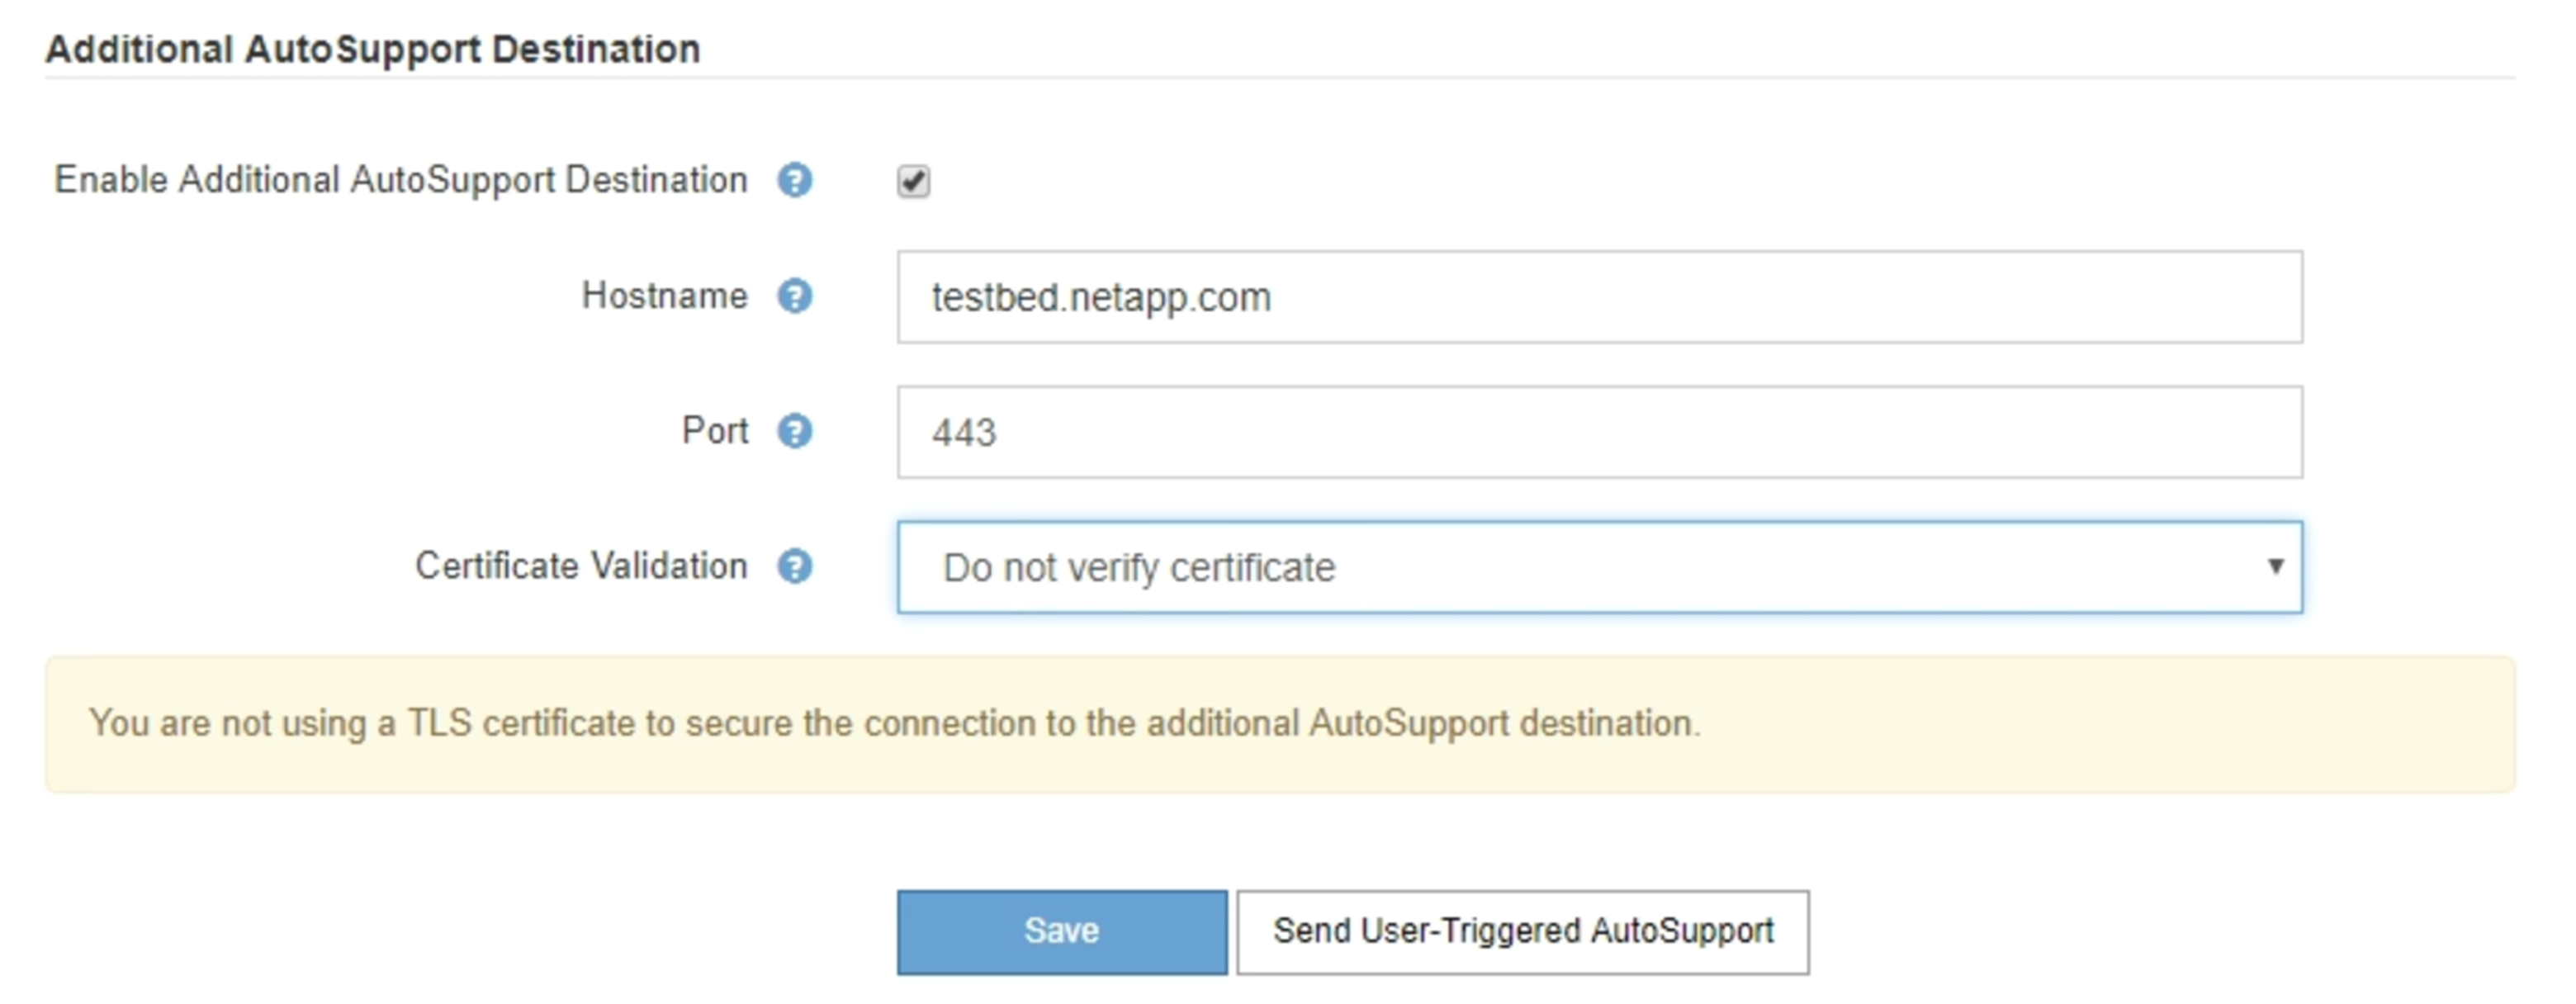
Add an additional AutoSupport destination
When you enable AutoSupport, heath and status messages are sent to NetApp support. You can specify one additional destinations for all AutoSupport messages.
To verify or change the protocol used to send AutoSupport messages, see the instructions to Specify the protocol for AutoSupport messages.
|
|
You cannot use the SMTP protocol to send AutoSupport messages to an additional destination. |
-
Select SUPPORT > Tools > AutoSupport.
-
Select Enable additional AutoSupport destination.
The Additional AutoSupport Destination fields appear.
-
Enter the server hostname or IP address of an additional AutoSupport destination server.
You can enter only one additional destination. -
Enter the port used to connect to an additional AutoSupport destination server (default is port 80 for HTTP or port 443 for HTTPS).
-
To send your AutoSupport messages with certificate validation, select Use custom CA bundle in the Certificate Validation drop-down. Then, do one of the following:
-
Use an editing tool to copy and paste all the contents of each of the PEM-encoded CA certificate files into the CA bundle field, concatenated in certificate chain order. You must include
----BEGIN CERTIFICATE----and----END CERTIFICATE----in your selection.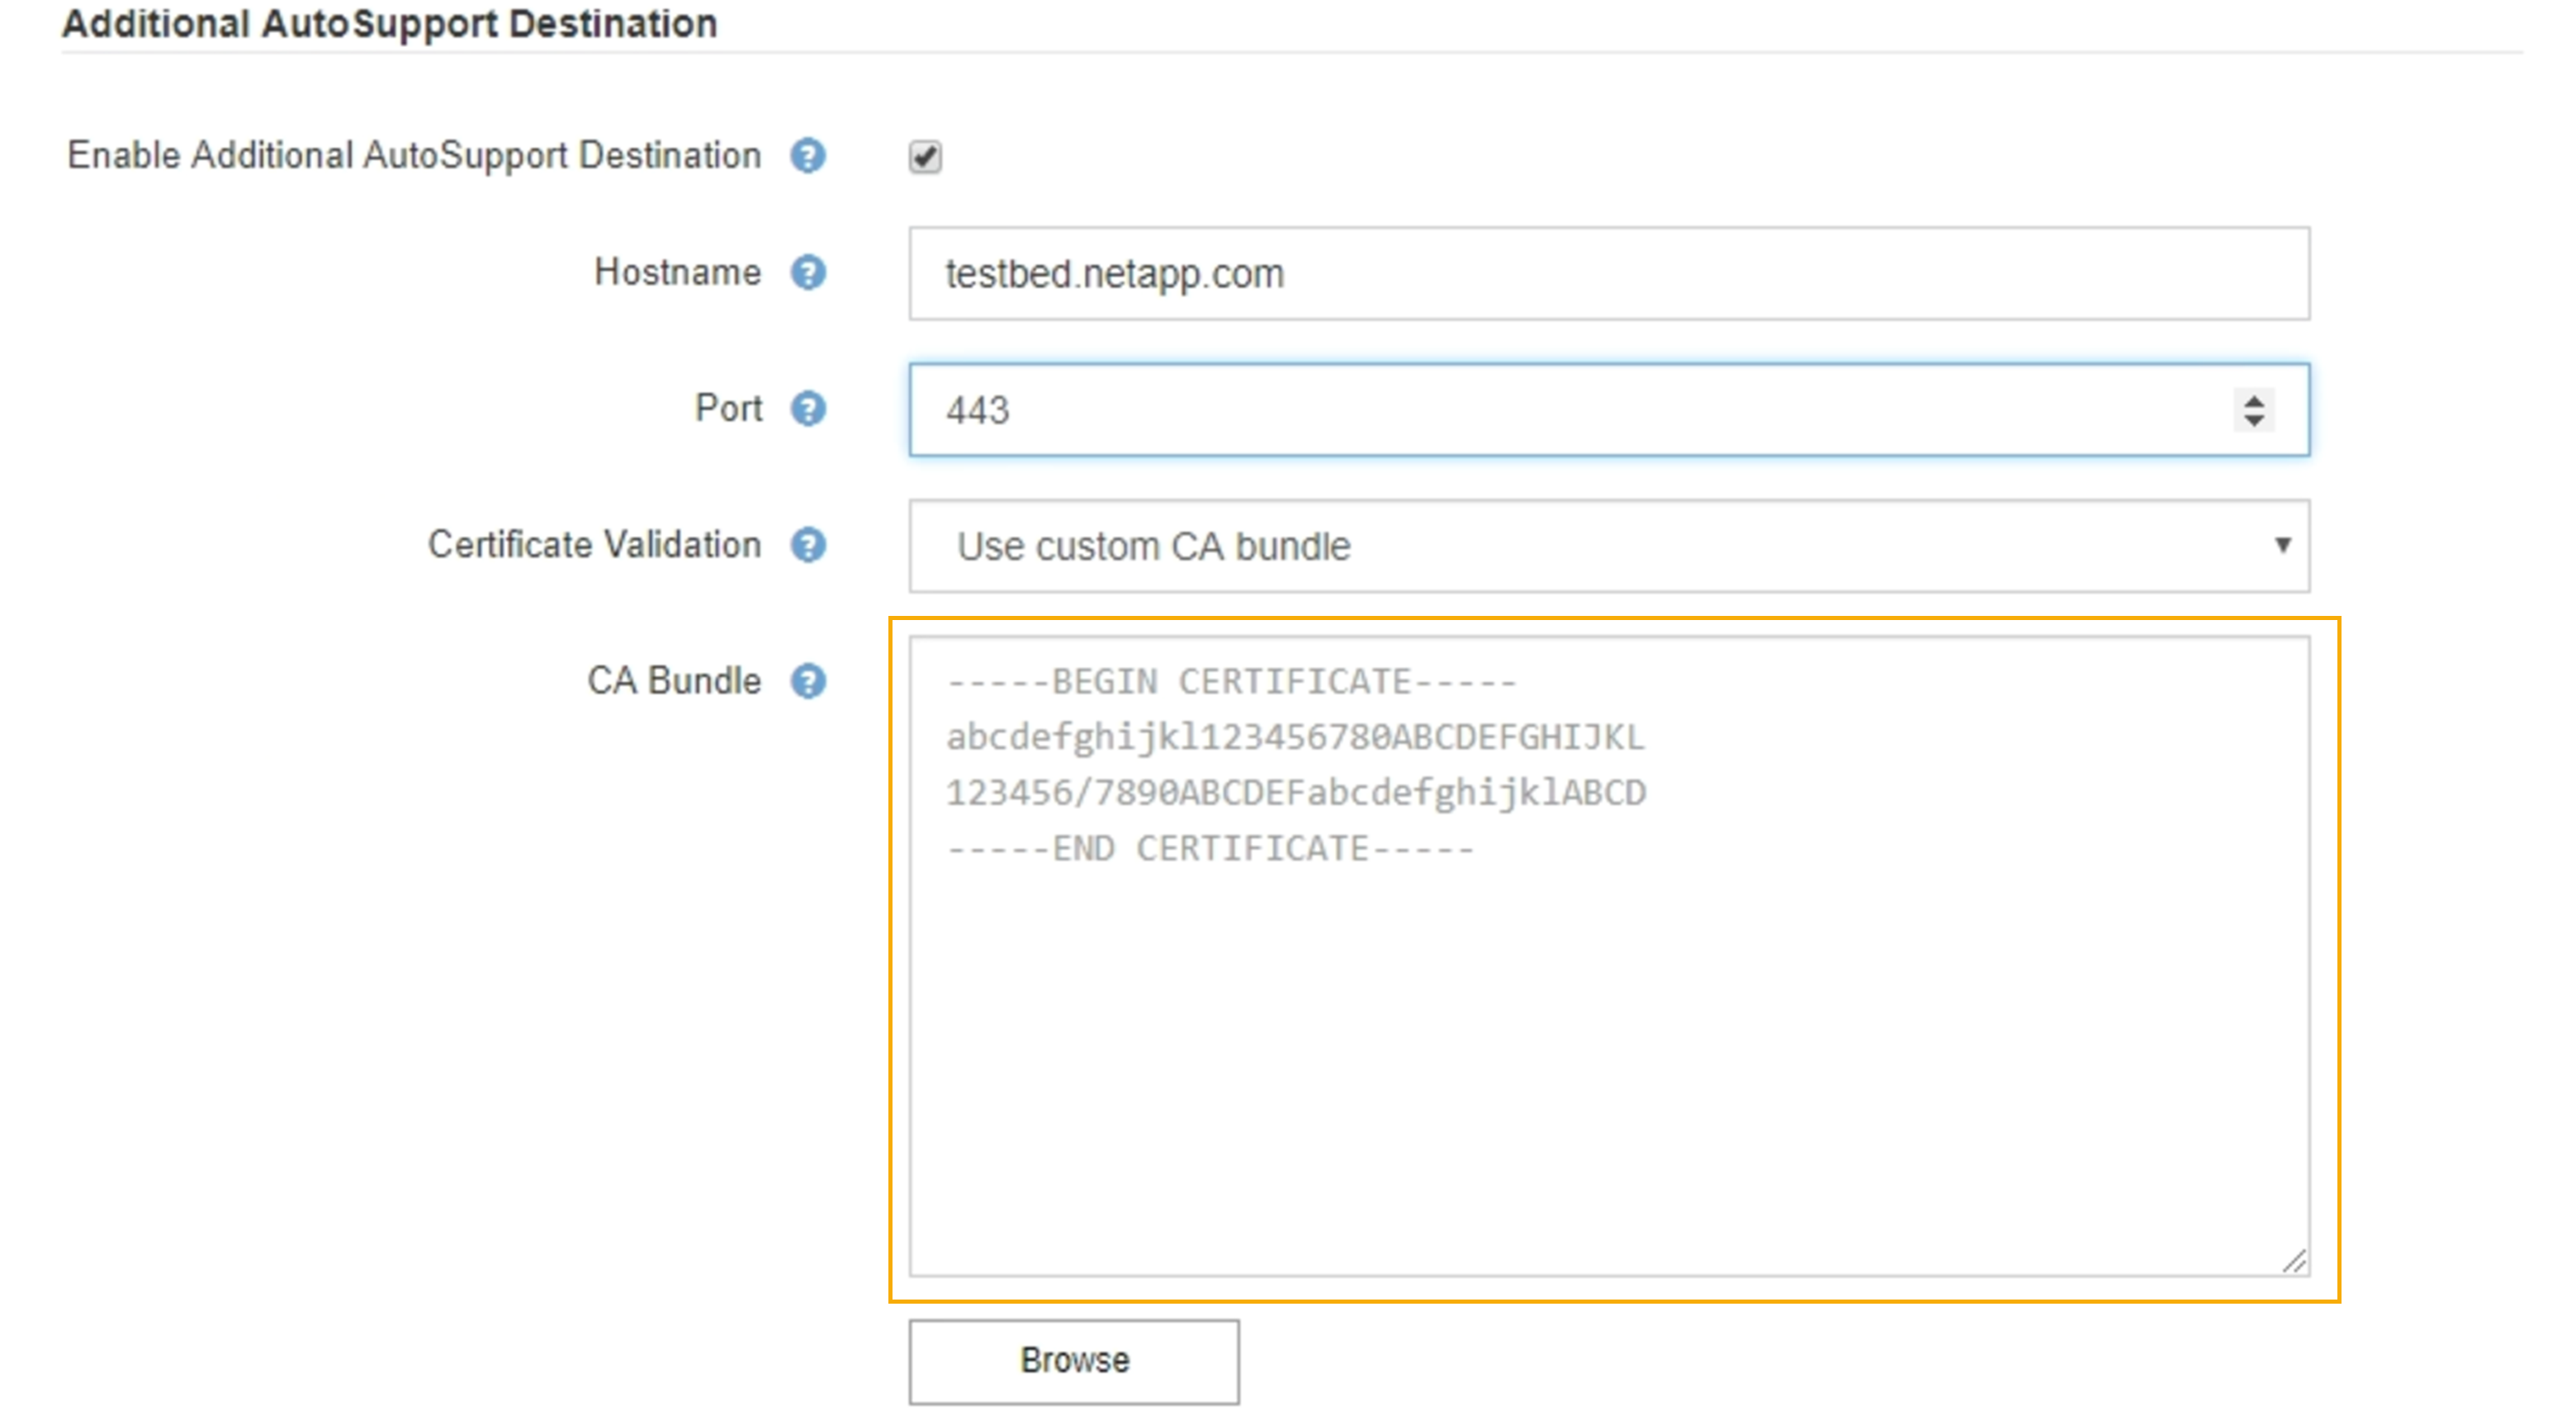
-
Select Browse, navigate to the file containing the certificates, and then select Open to upload the file. Certificate validation ensures that the transmission of AutoSupport messages is secure.
-
-
To send your AutoSupport messages without certificate validation, select Do not verify certificate in the Certificate Validation drop-down.
Select this choice only when you have a good reason not to use certificate validation, such as when there is a temporary problem with a certificate.
A caution a message appears: "You are not using a TLS certificate to secure the connection to the additional AutoSupport destination."
-
Select Save.
All future weekly, event-triggered, and user-triggered AutoSupport messages will be sent to the additional destination.