

Mirror WORM files with ONTAP SnapMirror for disaster recovery
 Suggest changes
You can use SnapMirror to replicate WORM files to another geographic location for disaster recovery and other purposes. Both the source volume and destination volume must be configured for SnapLock, and both volumes must have the same SnapLock mode, Compliance or Enterprise. All key SnapLock properties of the volume and files are replicated.
The source and destination volumes must be created in peered clusters with peered SVMs. For more information, see Cluster and SVM peering.
-
Beginning with ONTAP 9.5, you can replicate WORM files with the XDP (extended data protection) type SnapMirror relationship rather than the DP (data protection) type relationship. XDP mode is ONTAP version-independent, and is able to differentiate files stored in the same block, making it much easier to resync replicated Compliance-mode volumes. For information on how to convert an existing DP-type relationship to an XDP-type relationship, see Data Protection.
-
A resync operation on a DP type SnapMirror relationship fails for a Compliance-mode volume if SnapLock determines that it will result in a loss of data. If a resync operation fails, you can use the
volume clone createcommand to make a clone of the destination volume. You can then resync the source volume with the clone. -
A SnapMirror relationship of a SnapLock volume only supports the
MirrorAllSnapshotspolicy of type async-mirror. The retention period of a SnapLock volume is determined by the maximum retention period among all the WORM files that it holds. Because the destination is a DR copy of the source, the retention period of the destination SnapLock volume will be same as the source. -
A SnapMirror relationship of type XDP between SnapLock compliant volumes supports a resync after a break even if data on the destination has diverged from the source post the break.
On a resync, when data divergence is detected between the source the destination beyond the common snapshot, a new snapshot is cut on the destination to capture this divergence. The new snapshot and the common snapshot are both locked with a retention time as follows:
-
The volume expiry time of the destination
-
If the volume expiry time is in the past or has not been set, then the snapshot is locked for a period of 30 days
-
If the destination has legal-holds, the actual volume expiry period is masked and shows up as ‘indefinite'; however, the snapshot is locked for the duration of the actual volume expiry period.
-
If the destination volume has an expiry period that is later than the source, the destination expiry period is retained and will not be overwritten by the expiry period of the source volume post the resync.
If the destination has legal-holds placed on it that differ from the source, a resync is not allowed. The source and destination must have identical legal-holds or all legal-holds on the destination must be released before a resync is attempted.
A locked snapshot on the destination volume created to capture the divergent data can be copied to the source using the CLI by running the snapmirror update -s snapshot command. The snapshot once copied will continue to be locked at the source as well.
-
SVM data protection relationships are not supported.
-
Load-sharing data protection relationships are not supported.
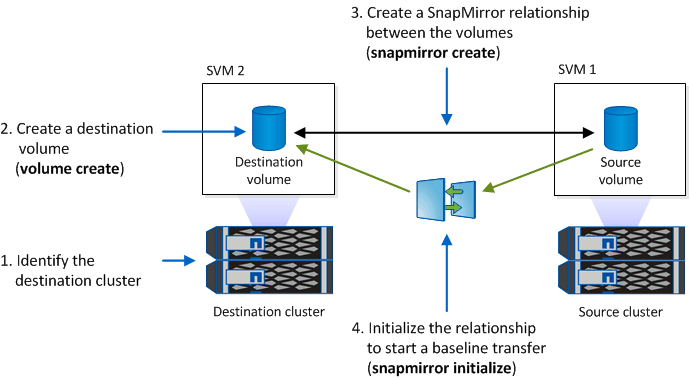
The following illustration shows the procedure for initializing a SnapMirror relationship:
Beginning with ONTAP 9.12.1, you can use System Manager to set up SnapMirror replication of WORM files.
-
Navigate to Storage > Volumes.
-
Click Show/Hide and select SnapLock Type to display the column in the Volumes window.
-
Locate a SnapLock volume.
-
Click
 and select Protect.
 -
Choose the destination cluster and the destination storage VM.
-
Click More Options.
-
Select Show legacy policies and select DPDefault (legacy).
-
In the Destination Configuration details section, select Override transfer schedule and select hourly.
-
Click Save.
-
To the left of the source volume name, click the arrow to expand the volume details, and on the right side of the page,review the remote SnapMirror protection details.
-
On the remote cluster, navigate to Protection Relationships.
-
Locate the relationship and click the destination volume name to view the relationship details.
-
Verify that the destination volume SnapLock type and other SnapLock information.
-
Identify the destination cluster.
-
On the destination cluster, install the SnapLock license, initialize the Compliance Clock, and, if you are using an ONTAP release earlier than 9.10.1, create a SnapLock aggregate.
-
On the destination cluster, create a SnapLock destination volume of type
DPthat is either the same size as or greater in size than the source volume:volume create -vserver SVM_name -volume volume_name -aggregate aggregate_name -snaplock-type compliance|enterprise -type DP -size size
Beginning with ONTAP 9.10.1, SnapLock and non-SnapLock volumes can exist on the same aggregate; therefore, you are no longer required to create a separate SnapLock aggregate if you are using ONTAP 9.10.1. You use the volume -snaplock-type option to specify a Compliance or Enterprise SnapLock volume type. In ONTAP releases earlier than ONTAP 9.10.1, the SnapLock mode—Compliance or Enterprise—is inherited from the aggregate. The language setting of the destination volume must match the language setting of the source volume. The following command creates a 2 GB SnapLock
Compliancevolume nameddstvolBinSVM2on the aggregatenode01_aggr:cluster2::> volume create -vserver SVM2 -volume dstvolB -aggregate node01_aggr -snaplock-type compliance -type DP -size 2GB
-
On the destination SVM, create a SnapMirror policy:
snapmirror policy create -vserver SVM_name -policy policy_nameThe following command creates the SVM-wide policy
SVM1-mirror:SVM2::> snapmirror policy create -vserver SVM2 -policy SVM1-mirror
-
On the destination SVM, create a SnapMirror schedule:
job schedule cron create -name schedule_name -dayofweek day_of_week -hour hour -minute minuteThe following command creates a SnapMirror schedule named
weekendcron:SVM2::> job schedule cron create -name weekendcron -dayofweek "Saturday, Sunday" -hour 3 -minute 0
-
On the destination SVM, create a SnapMirror relationship:
snapmirror create -source-path source_path -destination-path destination_path -type XDP|DP -policy policy_name -schedule schedule_nameThe following command creates a SnapMirror relationship between the source volume
srcvolAonSVM1and the destination volumedstvolBonSVM2, and assigns the policySVM1-mirrorand the scheduleweekendcron:SVM2::> snapmirror create -source-path SVM1:srcvolA -destination-path SVM2:dstvolB -type XDP -policy SVM1-mirror -schedule weekendcron
The XDP type is available in ONTAP 9.5 and later. You must use the DP type in ONTAP 9.4 and earlier. -
On the destination SVM, initialize the SnapMirror relationship:
snapmirror initialize -destination-path destination_pathThe initialization process performs a baseline transfer to the destination volume. SnapMirror makes a snapshot of the source volume, then transfers the copy and all the data blocks that it references to the destination volume. It also transfers any other snapshots on the source volume to the destination volume.
The following command initializes the relationship between the source volume
srcvolAonSVM1and the destination volumedstvolBonSVM2:SVM2::> snapmirror initialize -destination-path SVM2:dstvolB