

Create ONTAP Vscan scanner pools in MetroCluster configurations
 Suggest changes
You must create primary and secondary scanner pools on each cluster in a MetroCluster configuration, corresponding to the primary and secondary SVMs on the cluster.
-
SVMs and Vscan servers must be in the same domain or in trusted domains.
-
For scanner pools defined for an individual SVM, you must have configured ONTAP Antivirus Connector with the SVM management LIF or SVM data LIF.
-
For scanner pools defined for all the SVMs in a cluster, you must have configured ONTAP Antivirus Connector with the cluster management LIF.
-
The list of privileged users must include the domain user account the Vscan server uses to connect to the SVM.
-
Once the scanner pool is configured, check the connection status to the servers.
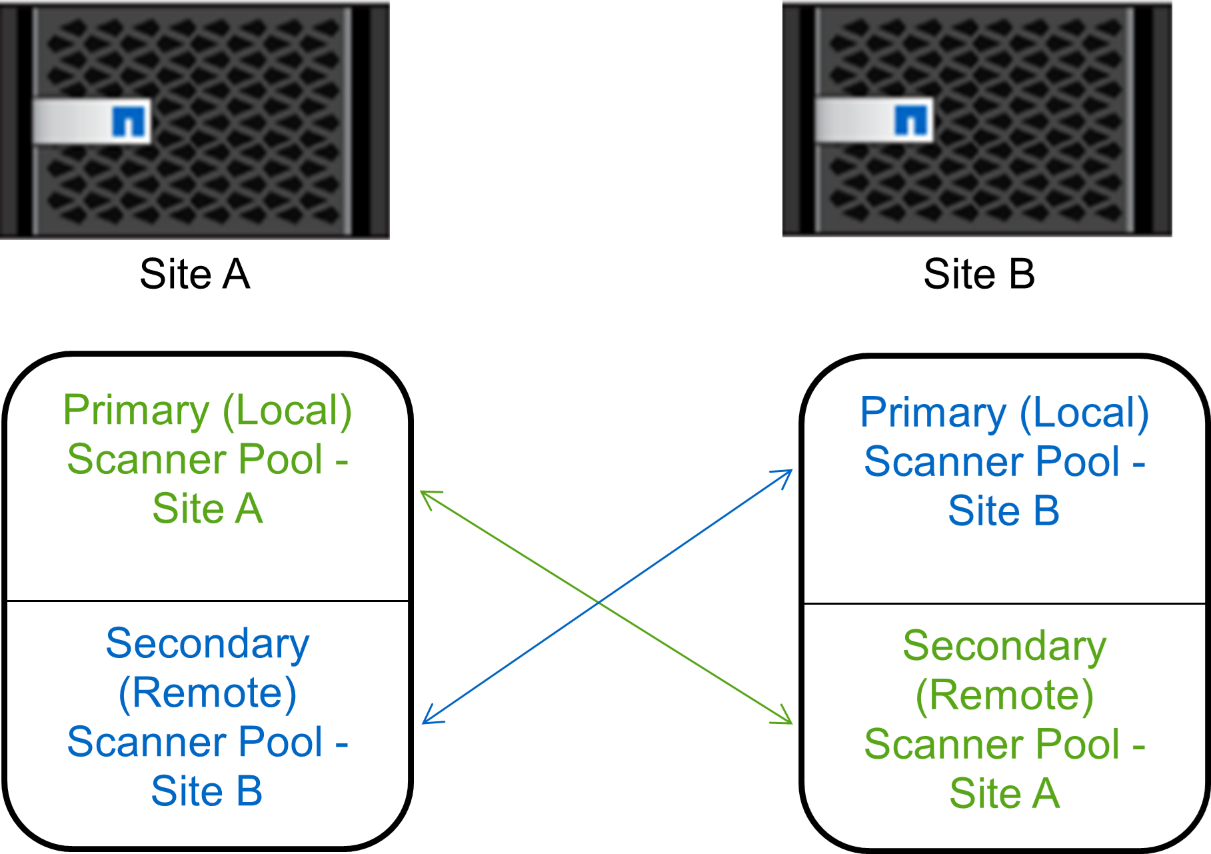
MetroCluster configurations protect data by implementing two physically separate mirrored clusters. Each cluster synchronously replicates the data and SVM configuration of the other. A primary SVM on the local cluster serves data when the cluster is online. A secondary SVM on the local cluster serves data when the remote cluster is offline.
This means that you must create primary and secondary scanner pools on each cluster in a MetroCluster configuration, The secondary pool becomes active when the cluster begins serving data from the secondary SVM. For Disaster Recovery (DR) the configuration is similar to MetroCluster.
This figure shows a typical MetroCluster/DR configuration.
-
Create a scanner pool:
vserver vscan scanner-pool create -vserver <data_SVM|cluster_admin_SVM> -scanner-pool <scanner_pool> -hostnames <Vscan_server_hostnames> -privileged-users <privileged_users>-
Specify a data SVM for a pool defined for an individual SVM, and specify a cluster admin SVM for a pool defined for all the SVMs in a cluster.
-
Specify an IP address or FQDN for each Vscan server host name.
-
Specify the domain and user name for each privileged user.

You must create all scanner pools from the cluster containing the primary SVM.
Learn more about
vserver vscan scanner-pool createin the ONTAP command reference.The following commands create primary and secondary scanner pools on each cluster in a MetroCluster configuration:
site_A::> vserver vscan scanner-pool create -vserver cifssvm1 -
scanner-pool pool1_for_siteA -hostnames scan1 -privileged-users cifs
\u1,cifs\u2

site_B::> vserver vscan scanner-pool create -vserver cifssvm1 -
scanner-pool pool1_for_siteB -hostnames scan1 -privileged-users cifs
\u1,cifs\u2

site_A::> vserver vscan scanner-pool create -vserver cifssvm1 -
scanner-pool pool2_for_siteA -hostnames scan2 -privileged-users cifs
\u1,cifs\u2

site_B::> vserver vscan scanner-pool create -vserver cifssvm1 -
scanner-pool pool2_for_siteB -hostnames scan2 -privileged-users cifs
\u1,cifs\u2
-
-
Verify that the scanner pools were created:
vserver vscan scanner-pool show -vserver <data_SVM|cluster_admin_SVM> -scanner-pool <scanner_pool>The following command displays the details for the scanner pool
pool1_for_siteA:site_A::> vserver vscan scanner-pool show -vserver cifssvm1 -scanner-pool pool1_for_siteA Vserver: cifssvm1 Scanner Pool: pool1_for_siteA Applied Policy: idle Current Status: off Cluster on Which Policy Is Applied: - Scanner Pool Config Owner: vserver List of IPs of Allowed Vscan Servers: List of Host Names of Allowed Vscan Servers: scan1 List of Privileged Users: cifs\u1,cifs\u2You can also use the
vserver vscan scanner-pool showcommand to view all of the scanner pools on an SVM. Learn more aboutvserver vscan scanner-pool showin the ONTAP command reference.