

在没有打开插槽的系统中添加X91148A存储模块- FAS9000
 建议更改
建议更改
您必须删除系统中的一个或多个现有 NIC 或存储模块,才能将一个或多个 X91148A 存储模块安装到已完全填充的系统中。
-
您的系统必须运行 ONTAP 9.8 及更高版本。
-
要无中断地添加 X91148A 模块,您必须接管目标控制器,添加该模块,然后交还目标控制器。
-
如果要将 X91148A 模块添加为存储适配器,则必须将此模块安装在插槽 3 和 / 或 7 中。
-
If you are adding the X91148A module as a 100GbE NIC, you can use any open slot.However, by default, slots 3 and 7 are set as storage slots.如果要将这些插槽用作网络插槽、并且不会添加NS224磁盘架、则必须修改这些插槽、以便与联网
storage port modify -node node name -port port name -mode network命令。请参见 "NetApp Hardware Universe" 用于X91148A模块可用于网络连接的其他插槽。 -
系统中的所有其他组件必须正常运行;否则,您必须联系技术支持。
要在已完全填充的系统中安装一个或多个 X91148A NIC 模块,您必须删除系统中的一个或多个现有 NIC 或存储模块。
-
If you are adding an X91148A module into a slot that contains a NIC module with the same number of ports as the X91148A module, the LIFs will automatically migrate when its controller module is shut down.If the NIC module being replaced has more ports than the X91148A module, you must permanently reassign the affected LIFs to a different home port.请参见 "迁移 LIF" for information about using System Manager to permanently move the LIFs
-
关闭控制器 A :
-
禁用自动交还:
storage failover modify -node local -auto-giveback false -
接管目标节点:
storage failover takeover -ofnode target_node_name控制台连接显示,接管完成后,节点将进入 LOADER 提示符。
-
-
如果您尚未接地,请正确接地。
-
拔下目标 I/O 模块上的所有布线。
-
从机箱中卸下目标 I/O 模块:
-
按下带字母和编号的凸轮按钮。
凸轮按钮离开机箱。
-
向下旋转凸轮闩锁,直到其处于水平位置。
I/O 模块从机箱中分离,并从 I/O 插槽中移出大约 1/2 英寸。
-
拉动 I/O 模块侧面的拉片,将 I/O 模块从机箱中卸下。
确保跟踪 I/O 模块所在的插槽。
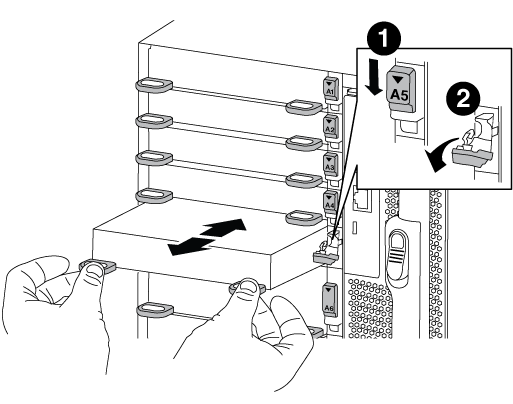

I/O 凸轮闩锁有字母和编号

I/O 凸轮闩锁完全解锁
-
-
将 X91148A 模块安装到目标插槽中:
-
将 X91148A 模块与插槽边缘对齐。
-
将 X91148A 模块滑入插槽,直到带字母和编号的 I/O 凸轮闩锁开始与 I/O 凸轮销啮合。
-
将 I/O 凸轮闩锁完全向上推,以将模块锁定到位。
-
-
重复执行拆卸和安装步骤以更换控制器 A 的其他模块
-
使用缆线将模块连接到数据交换机。
-
从加载程序提示符处重新启动控制器A:
bye
此操作将重新初始化PCIe卡和其他组件、并重新启动节点。 -
从配对节点交还节点:
storage failover giveback -ofnode target_node_name -
如果已禁用,请启用自动交还:
storage failover modify -node local -auto-giveback true -
如果您在插槽 3 或 7 中将 X91148A 模块添加为 NIC 模块,则对于网络连接,请对每个端口使用
storage port modify -node node name -port port name -mode network命令。 -
对控制器 B 重复上述步骤
要在已完全填充的系统中安装一个或多个 X91148A 存储模块,您必须删除系统中的一个或多个现有 NIC 或存储模块。
-
此操作步骤假定您将 X91148A 模块安装到插槽 3 和 / 或 7 中。
-
If you are adding an X91148A module as a storage module in slots 3 and/or 7 into a slot that has an existing NIC module in it, use System Manager to permanently migrate the LIFs to different home ports, as described in "迁移 LIF"。
-
关闭控制器 A :
-
禁用自动交还:
storage failover modify -node local -auto-giveback false -
接管目标节点:
storage failover takeover -ofnode target_node_name控制台连接显示,接管完成后,节点将进入 LOADER 提示符。
-
-
如果您尚未接地,请正确接地。
-
拔下目标 I/O 模块上的所有布线。
-
从机箱中卸下目标 I/O 模块:
-
按下带字母和编号的凸轮按钮。
凸轮按钮离开机箱。
-
向下旋转凸轮闩锁,直到其处于水平位置。
I/O 模块从机箱中分离,并从 I/O 插槽中移出大约 1/2 英寸。
-
拉动 I/O 模块侧面的拉片,将 I/O 模块从机箱中卸下。
确保跟踪 I/O 模块所在的插槽。
I/O 凸轮闩锁有字母和编号
I/O 凸轮闩锁完全解锁
-
-
将 X91148A 模块安装到插槽 3 :
-
将 X91148A 模块与插槽边缘对齐。
-
将 X91148A 模块滑入插槽,直到带字母和编号的 I/O 凸轮闩锁开始与 I/O 凸轮销啮合。
-
将 I/O 凸轮闩锁完全向上推,以将模块锁定到位。
-
如果要安装另一个 X91148A 模块进行存储,请对插槽 7 中的模块重复执行拆卸和安装步骤。
-
-
从加载程序提示符处重新启动控制器A:
bye
此操作将重新初始化PCIe卡和其他组件、并重新启动节点。 -
从配对节点交还节点:
storage failover giveback -ofnode target_node_name -
如果已禁用,请启用自动交还:
storage failover modify -node local -auto-giveback true -
对控制器 B 重复上述步骤
-
按照中所述安装NS224磁盘架并为其布线 "热添加工作流"。